Control Customization Details
You can customize camera features on the [![]() ] tab to suit your shooting preferences.
] tab to suit your shooting preferences.
[Customized controls when shooting]
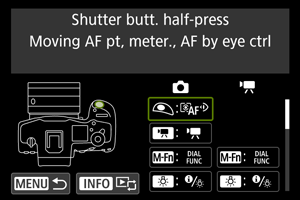
[Customize buttons for shooting]
You can assign common shooting functions to camera buttons that are easy for you to use. Different functions, for use when shooting still photos or movies, can be assigned to the same button.
-
Select a camera control.
-
Select a function to assign.

- Press
 to set it.
 - You can configure advanced settings for functions labeled with [
 ] in the lower left of the screen by pressing the
  button.
- Press
Note
- [
 ]: “AF Stop” or “Lens Function” button on super telephoto lenses with Image Stabilizer.
 - [
 ]: “Menu direct” button on Speedlites.
 - Only still photo shooting settings can be assigned to [
 ], [
], [ ], or [].
 - To clear settings configured with [
 : Customize buttons for shooting], select [: Clear all customized controls].
Functions available for customization
AF
| ●: Default ○: Available for customization | ||||||||||||
| ○*1 | - | - | - | - | ● | ○ | ○ | ○ | ○ | - | - | - |
| - | ○*1 | ○ | ○ | ○ | ○ | ○ | ○ | ○ | ● | - | - | - |
| - | ○*1 | ○ | ○ | ○ | ○ | ○ | ● | ○ | ○ | ○ | - | - |
| - | - | - | - | - | - | - | - | - | - | - | ● | - |
| - | ○*1 | ○ | ○ | ○ | ○ | ○ | ○ | ○ | ○ | ○ | - | - |
| - | ○*1 | ○ | ○ | ○ | ○ | ○ | ○ | ○ | ○ | ● | - | - |
| - | - | - | - | - | ○ | ○ | ○ | ○ | ○ | - | - | - |
| - | - | - | - | - | ○ | ○ | ○ | ○ | ○ | - | - | - |
| - | ○ | ○ | ○ | ○ | ○ | ○ | ○ | ○ | ○ | ○ | - | - |
| - | ○ | ○ | ○ | ○ | ○ | ○ | ○ | ○ | ○ | ○ | - | - |
| - | ○ | ○ | ○ | ○ | ○ | ○ | ○ | ○ | ○ | ○ | - | - |
| ●*3 | - | - | - | - | - | - | - | - | - | - | - | - |
| - | - | - | - | - | ○ | ○ | ○ | ○ | ○ | - | - | - |
| - | - | - | - | - | ○ | ○ | ○ | ○ | ○ | - | - | - |
| - | ○ | ○ | ○ | ○ | ○ | ○ | ○ | ○ | ○ | ○ | - | - |
| - | - | - | - | - | ○ | ○ | ○ | ○ | ○ | - | - | - |
| - | - | - | - | - | ○ | ○ | ○ | ○ | ○ | - | - | - |
| - | ○*1 | ○ | ○ | ○ | ○ | ○ | ○ | ○ | ○ | ○ | - | - |
| - | ○*1 | ○ | ○ | ○ | ○ | ○ | ○ | ○ | ○ | ○ | - | - |
| - | ○*1 | ○ | ○ | ○ | ○ | ○ | ○ | ○ | ○ | ○ | - | - |
| - | ○ | ○ | ○ | ○ | ○ | ○ | ○ | ○ | ○ | ○ | - | - |
| - | ○*1 | ○ | ○ | ○ | ○ | ○ | ○ | ○ | ○ | ○ | - | - |
| - | ○*1 | ○ | ○ | ○ | ○ | ○ | ○ | ○ | ○ | ○ | - | - |
| - | ○*1 | ○ | ○ | ○ | ○ | ○ | ○ | ○ | ○ | ○ | - | - |
| - | ○*1 | ○ | ○ | ○ | ○ | ○ | ○ | ○ | ○ | ○ | - | - |
| - | ○*1 | ○ | ○ | ○ | ○ | ○ | ○ | ○ | ○ | ○ | - | - |
| - | - | ○ | ○ | ○ | ○ | ○ | ○ | ○ | ○ | ○ | - | - |
| - | ○ | ○ | ○ | ○ | ○ | ○ | ○ | ○ | ○ | ○ | - | - |
| - | - | - | - | - | ○ | ○ | ○ | ○ | ○ | - | - | - |
1: Cannot be assigned as a function available in movie recording.
2: Cannot be assigned as a function available in still photo shooting.
3: Default in still photo shooting.
Exposure Compensation
| ●: Default ○: Available for customization | ||||||||||||
| - | ○*1 | ○ | ○ | ○ | ○ | ○ | ○ | ○ | ○ | - | - | - |
| ○*1 | - | - | - | - | - | - | - | - | - | - | - | - |
| - | ○*1 | ○ | ○ | ○ | ○ | ○ | ○ | ○ | ○ | - | - | - |
| - | ○*1 | ○ | ○ | ○ | ○ | ●*4 | ○ | ○ | ○ | - | - | - |
| ○ | - | - | - | - | - | - | - | - | - | - | - | - |
| - | ○ | ○ | ○ | ○ | ○ | ●*3 | ○ | ○ | ○ | - | - | - |
| - | ○*1 | ○ | ○ | ○ | ○ | ○ | ○ | ○ | ○ | - | - | - |
| - | - | - | - | - | ○ | ○ | ○ | ○ | ○ | ○ | - | - |
| - | ○*1 | ○ | ○ | ○ | ○ | ○ | ○ | ○ | ○ | ○ | - | - |
| - | - | - | - | - | ○ | ○ | ○ | ○ | ○ | ○ | - | - |
| - | ○ | ○ | ○ | ○ | ○ | ○ | ○ | ○ | ○ | ○ | - | - |
| - | ○ | ○ | ○ | ○ | ○ | ○ | ○ | ○ | ○ | - | - | - |
1: Cannot be assigned as a function available in movie recording.
3: Default in still photo shooting.
4: Default in movie recording.
Image
| ●: Default ○: Available for customization | ||||||||||||
| - | ○ | ○ | ○ | ○ | ○ | ○ | ○ | ○ | ○ | ○ | - | - |
| - | ○ | ○ | ○ | ○ | ○ | ○ | ○ | ○ | ○ | ○ | - | - |
| - | ○ | ○ | ○ | ○ | ○ | ○ | ○ | ○ | ○ | ○ | - | - |
| - | ○ | ○ | ○ | ○ | ○ | ○ | ○ | ○ | ○ | ○ | - | - |
| - | ○ | ○ | ○ | ○ | ○ | ○ | ○ | ○ | ○ | ○ | - | - |
| - | ○*1 | ○ | ○ | ○ | ○ | ○ | ○ | ○ | ○ | ○ | - | - |
| - | ○*1 | ○ | ○ | ○ | ○ | ○ | ○ | ○ | ○ | ○ | - | - |
| - | ○*1 | ○ | ○ | ○ | ○ | ○ | ○ | ○ | ○ | ○ | - | - |
| - | ○ | ○ | ○ | ○ | ○ | ○ | ○ | ○ | ○ | ○ | - | - |
| - | - | ○ | ○ | ○ | ○ | ○ | ○ | ○ | ○ | ○ | - | - |
| - | ○*1 | ○ | ○ | ○ | ○ | ○ | ○ | ○ | ○ | ○ | - | - |
| - | ○*1 | ○ | ○ | ○ | ○ | ○ | ○ | ○ | ○ | ○ | - | - |
1: Cannot be assigned as a function available in movie recording.
2: Cannot be assigned as a function available in still photo shooting.
Movies
| ●: Default ○: Available for customization | ||||||||||||
| - | - | ○ | ○ | ○ | ○ | ○ | ○ | ○ | ○ | ○ | - | - |
| - | - | ○ | ○ | ○ | ○ | ○ | ○ | ○ | ○ | ○ | - | - |
| - | ●*1*3 | ○ | ○ | ○ | ○ | ○ | ○ | ○ | ○ | ○ | - | - |
| - | - | ○ | ○ | ○ | ○ | ○ | ○ | ○ | ○ | ○ | - | - |
| - | - | ○ | ○ | ○ | ○ | ○ | ○ | ●*4 | ○ | ○ | - | - |
| - | ○*1 | ○ | ○ | ○ | ○ | ○ | ○ | ○ | ○ | ○ | - | - |
| - | ○*1 | ○ | ○ | ○ | ○ | ○ | ○ | ○ | ○ | ○ | - | - |
| - | - | ○ | ○ | ○ | ○ | ○ | ○ | ○ | ○ | ○ | - | - |
| - | - | ○ | ○ | ○ | ○ | ○ | ○ | ○ | ○ | ○ | - | - |
| - | - | ○ | ○ | ○ | ○ | ○ | ○ | ○ | ○ | ○ | - | - |
| - | - | ○ | ○ | ○ | ○ | ○ | ○ | ○ | ○ | ○ | - | - |
1: Cannot be assigned as a function available in movie recording.
2: Cannot be assigned as a function available in still photo shooting.
3: Default in still photo shooting.
4: Default in movie recording.
Operation
| ●: Default ○: Available for customization | ||||||||||||||||
| - | ○ | ○ | ○ | ○ | ○ | ○ | ○ | ○ | ○ | ○ | - | ●*3 | ||||
| - | ○ | ○ | ○ | ○ | ○ | ○ | ○ | ○ | ○ | ○ | - | ○ | ||||
| - | ○*1 | ● | ○ | ○ | ○ | ○ | ○ | ○ | ○ | ○ | - | - | ||||
| - | ○*1 | ○ | ○ | ○ | ○ | ○ | ○ | ○ | ○ | ○ | - | - | ||||
| - | ○*1 | ○ | ○ | ○ | ○ | ○ | ○ | ○ | ○ | - | - | - | ||||
| - | ○*1 | ○ | ○ | ○ | ○ | ○ | ○ | ○ | ○ | ○ | - | - | ||||
| - | - | - | - | - | - | - | - | ○ | ○ | - | - | - | ||||
| - | - | - | ○ | - | - | - | - | - | - | - | - | - | ||||
| - | - | - | ● | - | - | - | - | - | - | - | - | - | ||||
| - | ○*1 | ○ | ○ | ○ | ○ | ○ | ○ | ○ | ○ | - | - | - | ||||
| - | ○*1 | ○ | ○ | ○ | ○ | ○ | ○ | ○ | ○ | - | - | - | ||||
| - | ○*1 | ○ | ○ | ● | ○ | ○ | ○ | ○ | ○ | - | - | - | ||||
| - | - | ○ | - | - | - | - | - | - | - | - | - | - | ||||
| - | ○ | ○ | ○ | ○ | ○ | ○ | ○ | ○ | ○ | ○ | - | - | ||||
| - | ○*1 | ○ | ○ | ○ | ○ | ○ | ○ | ○ | ○ | ○ | - | - | ||||
| - | ○ | ○ | ○ | ○ | ○ | ○ | ○ | ●*3 | ○ | ○ | - | - | ||||
| - | ○ | ○ | ○ | ○ | ○ | ○ | ○ | ○ | ○ | ○ | - | - | ||||
| - | ○ | ○ | ○ | ○ | ○ | ○ | ○ | ○ | ○ | ○ | - | - | ||||
| - | ○*1 | ○ | ○ | ○ | ○ | ○ | ○ | ○ | ○ | ○ | - | - | ||||
| - | ○*1 | ○ | ○ | ○ | ○ | ○ | ○ | ○ | ○ | ○ | - | - | ||||
| - | ○*1 | ○ | ○ | ○ | ○ | ○ | ○ | ○ | ○ | ○ | - | - | ||||
| - | ○*1 | ○ | ○ | ○ | ○ | ○ | ○ | ○ | ○ | ○ | - | - | ||||
| - | - | - | - | - | ○ | ○ | ○ | ○ | ○ | - | - | - | ||||
| - | ○*1 | ○ | ○ | ○ | ○ | ○ | ○ | ○ | ○ | ○ | - | - | ||||
| - | ○*1 | ○ | ○ | ○ | ○ | ○ | ○ | ○ | ○ | ○ | - | - | ||||
| - | ○ | ○ | ○ | ○ | ○ | ○ | ○ | ○ | ○ | ○ | - | - | ||||
| - | ○ | ○ | ○ | ○ | ○ | ○ | ○ | ○ | ○ | ○ | - | - | ||||
| - | ○ | ○ | ○ | ○ | ○ | ○ | ○ | ○ | ○ | ○ | - | - | ||||
| - | ○ | ○ | ○ | ○ | ○ | ○ | ○ | ○ | ○ | ○ | - | - | ||||
| - | ○ | ○ | ○ | ○ | ○ | ○ | ○ | ○ | ○ | ○ | - | - | ||||
| - | ○*1 | ○ | ○ | ○ | ○ | ○ | ○ | ○ | ○ | ○ | - | - | ||||
| - | ○*1 | ○ | ○ | ○ | ○ | ○ | ○ | ○ | ○ | ○ | - | - | ||||
| - | ○ | ○ | ○ | ○ | ○ | ○ | ○ | ○ | ○ | ○ | - | - | ||||
| - | ○ | ○ | ○ | ○ | ○ | ○ | ○ | ○ | ○ | ○ | - | - | ||||
| - | ○ | ○ | ○ | ○ | ○ | ○ | ○ | ○ | ○ | ○ | - | - | ||||
| - | ○ | ○ | ○ | ○ | ○ | ○ | ○ | ○ | ○ | ○ | - | - | ||||
| - | ○ | ○ | ○ | ○ | ○ | ○ | ○ | ○ | ○ | ○ | - | - | ||||
| - | ○ | ○ | ○ | ○ | ○ | ○ | ○ | ○ | ○ | ○ | - | - | ||||
| - | ○ | ○ | ○ | ○ | ○ | ○ | ○ | ○ | ○ | ○ | - | - | ||||
| - | ○ | ○ | ○ | ○ | ○ | ○ | ○ | ○ | ○ | ○ | - | - | ||||
| - | ○*1 | ○ | ○ | ○ | ○ | ○ | ○ | ○ | ○ | ○ | - | - | ||||
| - | ○*1 | ○ | ○ | ○ | ○ | ○ | ○ | ○ | ○ | ○ | ○ | ○*1 | ||||
1: Cannot be assigned as a function available in movie recording.
3: Default in still photo shooting.
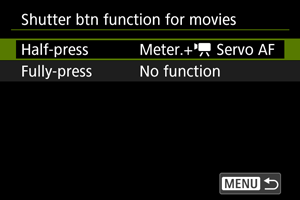
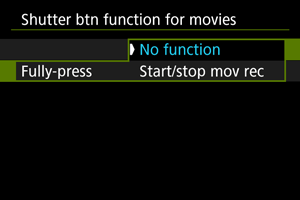
Shutter btn function for movies
You can set the functions performed by pressing the shutter button halfway or completely during movie recording.
Caution
- In movie recording, the [Shutter btn function for movies] setting overrides any function assigned to the shutter button in [: Customize buttons for shooting].
-
Select an option.
-
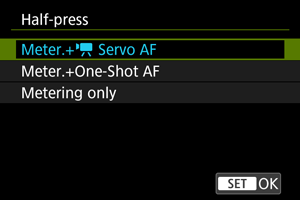
Half-press
Specify the function performed by pressing the shutter button halfway.
-
Fully-press
Specify the function performed by pressing the shutter button completely.
-
-
Select an option.
[Half-press] options
[Fully-press] options
-
With [Fully-press] set to [Start/stop mov rec], you can start/stop movie recording not only with the movie shooting button but also by pressing the shutter button completely, or by using Remote Switch RS-80N3 (sold separately).
-
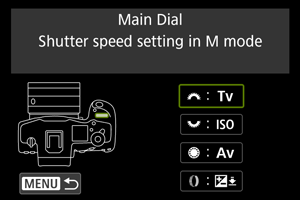
Customize dials/control ring
Frequently used functions can be assigned to the ![]() /
/![]() /
/![]() /
/![]() dials.
dials.
-
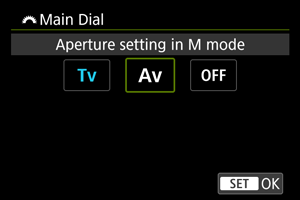
Select a camera control.
-
Select a function to assign.
- Press to set it.
- You can configure advanced settings for functions labeled with [] in the lower left of the screen by pressing the button.
- Press
Note
- To clear settings configured with [: Customize dials/control ring], select [: Clear all customized controls].
Functions available for dials
| ●: Default ○: Available for customization | ||||
| Function | ||||
|---|---|---|---|---|
| - | ○ | ○ | - | |
| - | ○ | ○ | ○ | |
| - | - | - | ○ | |
| - | - | - | ○ | |
| - | - | - | ○ | |
| - | ○ | ○ | ○ | |
| - | ● | ○ | ○ | |
| - | - | - | ○ | |
| - | - | - | ○ | |
| - | - | - | ● | |
| - | - | - | ○ | |
| - | - | - | ○ | |
| ● | ○ | ○ | - | |
| ○ | ○ | ● | - | |
| - | ○ | ○ | ○ | |
| - | ○ | ○ | ○ | |
| - | ○ | ○ | ○ | |
| - | - | - | ○ | |
| - | - | - | ○ | |
| - | - | - | ○ | |
| ○ | ○ | ○ | ○ | |
Note
- The
 dial cannot be customized in [Fv] mode.
 - [
 ]: Control ring on RF lenses and mount adapters.
![]()
![]()
![]() direction to set Tv/Av
direction to set Tv/Av
Dial turning direction when setting the shutter speed and aperture value can be reversed.
Reverses the turning direction of the ![]() ,
, ![]() , and
, and ![]() dial in [M] shooting mode and only the
dial in [M] shooting mode and only the ![]() dial in other shooting modes. The direction of the
dial in other shooting modes. The direction of the ![]() and
and ![]() dials in [M] mode matches the direction to set exposure compensation in [P], [Tv], and [Av] modes.
dials in [M] mode matches the direction to set exposure compensation in [P], [Tv], and [Av] modes.
 : Normal
 : Reverse direction
![]() direction to set Tv/Av
direction to set Tv/Av
The direction to set the shutter speed and aperture value with the control ring of RF or RF-S lenses or mount adapters can be reversed.
- : Normal
- : Reverse direction
Switch ![]() /
/![]() when shooting
when shooting
Functions assigned to the Main dial and Quick control dial 2 can be reversed.
- OFF: Disable
- ON: Enable
Touch Shutter
Touch Shutter can be specified. When set to [Enable], [![]() ] display in the lower left of the shooting screen changes to [
] display in the lower left of the shooting screen changes to [![]() ], and Touch Shutter is enabled.
], and Touch Shutter is enabled.
For Touch Shutter instructions, see Shooting with the Touch Shutter.
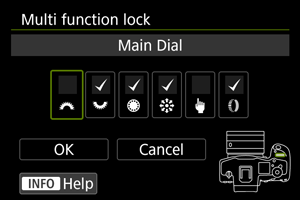
Multi function lock
Specify camera controls to lock when the Multi-function lock is enabled. This can help prevent accidentally changing settings.
-
Select camera controls to lock.
- Select a camera control and press to display [
 ].
].
- Select a camera control and press
-
Select [OK].
- Setting the power/multi-function lock switch to
 locks the selected [] camera controls.
- Setting the power/multi-function lock switch to
Note
- An asterisk “*” to the right of [: Multi function lock] indicates that the default setting has been modified.
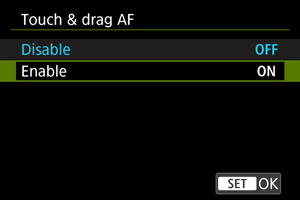
Touch & drag AF settings
You can move the AF point or Zone AF frame by tapping or dragging on the screen as you look through the viewfinder.

Touch & drag AF
Select [Enable] to enable Touch and Drag AF.
Positioning method
You can set how positions are specified by tapping or dragging.

-
Absolute
The AF point moves to the tapped or dragged position on the screen.
-
Relative
The AF point moves in the direction you drag, by an amount corresponding to the amount you drag, no matter where you tap the screen.
Active touch area
You can specify the area of the screen used for tap and drag operations.

Note
- A round orange frame [
 ] is displayed when you tap the screen with [
 : AF area] set to [Whole area AF]. After you lift your finger at the position to move the AF point to, [
 ] is displayed and that subject is tracked. To cancel subject selection, tap [
 ].
].
Rel. sensitivity
By setting [Positioning method] to [Relative], you can specify the amount of movement in response to tapping or dragging.

For faster AF point positioning, set toward the positive end, and for slower positioning, set toward the negative end.
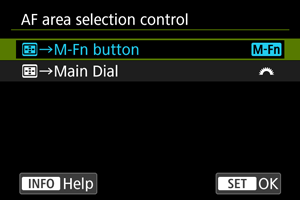
AF area selection control
You can set how AF area selection methods are switched.
-
 :
:  →M-Fn button
Press the
 button, then the
  button. Each press switches the AF area.
 -
 : →Main Dial
Press the
button, then turn the  dial to switch the AF area.
Note
- When [→Main Dial] is set, use
 to move the AF point horizontally.
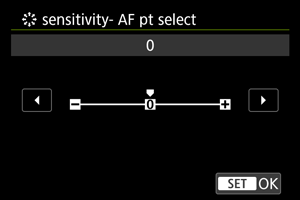
![]() sensitivity- AF pt select
sensitivity- AF pt select
You can adjust Multi-controller sensitivity, which applies to AF point positioning.
Focus/control ring
In this menu, you can configure lens [Focus/control ring] functionality.
Lenses without a focusing/control ring switch
-
FOCUS: Use as focus ring
The ring works as a focusing ring.
-
CONTROL: Use as control ring
The ring works as a control ring. To restrict [
: Focus mode] to [AF], press the  button and add a checkmark [] to [Focus mode is AF when used as a control ring].
Lenses for which this menu is displayed that have both focusing and control rings
-
FOCUS: Use as focus ring
No change to focusing or control ring operation.
-
CONTROL: Use as control ring
The focusing ring works as a control ring. Control ring operation is disabled.
Note
- This menu is not displayed for lenses with a focusing/control ring switch. Use the lens to configure focusing/control ring functionality.
- For details on lenses with both focusing and control rings for which the camera displays this menu, visit the Canon website.
- Switching is also possible from the Quick Control screen, when customized with [
 : Customize Quick Controls] ().
Focus ring rotation
You can reverse the direction that the focusing ring of RF lens is rotated to adjust settings.
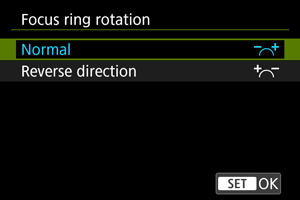
- : Normal
- : Reverse direction
RF lens MF focus ring sensitivity
You can set the sensitivity of the RF lens focusing ring.
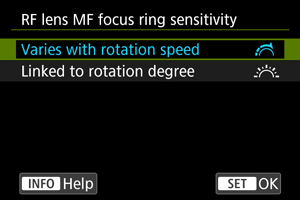
-
 : Varies with rotation speed
Focusing ring sensitivity varies depending on rotation speed.
-
 : Linked to rotation degree
The focal position is adjusted based on the amount of rotation, regardless of the rotation speed.
[Customized controls when playback]
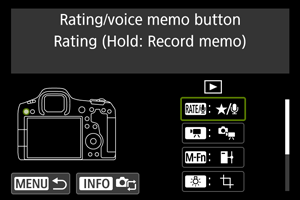
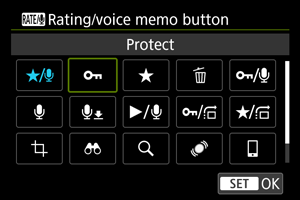
Customize buttons for playback
You can assign common playback functions to camera buttons that are easy for you to use.
-
Select a camera control.
-
Select a function to assign.
- Press to set it.
- You can configure advanced settings for functions labeled with [] in the lower left of the screen by pressing the button.
- Press
Note
- To clear settings configured with [: Customize buttons for playback], select [: Clear all customized controls].
Functions available for customization
| ●: Default ○: Available for customization | |||||
| ○ | ○ | ○ | ○ | ○ | ○ |
| ○ | ○ | ○ | ○ | ○ | ○ |
| ○ | ○ | ○ | ○ | ○ | ○ |
| ○ | - | - | - | - | - |
| ● | - | - | - | - | - |
| ○ | - | - | - | - | - |
| ○ | ○ | ○ | ○ | ○ | ○ |
| ○ | - | - | - | - | - |
| ○ | ○ | ○ | ○ | ○ | ○ |
| ○ | ○ | ○ | ○ | ○ | ○ |
| ○ | ○ | ○ | ● | ○ | ○ |
| ○ | ○ | ○ | ○ | ○ | ○ |
| ○ | ○ | ○ | ○ | ○ | ○ |
| ○ | ○ | ○ | ○ | ○ | ○ |
| ○ | ○ | ○ | ○ | ○ | ○ |
| ○ | ○ | ● | ○ | ○ | ○ |
| ○ | ○ | ○ | ○ | ○ | ○ |
| ○ | ○ | ○ | ○ | ○ | ○ |
| - | ● | ○ | ○ | ● | ○ |
| ○ | ○ | ○ | ○ | ○ | ● |
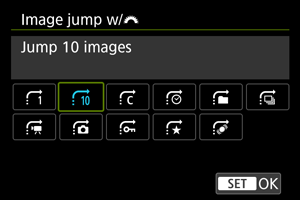
Image jump w/![]()
To set how the camera jumps through images, you can turn the ![]() dial on the playback screen in single-image display.
dial on the playback screen in single-image display.
Note
- With [Jump images by the specified number], you can turn the dial to select the number of images to jump by.
- With [Display by image rating], turn the dial to select the rating (). Selecting
 will show all rated images as you browse.
 - You can also change the jump method by pressing horizontally on the playback screen in single-image display.
Img jump w/![]() +
+![]()
To set how the camera jumps through images, you can turn the ![]() dial while pressing the button assigned to [
dial while pressing the button assigned to [![]() /
/![]() ] [
] [![]() /
/![]() ] on the playback screen in single-image display.
] on the playback screen in single-image display.
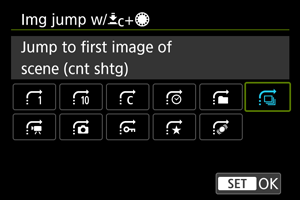
Note
- You can configure this function when assigning [/
 ] [
] [ /] to a button in [: Customize buttons for playback] ().
 - With [Jump images by the specified number], you can turn the dial to select the number of images to jump by.
- With [Display by image rating], turn the dial to select the rating (). Selecting will show all rated images as you browse.
Switch ![]() /
/![]() during playback
during playback
You can switch the functions assigned to these dials, as used on the playback screen.
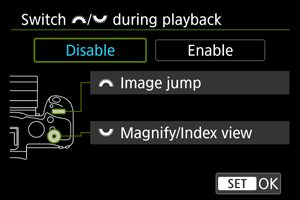
-
Disable
Assigns [Image jump] to the
dial and [Magnify/Index view] to the dial. -
Enable
Assigns [Magnify/Index view] to the
dial and [Image jump] to the dial.
Note
- Corresponding icons in menus and on screens such as the Quick Control and Magnify/Reduce screen are changed accordingly.
[Customized controls/Reset]
Eye control![]()
Eye control can be specified. For eye control instructions, see Using Eye Control.
Touch control
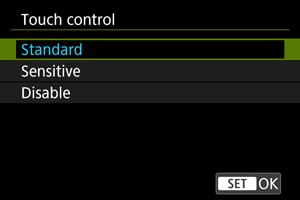
- [Sensitive] makes the touch-screen panel more responsive than [Standard].
- To disable touch operations, select [Disable].
Caution
-
Precautions for touch-screen panel operations
- Do not use sharp objects such as fingernails or ballpoint pens for touch operations.
- Do not use wet fingers for touch operations. If the screen has any moisture or if your fingers are wet, the touch-screen panel may not respond or malfunction may occur. In this case, turn off the power and wipe off the moisture with a cloth.
- Attaching a commercially available protective sheet or a sticker on the screen may impair responsiveness to touch operations.
- The camera may not respond as well if you quickly perform touch operation when [Sensitive] is set.
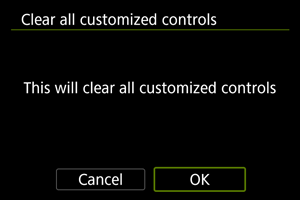
Clear all customized controls
Selecting [![]() : Clear all customized controls] clears all control customization settings.
: Clear all customized controls] clears all control customization settings.