Transferring Images to an FTP Server
- Configuring FTP Server Connection Settings
- Editing/Deleting Devices for Connections
- Reconnecting Using Connection Information
- Transferring Images Individually
- Transferring Multiple Images at Once
- Using the [
 Image sel./transfer] Screen
 - Adding a Caption Before Transfer
- Auto Retry If Transfer Fails
- Using the Power Saving Function
- Protecting Images after Transfer
- Viewing Transferred Images
- Transferring Image with Content Transfer Professional
By connecting to an FTP server, you can send images on the camera to a computer.
With FTP transfer, you can automatically transfer each image to the FTP server as you shoot or transfer a set of images together.
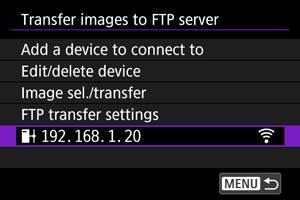
Configuring FTP Server Connection Settings
For secure FTP transfer using a root certificate, import a root certificate ().
-
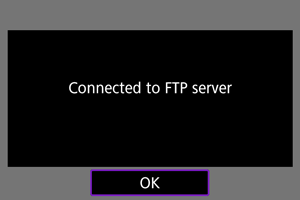
Select [OK].
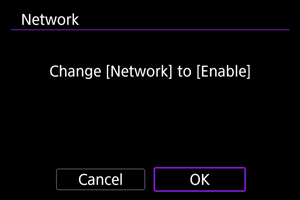
- This screen is not displayed if the network setting is already set to [Enable].
-
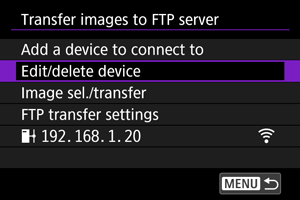
Select [Add a device to connect to].
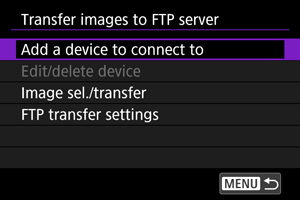
-
Select an option.
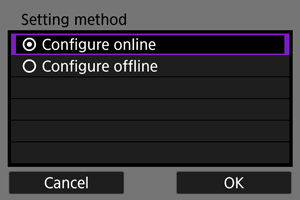
- Select [OK] to go to the next screen.
- Selecting [Configure offline] will keep the camera disconnected from the network after configuration.
-
Select [New settings].
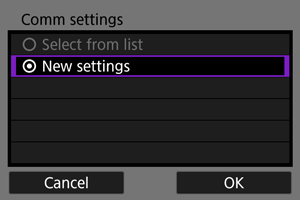
- Select [OK] to go to the next screen.
- By selecting [Select from list] when settings are already registered on the camera, you can apply the registered settings.
-
Select an option.
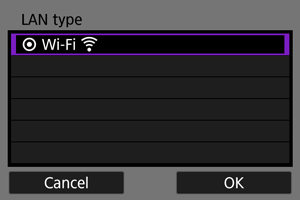
- Select [OK] to go to the next screen.
- For instructions on configuring communication functions, see Basic Communication Settings.
-
Save the settings.
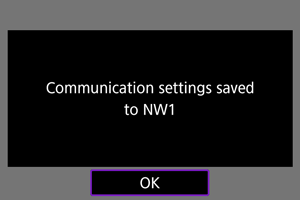
- Press
 .
. - After you finish the communication settings, configure FTP transfer.
- Press
-
Select an option.
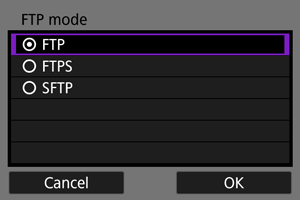
- For secure FTP transfer using a root certificate, select [FTPS].
- For secure FTP transfer over an SSH connection, select [SFTP].
- Select [OK] to go to the next screen.
-
Configure the FTP server settings.
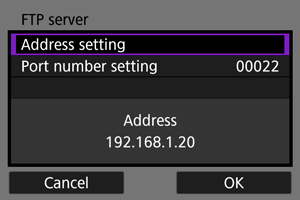
- Select [Address setting] or [Port number setting], then press to display the setting screen.
- Select [OK] to go to the next screen.
- Select [Address setting] or [Port number setting], then press
-
Configure the SSH login authentication settings.
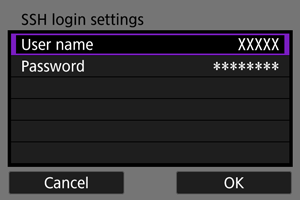
- Displayed if you selected [SFTP] as the FTP mode.
- Select [User name] or [Password], then press to display the setting screen.
- Select [OK] to go to the next screen.
-
Select an option.

- Displayed if you selected [FTP] or [FTPS] as the FTP mode.
- Enable this setting in network environments protected by a firewall.
- Select [OK] to go to the next screen.
- If an Error 41 (Cannot connect to FTP server) is displayed while you are configuring the connection, setting [Passive mode] to [Enable] may resolve it.
-
Configure proxy server settings.
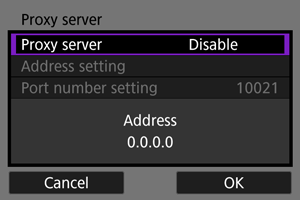
- Displayed if you selected [FTP] as the FTP mode.
- Select [OK] to go to the next screen.
-
Select an option.
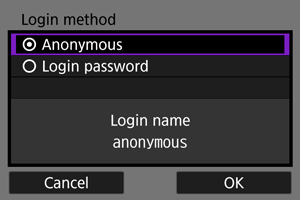
- Displayed if you selected [FTP] or [FTPS] as the FTP mode.
- Select [OK] to go to the next screen.
Note
-
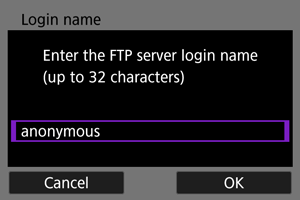
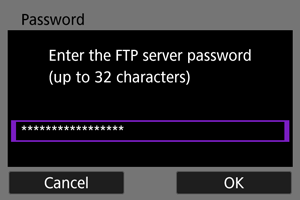
If you have selected [Login password], enter the name and password.
-
Specify a target folder.
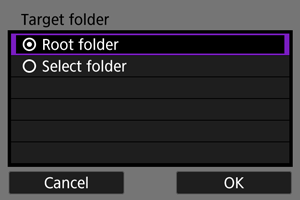
- Select [Root folder] to have images saved in the root folder, as specified in FTP server settings ().
- Select [Select folder] to access the setting screen.
- Select [OK] to go to the next screen.
Note
-
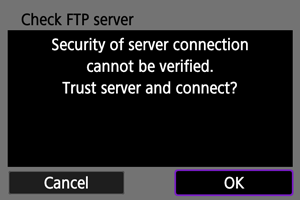
When the following message appears, select [OK] to trust the target server.
-
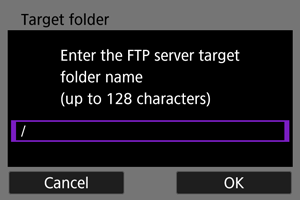
If you have selected [Select folder], enter the name of the destination folder.
-
Press
.
- The FTP settings are saved.
- This screen is not displayed if you selected [Configure offline] as the method of configuration.
Connection settings for FTP transfer are now complete.
Note
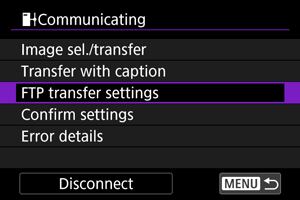
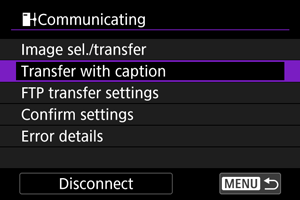
[ Communicating] screen
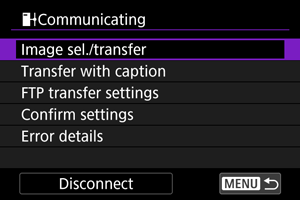
-
Image sel./transfer
-
Transfer with caption
You can add a registered caption to individual images before transfer ().
-
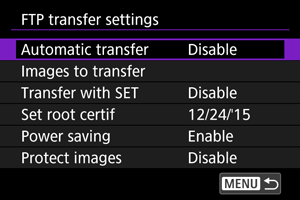
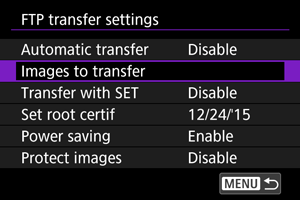
FTP transfer settings
You can configure settings related to FTP transfer and power saving.
-
Confirm settings
You can check setting details.
-
Error details
After any network connection errors, you can check the error details ().
-
Disconnect
Terminates the network connection.
Importing a root certificate for FTPS
If you specified [FTPS] FTP mode when configuring connection settings, the root certificate used by the FTP server must be imported to the camera.
- Only the root certificate with a file name of “ROOT.CER,” “ROOT.CRT,” or “ROOT.PEM” can be imported to the camera.
- Only one root certificate file can be imported to the camera. Insert a card containing the root certificate file in advance.
- The priority card selected for [
 Record/play], [
 Record/play], [ Play], or [ Play] in [
 : Record func+card/folder sel.] is used to import a certificate.
 - It may not be possible to trust servers you try to connect to in FTPS connections with a self-signed certificate.
-
Select [OK].
- This screen is not displayed if the network setting is already set to [Enable].
-
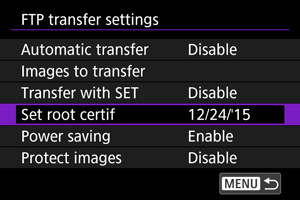
Select [FTP transfer settings].
-
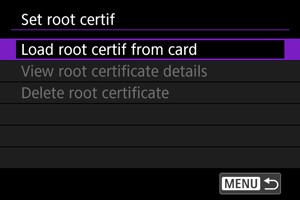
Select [Set root certif].
-
Select [Load root certif from card].
-
Select [OK].
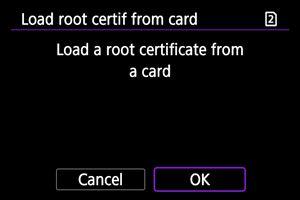
- The root certificate is imported.
- Select [OK] on the confirmation screen to return to the [Set root certif] screen.
Note
- To delete the root certificate imported to the camera, select [Delete root certificate] on the screen in step 5. To check who it was issued to and issued by, the period of validity, and other information, select [View root certificate details].
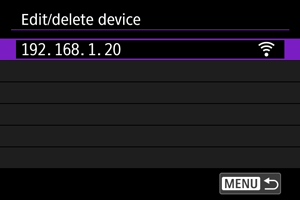
Editing/Deleting Devices for Connections
Before editing or deleting connection settings for other devices, end the Wi-Fi connection. This section covers items not described in Configuring FTP Server Connection Settings.
-
Select [Edit/delete device].
-
Select the device.
- Select the device for the connection, then press .
- Select the device for the connection, then press
-
Select an option.
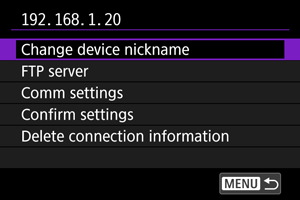
Changing device nicknames
You can change the nickname of devices the camera connects to.
FTP server
You can configure FTP server settings.
Directory structure
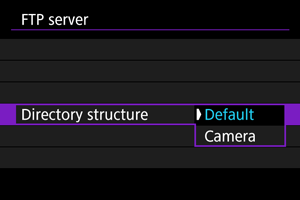
-
Default
The server root folder is used for image storage. If you have created a subfolder in the root folder by changing the [Target folder] setting, images are saved in that folder.
-
Camera
Automatically creates a folder structure matching that of the camera's (such as A/DCIM/100EOSR1) in the server's root folder for image storage. If you have created a subfolder in the root folder by changing the [Target folder] setting, a folder structure such as A/DCIM/100EOSR1 is automatically created in that folder for image storage.
Overwrite same file
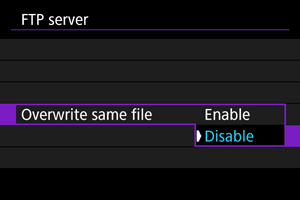
-
Disable
If there is already a file with the same name in the target folder on the FTP server, the new file is saved with an extension consisting of an underscore and a number, as in IMG_0003_1.JPG.
-
Enable
Any files with the same name in the target folder on the FTP server are overwritten by transferred images.
Note
-
Even if [Enable] is selected when you resend images that could not be transferred initially, existing images may not be overwritten in some cases.
If this happens, the new file is saved with an extension consisting of an underscore, a letter, and a numeral, as in IMG_0003_a1.JPG.
Trusting target servers
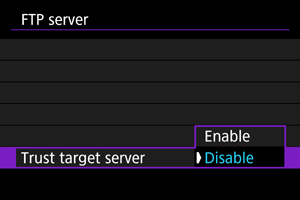
Set to [Enable] if you prefer to connect to FTP servers even when trust cannot be established based on the root certificate used. In this case, take suitable security measures.
Communication settings
Deleting connection information
You can delete the connection information.
Reconnecting Using Connection Information
The configured connection information can be used to connect again.

Transferring Images Individually
- Automatic transfer after each shot
- Specifying sizes or types of images to transfer
- Transferring the current image
Automatic transfer after each shot
Each image can be immediately transferred to the FTP server automatically after your shot. You can continue shooting still photos as usual while images are being transferred.
- Before shooting, make sure a card is in the camera. If you shoot without recording images, they cannot be transferred.
- Automatic transfer of movies during recording is not supported. After recording, transfer movies as described in Transferring Multiple Images at Once or Adding a Caption Before Transfer.
-
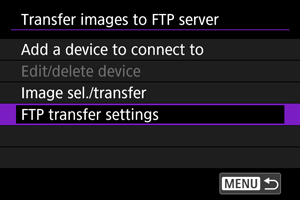
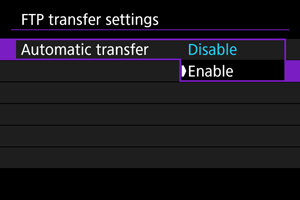
Select [FTP transfer settings].
-
Select [Automatic transfer].
-
Select [Enable].
-
Take the picture.
- The captured image is transferred to the FTP server.
Caution
- Images cannot be erased during image transfer.
Note
- Captured images are also stored on the card.
- Any images for which transfer fails or is interrupted will be transferred automatically when the connection is recovered (). These images can also be transferred together manually at a later time ().
- Repeated automatic transfer is not attempted if network settings (such as FTP server settings) are changed before automatic FTP transfer begins.
Specifying sizes or types of images to transfer
You can specify which images to transfer when recording images of different sizes to both cards, or when shooting RAW+JPEG or RAW+HEIF images.
-
Access the [FTP transfer settings] screen.
- Follow steps 1–2 in Automatic transfer after each shot.
-
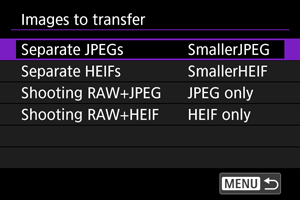
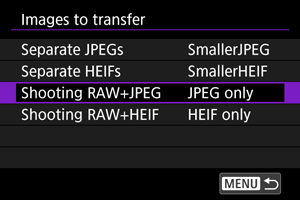
Select [Images to transfer].
-
Select the size of images to transfer.
-
Separate JPEGs
Choose [SmallerJPEG] or [Larger JPEG].
-
Separate HEIFs
Choose [SmallerHEIF] or [Larger HEIF].
-
-
Select the type of images to transfer.
-
Shooting RAW+JPEG
Choose from [JPEG only], [RAW only] or [RAW+JPEG].
-
Shooting RAW+HEIF
Choose from [HEIF only], [RAW only] or [RAW+HEIF].
-
Note
- [Separate JPEGs] or [Separate HEIFs] determines the image size transferred if [ Rec options] in [: Record func+card/folder sel.] is selected with different image quality set for each card ().
- When the camera is set to record RAW images to one card and JPEGs or HEIFs to the other, specify which images to transfer in the [Shooting RAW+JPEG] or [Shooting RAW+HEIF] setting. Similarly, specify your transfer preference when RAW+JPEG images or RAW+HEIF images are simultaneously recorded to a single card.
- Captured images are also stored on the card.
- When images of the same size are recorded to both cards simultaneously, images recorded to the card selected for [ Record/play] or [ Play] in [: Record func+card/folder sel.] are given priority for transfer.
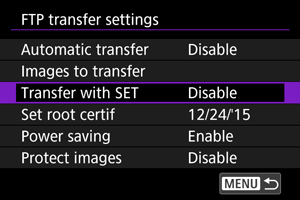
Transferring the current image
Enables you to transfer the image you are viewing simply by pressing ![]() . You can continue shooting still photos as usual while images are being transferred.
. You can continue shooting still photos as usual while images are being transferred.
-
Access the [FTP transfer settings] screen.
- Follow steps 1–2 in Automatic transfer after each shot.
-
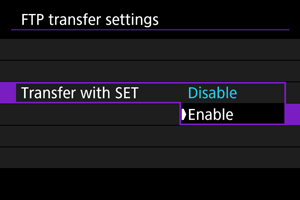
Select [Transfer with SET].
-
Select [Enable].
-
Select an image.
- On the camera, press the
 button.
 - Select an image to transfer, then press to transfer the image.
- Movies cannot be transferred this way. Selecting a movie and pressing will display the movie playback panel.
- On the camera, press the
Transferring Multiple Images at Once
After shooting, you can select multiple images and transfer them all at once, or you can transfer unsent images or images that could not be sent previously.
You can continue shooting still photos as usual during transfer.
Caution
-
Transfer is paused in the following cases.
- Movie recording in progress
- Pre-recording in progress
- [
 : Standby: Low res.] is set to [Off]
- If you will transfer many images, consider using a household power outlet accessory (sold separately).
-
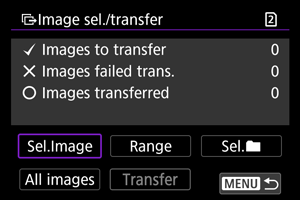
Select [Image sel./transfer].

- The [
 Image sel./transfer] screen is displayed.
 - For details on the [Image sel./transfer] screen, see Using the [Image sel./transfer] Screen.
- The [
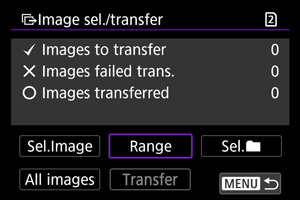
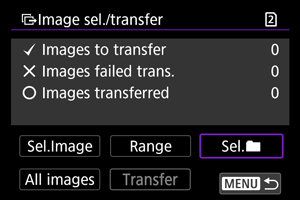
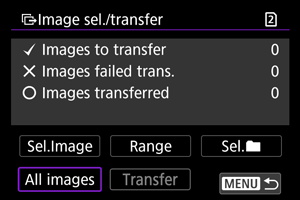
Using the [Image sel./transfer] Screen
- Selecting ([
 ]) multiple images to transfer
 - Specifying a range of images to transfer
- Transferring all images in a folder
- Transferring all images on a card
From the [![]() Image sel./transfer] screen, you can select multiple images and transfer them all at once.
Image sel./transfer] screen, you can select multiple images and transfer them all at once.
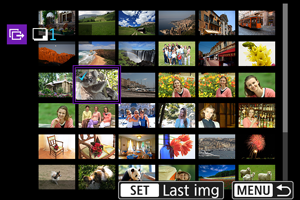
Selecting ([ ]) multiple images to transfer
By adding checkmarks to your selected images, you can transfer all of them at once.
-
Select [Sel.Image].
-
Select the image to transfer.
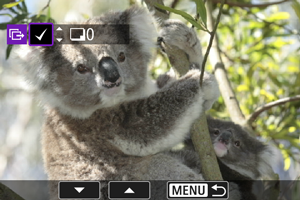
- Use the
 dial to select an image to transfer, then press .
 - Use the dial to add a checkmark [] in the upper left of the screen, then press .
- For three-image display, turn the
 dial counterclockwise. To return to single-image display, turn the dial clockwise.
 - To select other images to transfer, repeat step 2.
- After image selection, press the
 button.
- Use the
-
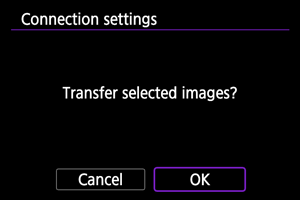
Select [Transfer].
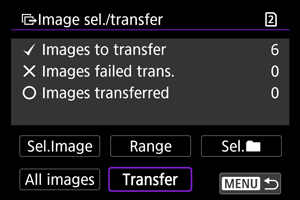
-
Select [OK].
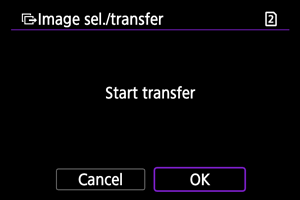
- The selected images are transferred to the FTP server.
Specifying a range of images to transfer
You can transfer multiple images by specifying a range.
-
Select [Range].
-
Specify the range of images.
- Select the first image (start point).
- Next, select the last image (end point). A checkmark [] will be appended to all the images within the range between first and last images.
- To select other images, repeat step 2.
- After image selection, press the button.
-
Select [Transfer].
-
Select [OK].
- The selected images are transferred to the FTP server.
Transferring all images in a folder
You can transfer all the images in a folder at once.
-
Select [Sel.
 ].
].
-
Select a selection method.
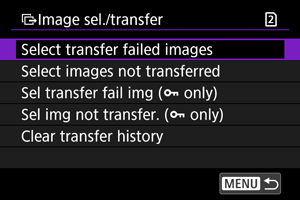
-
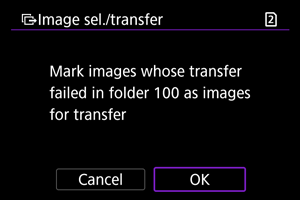
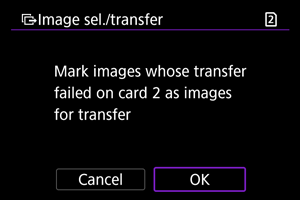
Select transfer failed images
Selects all images in the selected folder for which transfer failed.
-
Select images not transferred
Selects all unsent images in the selected folder.
-
Sel transfer fail img (
 only)
only)Selects all protected images in the selected folder for which transfer failed.
-
Sel img not transfer. (
only)Selects all unsent protected images in the selected folder.
-
Clear transfer history
Clears the transfer history of images in the selected folder.
Note
- After clearing the transfer history, you can select [Select images not transferred] and transfer all images in the folder again.
- After clearing the transfer history, you can select [Sel img not transfer. ( only)] and transfer all protected images in the folder again.
-
-
Select the folder.
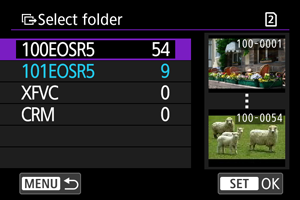
-
Select [OK].
- Selected images are registered in [Images to transfer].
-
Select [Transfer].
-
Select [OK].
- The selected images are transferred to the FTP server.
Transferring all images on a card
You can transfer all the images on a card at once.
-
Select [All images].
-
Select a selection method.

-
Select transfer failed images
Selects all images on the card for which transfer failed.
-
Select images not transferred
Selects all unsent images on the card.
-
Sel transfer fail img (
only)Selects all protected images on the card for which transfer failed.
-
Sel img not transfer. (
only)Selects all unsent protected images on the card.
-
Clear transfer history
Clears the transfer history of images on the card.
Note
- After clearing the transfer history, you can select [Select images not transferred] and transfer all images recorded on the card again.
- After clearing the transfer history, you can select [Sel img not transfer. ( only)] and transfer all protected images recorded on the card again.
-
-
Select [OK].
- Selected images are registered in [Images to transfer].
-
Select [Transfer].
-
Select [OK].
- The selected images are transferred to the FTP server.
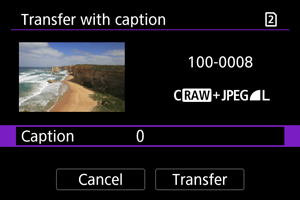
Adding a Caption Before Transfer
You can add a registered caption to each image before transfer. This is convenient if you want to inform the recipient of the printing quantity, for example. Captions are also added to images saved to the camera.
- You can check captions added to images by examining the Exif information, in the user comments.
- Captions can be created and registered with EOS Utility ().
-
Select [Transfer with caption].
- The last image viewed is displayed.
-
Specify the caption.
-
Select [Caption], and on the screen displayed, select the content of the caption.
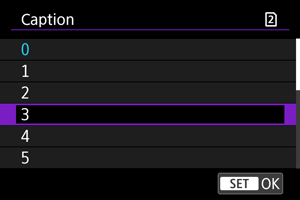
-
-
Select [Transfer].
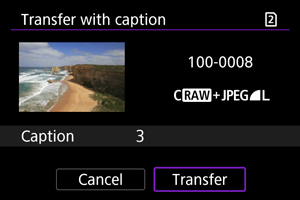
- The image is transferred with the caption. After transfer, display returns to the [Image transfer] screen.
Caution
- Other images cannot be selected from the [Transfer with caption] screen. To select another image for transfer with a caption, view that image before following these steps.
Auto Retry If Transfer Fails
If transfer fails, the Wi-Fi icon blinks temporarily. In this case, the following screen is displayed after you press the ![]() button and select [
button and select [![]() :
: ![]() Transfer images to FTP server].
Transfer images to FTP server].
To resolve the error displayed, see Responding to Error Messages.
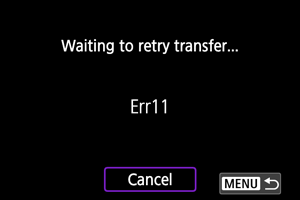
Once you have resolved the issue, the images that could not be sent initially will be transferred automatically. With this option activated, transfer is attempted again automatically after failure, whether automatic transfer is used or captured images are transferred via FTP. Note that if you cancel transfer or turn the camera off, auto retry is not attempted.
See Transferring Multiple Images at Once and transfer images as needed.
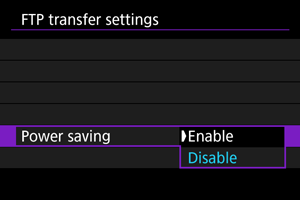
Using the Power Saving Function
When [Enable] is set and no image is transferred for a certain period, the camera will log off from the FTP server and end the Wi-Fi connection. The connection is re-established automatically when the camera is ready for image transfer again. If you prefer not to end the Wi-Fi connection, set to [Disable].
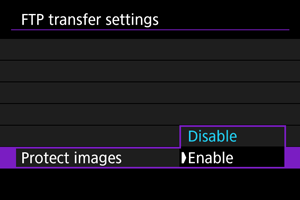
Protecting Images after Transfer
To automatically protect images transferred via FTP, set to [Enable] ().
Viewing Transferred Images
Images transferred to the FTP server are stored in the following folder as specified in the FTP server settings.
-
Target folder of the FTP server
- Under the default settings of the FTP server, images are stored in [C drive] → [Inetpub] folder → [ftproot] folder, or in a subfolder of this folder.
- If the root folder of the transfer destination has been changed in the FTP server settings, ask the FTP server administrator where images are transferred.
Transferring Image with Content Transfer Professional
Using the Content Transfer Professional smartphone app, you can transfer images from the camera to FTP servers over a mobile network connection.
For information about the app, see Software/Apps.