Shooting with Speedlites
- EL/EX Series Speedlites for EOS Cameras
- Canon Speedlites Other Than the EL/EX Series
- Non-Canon Flash Units
- Quick Flash Group Control
EL/EX Series Speedlites for EOS Cameras
Features of EL/EX series Speedlites (sold separately) can be used in flash photography with the camera.
For instructions, refer to the EL/EX series Speedlite's Instruction Manual.
Sync speed
Flash sync speeds vary as follows depending on the combination of camera settings.
| Camera Setting | Flash Sync Speed | |
|---|---|---|
| Shutter mode | ||
| Mechanical | 1/200 sec. | |
| 1/250 sec. | ||
| Elec. 1st-curtain | 1/250 sec. | |
| 1/320 sec. | ||
| Electronic |
1/160 sec. | |
| 1/250 sec. | ||
Equivalent to APS-C size
Flash exposure compensation
You can adjust flash output (flash exposure compensation). With an image displayed on the screen, press the ![]() button and use a dial to set the amount of flash exposure compensation (). You can set the flash exposure compensation up to ±3 stops in 1/3-stop increments.
button and use a dial to set the amount of flash exposure compensation (). You can set the flash exposure compensation up to ±3 stops in 1/3-stop increments.
FE Lock
This enables you to obtain appropriate flash exposure for a specific part of the subject. Aim the viewfinder center over the subject, press the camera's ![]() button, then compose the shot and take the picture.
button, then compose the shot and take the picture.
Caution
- Some Speedlites cannot be attached directly to this camera. For details, see Multi-Function Shoe.
- Setting [
 : Auto Lighting Optimizer] () to an option other than [Disable] may still cause images to look bright even if you set lower flash exposure compensation for darker images.
 -
Using high-speed sync may cause banding in images. To reduce the banding, it may help to do the following.
- Move the Speedlite farther from the camera.
- Lower the shutter speed.
- Set [: Shutter mode] to [Mechanical].
Note
- The Speedlite will fire an intermittent AF-assist beam as needed, if autofocusing is difficult under low light.
- You can also set flash exposure compensation on the Quick Control screen () or in the [Flash function settings] setting of [: External Speedlite control] ().
- The camera can turn on certain Speedlites automatically when the camera is turned on. For details, refer to the instruction manual of Speedlites that support this feature.
Canon Speedlites Other Than the EL/EX Series
-
With an EZ/E/EG/ML/TL series Speedlite set to A-TTL or TTL autoflash mode, the flash can be fired at full output only.
Set the camera's shooting mode to [M] or [Av] and adjust the aperture value before shooting.
- When using a Speedlite that has manual flash mode, shoot in the manual flash mode.
Non-Canon Flash Units
Sync speed
Sync speed for non-Canon compact flash units varies by shutter mode. Before shooting, confirm that flash sync is performed correctly.
| [ |
Sync Speed |
|---|---|
| Mechanical | 1/200 sec. or slower |
| Elec. 1st-curtain | 1/250 sec. or slower |
| Electronic |
1/160 sec. or slower |
With large studio flash units, the flash duration is longer than that of a compact flash unit and varies depending on the model. Before shooting, confirm that flash sync is performed correctly by taking some test shots at a sync speed of approx. 1/60 sec. to 1/30 sec.
Sync terminal
- You can use flash units with a sync cord via the sync terminal (). The terminal has locking threads to prevent accidental cord detachment.
- The sync terminal has no polarity. Sync cords can be connected regardless of polarity.
Caution
- Using the camera with a dedicated flash unit or flash accessory for cameras of other manufacturers poses a risk of malfunction and even damage.
- Do not connect flash units with an output voltage of 250 V or more to the camera's sync terminal.
- Do not attach a high-voltage flash unit to the camera's hot shoe. It may not fire.
Note
- You can use one flash unit attached to the camera's hot shoe and another connected to the sync terminal at the same time.
Quick Flash Group Control
As you view the shooting screen in wireless multi-flash photography, you can configure the settings for each flash group by pressing the button assigned to [Quick flash group control] in [![]() : Customize buttons for shooting]. This example is based on assigning the
: Customize buttons for shooting]. This example is based on assigning the ![]() button ().
button ().
-
Set the flash firing mode to
 (individual group control) to prepare for wireless multi-flash photography.
- For details, refer to the instruction manuals of flash units supporting wireless multi-flash photography.
-
During standby, press the
 button.
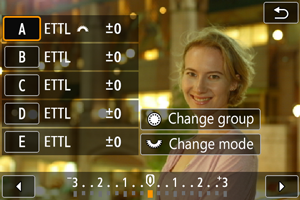
- Settings (flash mode and flash exposure compensation) for each flash group are displayed.
- Turn the
 dial to select a flash group (A–E) to configure.
 - Turn the
 dial to set the flash mode.
 - Turn the
 dial to adjust flash output or flash exposure compensation.
Note
- The [Quick flash group control] setting screen can be displayed in [Fv], [P], [Tv], [Av], [M], or [BULB] mode.
- When Speedlites are set to a flash mode other than (individual group control), pressing the button displays the [Flash function settings] screen.