Custom Function Setting Items
You can customize camera features on the [![]() ] tab to suit your shooting preferences. Any settings you change from default values are displayed in blue.
] tab to suit your shooting preferences. Any settings you change from default values are displayed in blue.
[Shooting mode/Exposure]
Restrict shooting modes
You can restrict the shooting modes available with the ![]() button.
button.
Select available shooting modes [Fv/P/Av/M/Tv/BULB/C1/C2/C3], then press ![]() to add a checkmark [
to add a checkmark [![]() ]. Select [OK] to register the setting.
]. Select [OK] to register the setting.
Caution
- Restricted shooting mode settings are not registered to [C1], [C2], or [C3].
- The [
 ] mark cannot be cleared from all nine modes at the same time.
Exposure level increments
Sets 1/2-stop increments for the shutter speed, aperture value, exposure compensation, AEB, flash exposure compensation, etc.
-
1/3: 1/3-stop
-
1/2: 1/2-stop
Note
-
Display when set to [1/2-stop] is as follows.

ISO speed setting increments
You can change the manual ISO speed setting increment to a whole stop.
- 1/3: 1/3-stop
- 1/1: 1-stop
Note
- Even if [1-stop] is set, ISO speed will be automatically set in 1/3-stop increments when ISO Auto is set.
Speed from metering/ISO Auto
You can set the ISO speed status after the metering timer ends in cases where, for ISO Auto operation in [P]/[Tv]/[Av]/[M]/[BULB] mode, the camera has adjusted the ISO speed during metering or during the metering timer.
 : Restore Auto after metering
 : Retain speed after metering
Bracketing auto cancel
You can specify to cancel AEB and white balance bracketing when the power switch is set to ![]() .
.
- ON: Enable
- OFF: Disable
Bracketing sequence
The AEB shooting sequence and white balance bracketing sequence can be changed.
- 0−+: 0, -, +
- −0+: -, 0, +
- +0−: +, 0, -
| AEB | White Balance Bracketing | |
|---|---|---|
| B/A Direction | M/G Direction | |
| 0: Standard exposure | 0: Standard white balance | 0: Standard white balance |
| −: Underexposure | −: Blue bias | −: Magenta bias |
| +: Overexposure | +: Amber bias | +: Green bias |
Number of bracketed shots
The number of shots taken with AEB and white balance bracketing can be changed.
When [Bracketing sequence] is set to [0, -, +], the bracketed shots will be taken as shown in the following table.
- 3: 3 shots
- 2: 2 shots
- 5: 5 shots
- 7: 7 shots
| (1-stop/step increments) | |||||||
| 1st Shot | 2nd Shot | 3rd Shot | 4th Shot | 5th Shot | 6th Shot | 7th Shot | |
| 3: 3 shots | Standard (0) | –1 | +1 | ||||
| 2: 2 shots | Standard (0) | ±1 | |||||
| 5: 5 shots | Standard (0) | –2 | –1 | +1 | +2 | ||
| 7: 7 shots | Standard (0) | –3 | –2 | –1 | +1 | +2 | +3 |
Note
- If [2 shots] is set, you can select the + or − side when setting the AEB range. With white balance bracketing, the second shot is adjusted toward the negative side for the B/A or M/G direction.
[Exposure]
Safety shift
If the subject brightness changes and the standard exposure cannot be obtained within the autoexposure range, the camera will automatically change the manually selected setting to obtain the standard exposure. [Shutter speed/Aperture] applies to [Tv] or [Av] mode. [ISO speed] applies to [P], [Tv], or [Av] mode.
- OFF: Disable
- Tv/Av: Shutter speed/Aperture
- ISO: ISO speed
Note
- Safety shift overrides any changes to [ISO speed range] or [Min. shutter spd.] from default settings in [
 :
:  ISO speed settings] if standard exposure cannot be obtained.
 - The minimum and maximum limits for the safety shift with the ISO speed are determined by [Auto range] (). However, if the manually set ISO speed exceeds the [Auto range], the safety shift will take effect up or down to the manually set ISO speed.
- Safety shift will take effect as necessary even when flash is used.
Same expo. for new aperture
The maximum aperture value may decrease (the lowest f/number may increase) in [M] mode (manual exposure shooting) with ISO speed set manually (except when set to ISO Auto) if you (1) Change lenses, (2) Attach an extender, or (3) Use a zoom lens with a variable maximum aperture value. This function prevents the corresponding underexposure by adjusting ISO speed or shutter speed (Tv value) automatically to maintain the same exposure as before (1), (2), or (3).
With [ISO speed/Shutter speed], the ISO speed is automatically adjusted within the ISO speed range. If exposure cannot be maintained by adjusting ISO speed, shutter speed (Tv value) is automatically adjusted.
- OFF: Disable
- ISO: ISO speed
- ISO/Tv: ISO speed/Shutter speed
- Tv: Shutter speed
Caution
- Does not respond to changes in effective aperture value from changes in magnification when macro lenses are used.
- Cannot provide the same exposure as before (1), (2), or (3) if [ISO speed] is set and the exposure cannot be maintained at speeds in [ISO speed range].
- Cannot provide the same exposure as before (1), (2), or (3) if [Shutter speed] is set and the exposure cannot be maintained at speeds set in [
 : Set shutter speed range].
 - Shutter speed is limited to 1/8000 when [: Shutter mode] is [Electronic
 ] and [Same expo. for new aperture] is set to [Shutter speed] or [ISO speed/Shutter speed].
Note
- Also responds to changes in the highest f/number (minimum aperture).
- The original exposure setting is restored if you perform (1), (2), or (3) with [ISO speed], [ISO speed/Shutter speed], or [Shutter speed] set and do not adjust ISO speed, shutter speed, or aperture value before returning the camera to the original state, before (1), (2), or (3).
- Shutter speed may change to maintain exposure if the ISO speed increases to an expanded ISO speed when [ISO speed] is set.
AE lock meter. mode after focus
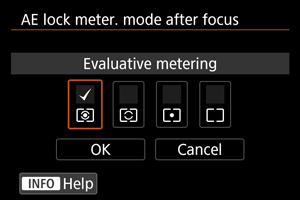
For each metering mode, you can specify whether to lock the exposure (AE lock) once subjects are in focus with One-Shot AF. The exposure will be locked while you keep pressing the shutter button halfway. Select metering modes for AE lock and add a checkmark [![]() ]. Select [OK] to register the setting.
]. Select [OK] to register the setting.
Set shutter speed range
You can set the shutter speed range for each [![]() : Shutter mode] option. In [Fv], [Tv], or [M] mode, you can set the shutter speed manually within your specified range. In [P] or [Av] mode, or in [Fv] mode with shutter speed set to [AUTO], the shutter speed is set automatically within your specified range (except for movie recording). Select [OK] to register the setting.
: Shutter mode] option. In [Fv], [Tv], or [M] mode, you can set the shutter speed manually within your specified range. In [P] or [Av] mode, or in [Fv] mode with shutter speed set to [AUTO], the shutter speed is set automatically within your specified range (except for movie recording). Select [OK] to register the setting.
-
Mech shutter/elec 1st-curtain
- Lowest speed: Can be set in a range of 30 sec.–1/4000 sec.
- Highest speed: Can be set in a range of 1/8000 sec.–15 sec.
-
Electronic
- Lowest speed: Can be set in a range of 30 sec.–1/16000 sec.
- Highest speed: Can be set in a range of 1/32000 sec.–15 sec.
Caution
- Setting [Highest speed] for [Electronic ] to 1/32000 sec. will not limit highest speeds faster than 1/8000 sec. in [P] or [Av] mode.
- This setting does not apply to high-frequency anti-flicker shooting.
Set aperture range
You can set the aperture value range. In [Fv], [Av], [M], or [BULB] mode, you can set the aperture value manually within your specified range. In [P] or [Tv] mode, or in [Fv] mode with the aperture value set to [AUTO], the aperture value is set automatically within your specified range. Select [OK] to register the setting.
-
Max. aperture
Can be set in a range of f/1.0–f/64.
-
Min. aperture
Can be set in a range of f/91–f/1.4.
Note
- The available aperture value range varies depending on the lens's minimum and maximum aperture value.
AE Microadjustment
Caution
- Normally, this adjustment is not required. Perform this adjustment only if necessary. Note that performing this adjustment may prevent you from obtaining suitable exposure.
You can fine-tune the standard exposure level. Effective if images in autoexposure shooting without exposure compensation usually seem underexposed or overexposed.
- OFF: Disable
-
ON: Enable
To access the adjustment screen, select [Enable], then press the
 button. Standard exposure can be adjusted in a range of ±1 stop, in 1/8-stop increments. Set on the positive side if shots tend to be underexposed and on the negative side if they tend to be overexposed.
Caution
- The effective exposure compensation range available in movie recording remains unchanged if you adjust standard exposure with AE Microadjustment, and only the standard exposure level is changed. An exposure compensation amount equivalent to the AE Microadjustment amount is not applied to resulting images if the effective exposure compensation range in movie recording is exceeded (for example, an exposure compensation amount of +1 stop is not applied if AE Microadjustment is set to +1 stop and exposure compensation to +3 stops).
Note
- Exposure compensation can be set up to ±3 stops from the adjusted standard exposure when shooting.
FE Microadjustment
Caution
- Normally, this adjustment is not required. Perform this adjustment only if necessary. Note that performing this adjustment may prevent you from obtaining suitable flash exposure.
You can fine-tune the standard flash exposure level. Effective if main subjects in autoflash shooting without flash exposure compensation usually seem underexposed or overexposed.
- OFF: Disable
-
ON: Enable
To access the adjustment screen, select [Enable], then press the
button. Standard flash exposure can be adjusted in a range of ±1 stop, in 1/8-stop increments. Set on the positive side if main subjects tend to be underexposed and on the negative side if they tend to be overexposed.
[Drive]
![]() Continuous shooting speed
Continuous shooting speed
You can set the continuous shooting speed for [![]() ] High-speed continuous shooting +, [
] High-speed continuous shooting +, [![]() ] High-speed continuous shooting, and [
] High-speed continuous shooting, and [![]() ] Low-speed continuous shooting. Select [OK] to register the setting.
] Low-speed continuous shooting. Select [OK] to register the setting.
-
High speed continuous +
Can be set in a range of 30–3 shots/sec.
-
High speed
Can be set in a range of 20–2 shots/sec.
-
Low speed
Can be set in a range of 15–1 shots/sec.
Caution
- Applies only when [: Shutter mode] is set to [Electronic ].
- Even if you set a continuous shooting speed, continuous shooting at the specified speed may not be possible under some shooting conditions. For precautions on continuous shooting, see Selecting the Drive Mode.
Limit continuous shot count
You can limit the maximum burst for continuous shooting, so that while you keep holding down the shutter button with continuous shooting set, the camera automatically stops shooting after the specified number of continuous shots.
You can set it from 99 to 2 exposures. Pressing the ![]() button returns the setting to [Disable].
button returns the setting to [Disable].
When [Disable] is set, continuous shooting can continue up to the maximum burst shown at right in the viewfinder.
[Various settings/Reset]
Add cropping information
Adding cropping information displays vertical lines for the aspect ratio specified in shooting, so that you can compose shots as if shooting with a medium- or large-format camera (6×6 cm, 4×5 inch, and so on).
When you shoot, instead of cropping images recorded to the card, the camera adds aspect ratio information to images for cropping in the Digital Photo Professional (EOS software).
You can import images to Digital Photo Professional on a computer and easily crop images to the aspect ratio set at the time of shooting.
- OFF: Disable
- 6:6: Aspect ratio 6:6
- 3:4: Aspect ratio 3:4
- 4:5: Aspect ratio 4:5
- 6:7: Aspect ratio 6:7
- 5:6: Aspect ratio 10:12
- 5:7: Aspect ratio 5:7
Caution
- Cropping information can only be added when [: Cropping/aspect ratio] is set to [Full-frame].
- JPEG or HEIF images are not saved at the cropped size if you use the camera to process RAW images with cropping information (). In this case, RAW processing produces JPEG or HEIF images with cropping information.
Note
- Vertical lines indicating your specified aspect ratio are displayed on the screen.
Default Erase option
You can set which option is selected by default in the erase menu (), which is accessed by pressing the ![]() button during image playback or during review after shooting.
button during image playback or during review after shooting.
By setting an option other than [Cancel], you can simply press ![]() to erase images quickly.
to erase images quickly.
 : [Cancel] selected
 : [Erase] selected
 : [Erase] selected
 : [Erase non-] selected
 : [Erase voice memo] selected
Caution
- Be careful not to erase images accidentally when an option other than [Cancel] is set.
Av setting without lens
You can specify whether the aperture value can still be set without a lens attached.
- OFF: Disable
-
ON: Enable
Aperture value can still be set without a lens attached. Convenient when you want to prepare for shooting and have already decided about the aperture value.
Release shutter w/o lens
You can specify whether shooting still photos or movies is possible without a lens attached.
- OFF: Disable
- ON: Enable
Retract lens on power off
You can set whether to retract gear-type STM lenses (such as RF35mm F1.8 Macro IS STM) automatically when the camera's power switch is set to ![]() .
.
- ON: Enable
- OFF: Disable
Caution
- With auto power off, the lens will not retract regardless of the setting.
- Before detaching the lens, make sure that it is retracted.
Note
- When [Enable] is set, this function takes effect regardless of the lens's focus mode switch setting (AF or MF).
Add IPTC information
Registering IPTC (International Press Telecommunications Council) information to the camera from software such as the EOS application EOS Utility enables you to record (embed) this information in JPEG/HEIF/RAW still photos at the time of shooting. This is helpful in file management and other tasks using the IPTC information.
For instructions on registering IPTC information to the camera and details on the information you can register, refer to the software instruction manual.
- OFF: Disable
- ON: Enable
Caution
- IPTC information is not added when you record movies.
Note
- During playback, you can check whether IPTC information was added.
- You can use Digital Photo Professional (EOS software) to check IPTC information in images.
- IPTC information registered to the camera is not erased if you select [: Clear all Custom Func. (C.Fn)] (), but the setting changes to [Disable].
Clear all Custom Func. (C.Fn)
Selecting [![]() : Clear all Custom Func. (C.Fn)] clears all Custom Functions settings.
: Clear all Custom Func. (C.Fn)] clears all Custom Functions settings.
Note
- Settings for [: AE Microadjustment] and [: FE Microadjustment] are set to [Disable] but not cleared when [: Clear all Custom Func. (C.Fn)] is performed. Note that although information added using [: Add IPTC information] is retained, the setting changes to [Disable].