Customizing AF Functions
- [Customize AF operation]
- [Customized controls]
- [MF related]
- [Various settings/Various settings]
- [Subject detection] (in movie recording)
- [Servo AF character.] (in movie recording)
You can configure AF functions in detail to suit your shooting style or subject.
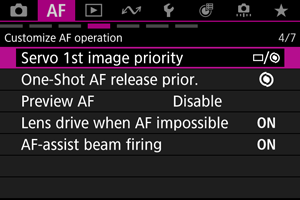
[Customize AF operation]
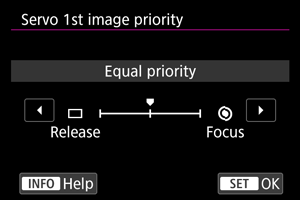
Servo 1st image priority
You can set AF operating characteristics and shutter-release timing for the first shot with Servo AF.
-
 : Equal priority
Equal priority is given to focusing and shutter-release timing.
-
 : Release
Pressing the shutter button takes the picture immediately even if focus has not been achieved. Useful when you want to give priority to capturing the decisive moment rather than achieving focus.
-
 : Focus
Pressing the shutter button does not take the picture until focus is achieved. Useful when you want to achieve focus before capturing the image.
Note
- The second and subsequent shots in continuous shooting prioritize the release timing.
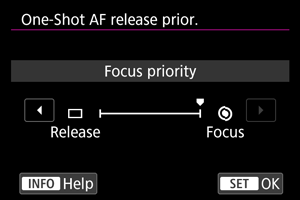
One-Shot AF release priority
You can specify whether to prioritize focus or release timing for One-Shot AF (except when shooting with Touch Shutter).
-
: Focus
The picture will not be taken until focus is achieved. Useful when you want to achieve focus before capturing the image.
-
: Release
Prioritizes shutter release over focus. Useful when capturing the decisive moment is most important.
Note that the camera shoots whether or not the subject is in focus.
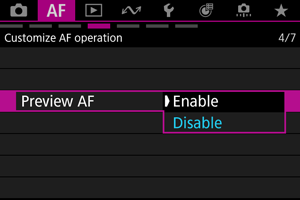
Preview AF
Keeps subjects generally in focus before you start shooting. When set to [Enable], the camera is ready to focus immediately after you press the shutter button halfway.
Caution
- Fewer shots are available when set to [Enable], because the lens is driven continuously and battery power is consumed.
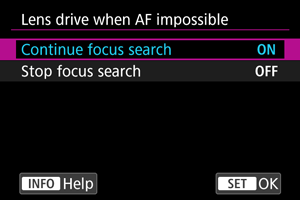
Lens operation when AF is not available
You can specify lens operation that applies when autofocusing on a subject is not possible.
-
ON: Continue focus search
If focus cannot be achieved with autofocus, the lens is driven to search for the precise focus.
-
OFF: Stop focus search
If autofocus starts and the focus is far off or if focus cannot be achieved, the lens drive will not be performed. This prevents the lens from becoming grossly out of focus due to the focus search drive.
Caution
- [Stop focus search] is recommended for super telephoto lenses or other lenses that are driven over a large focus area, to avoid significant delay from focus search drive if the lens becomes greatly out of focus.
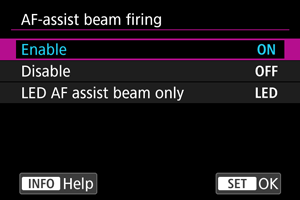
AF-assist beam firing
You can enable or disable AF-assist beam firing of the camera or a Speedlite for EOS cameras.
-
ON: Enable
Enables firing of the AF-assist beam, when needed.
-
OFF: Disable
Disables firing of the AF-assist beam. Set if you prefer not to fire the AF-assist beam.
-
LED: LED AF assist beam only
Enables LED AF-assist beam firing by Speedlites equipped with this feature, when these flash units are attached. If your Speedlite is not LED-equipped, the camera's AF-assist beam is fired instead.
Caution
- Speedlite AF-assist beam firing is disabled when the Speedlite's [
 : AF-assist beam firing] Custom Function is set to [Disable].
[Customized controls]
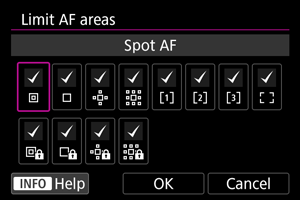
Limit AF areas
You can limit the AF areas available to the areas that you normally use. Select available AF areas and press ![]() to add a checkmark [
to add a checkmark [![]() ]. Select [OK] to register the setting. For details on AF areas, see AF Area.
]. Select [OK] to register the setting. For details on AF areas, see AF Area.
Caution
- The [
 ] mark cannot be cleared from all items at the same time.
Note
- An asterisk to the right of [: Limit AF areas] indicates that the default setting has been modified.
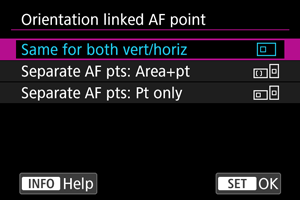
Orientation-linked AF points
You can set separate types of AF areas or positions of AF points for vertical and horizontal shooting.
-
 : Same for both vert/horiz
The same AF points or Zone AF frames in the same AF areas are used in both vertical and horizontal shooting.
-
 : Separate AF pts: Area+pt
Separate types of AF areas or separate AF points or Zone AF frames can be set for each camera orientation ((1) Horizontal, (2) Vertical with the camera grip up, (3) Vertical with the camera grip down ()).
Useful when switching to other types of AF areas or positions of AF points or Zone AF frames automatically based on camera orientation.
AF areas and AF points or Zone AF frames you assign to each of the three camera orientations are retained.
-
 : Separate AF pts: Pt only
Separate AF points or Zone AF frames can be set for each camera orientation ((1) Horizontal, (2) Vertical with the camera grip up, (3) Vertical with the camera grip down). Useful when switching to other positions of AF points or Zone AF frames automatically based on camera orientation.
Positions of AF points or Zone AF frames you assign to each of the three camera orientations are retained.
Limit subject to detect
You can limit the available setting options in [![]() : Subject to detect] to your preferred options. Select an option to exclude and press
: Subject to detect] to your preferred options. Select an option to exclude and press ![]() to clear [
to clear [![]() ]. Select [OK] to register the setting.
]. Select [OK] to register the setting.

Caution
- The [] mark cannot be cleared from all items at the same time.
Note
- An asterisk to the right of [: Limit subject to detect] indicates that the default setting has been modified.
Left/right eye detection
You can limit the available setting options in [![]() : Eye detection] to your preferred options. Select an option to exclude and press
: Eye detection] to your preferred options. Select an option to exclude and press ![]() to clear [
to clear [![]() ]. Select [OK] to register the setting.
]. Select [OK] to register the setting.
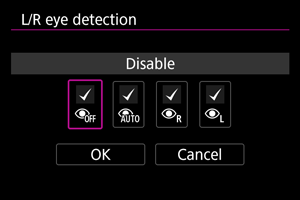
Caution
- The [] mark cannot be cleared from all items at the same time.
Note
- An asterisk to the right of [: L/R eye detection] indicates that the default setting has been modified.
[MF related]
Lens electronic MF
For attached lenses that support electronic manual focusing, you can specify the operation of manual focus adjustment.
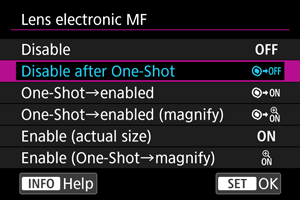
-
OFF: Disable
Manual focus adjustment is disabled when the lens's focus mode switch is set to
 .
. -
 : Disable after One-Shot
After One-Shot AF, manual focusing adjustment is disabled.
-
 : One-Shot→enabled
You can manually adjust the focus after the One-Shot AF if you keep holding down the shutter button halfway.
-
 : One-Shot→enabled (magnify)
You can manually adjust the focus after the One-Shot AF if you keep holding down the shutter button halfway. You can magnify the area in focus and adjust the focus manually by turning the lens focusing ring.
-
ON: Enable (actual size)
Manual focus adjustment is always available when the camera is on with certain lenses*1 attached.
With other lenses, operation is the same as [One-Shot→enabled].
-
 : Enable (One-Shot→magnify)
Manual focus adjustment is always available when the camera is on with certain lenses*1 attached.
Turning the lens focusing ring after One-Shot AF magnifies the area in focus.
With other lenses, operation is the same as [One-Shot→enabled].
1: For details on lenses compatible with this feature, check the Canon website ().
Caution
- With [One-Shot→enabled (magnify)], display may not be magnified even if you turn the lens focusing ring while pressing the shutter button halfway immediately after shooting. If so, you can magnify display by releasing the shutter button, waiting for [
 ] display, then pressing the shutter button halfway as you turn the lens focusing ring.
Note
- For details on your lens's manual focus specifications, refer to the Lens Instruction Manual.
[Various settings/Various settings]
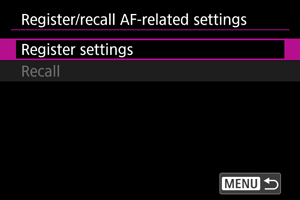
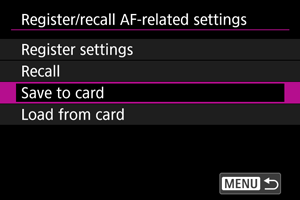
Register/recall AF-related settings
You can save current AF settings or apply saved settings all at once, and you can save or load sets of AF settings to or from a card. This also enables you to use settings that were saved from other cameras.
Caution
- Current camera settings are listed on the screen in step 4, which is used to register settings. The items listed on this screen cannot be changed.
-
The following [
] tab items are not available for this feature.- One-Shot AF release priority
- Preview AF
- AF-assist beam firing
- MF peaking settings
- Focus guide
Register
-
Select [Register settings].
-
Select a name for the settings.
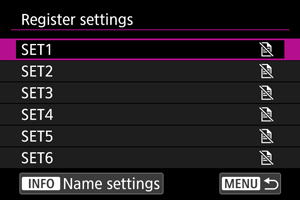
- [
 ] is displayed by names for which AF settings have not been registered yet.
 - To rename the settings, press the
 button.
- [
-
Select the AF settings to register.
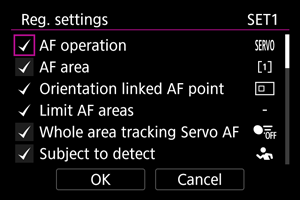
- All selected AF settings will be registered. To clear or reselect settings, turn the
 dial to select the setting, then press
  .
. - When you are finished choosing settings, select [OK].
- All selected AF settings will be registered. To clear or reselect settings, turn the
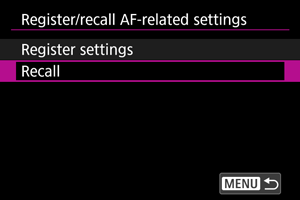
Recall
-
Select [Recall].
-
Select a name for the settings.
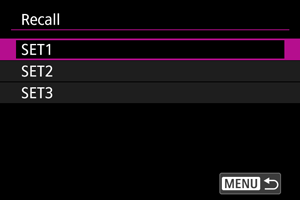
- Turn the dial to select a name, then press to confirm your selection.
- Turn the
-
Review the registered details and select [OK].
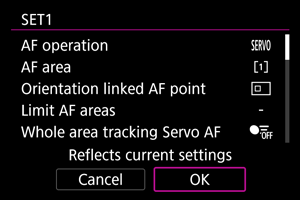
- You can use
 to scroll the screen when reviewing registered details.
- You can use
Save to card
-
Select [Save to card].
-
Select a settings file.
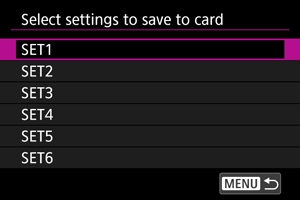
-
Select [OK].
- The settings are saved to the card.
- The settings file is saved to an area of the card shown when the card is opened (in the root directory).
Note
- Up to ten camera settings files can be saved on a card. If a card already has ten camera settings files, either overwrite existing files or use a different card.
Load from card
-
Select [Load from card].
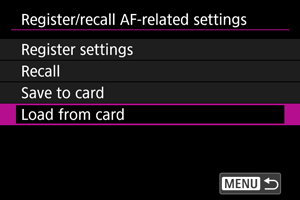
-
Select a settings file to load.
-
Select where to load the settings file to, then select [OK].
Caution
- Even if a computer or other device is used to save more than 10 settings files on a card, only 10 are displayed on the camera's screen for loading settings. When you have more than 10 settings files, divide them among multiple cards so that each card has no more than 10.
- Settings files saved by other camera models cannot be loaded.
- It may not be possible to load settings files that were saved by a camera with a different firmware version.
AF Setting Guide URL
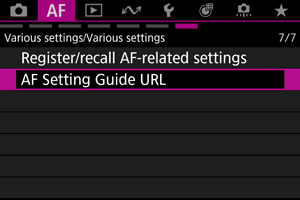
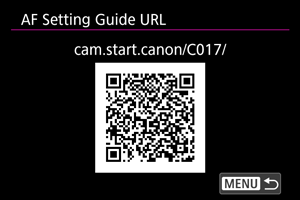
Select [![]() : AF Setting Guide URL] () to display the QR code. Scan the QR code with your smartphone to access the AF Setting Guide.
: AF Setting Guide URL] () to display the QR code. Scan the QR code with your smartphone to access the AF Setting Guide.
[Subject detection] (in movie recording)
Switching tracked subjects
You can set how easily the camera switches tracked subjects.
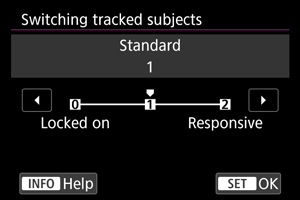
-
Standard
After determining the main subject from how your shot is composed, the camera tracks subjects or switches to others accordingly.
-
Locked on
Switches tracked subjects later than with [Standard].
-
Responsive
Switches tracked subjects sooner than with [Standard].
Caution
- Subjects selected by touch operations are tracked to the extent possible, regardless of the [: Switching tracked subjects] setting.
[Servo AF character.] (in movie recording)
AF for Close-up Demos
Setting [![]() : AF for close-up demos] to [On] enables the camera to focus on nearby subjects during recording. This is useful for demonstrations, product reviews, or similar situations.
: AF for close-up demos] to [On] enables the camera to focus on nearby subjects during recording. This is useful for demonstrations, product reviews, or similar situations.
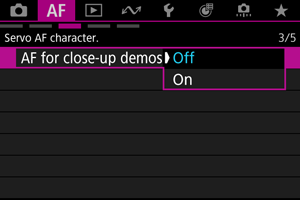
Caution
- Tracking frames are not displayed.
- Manual focusing is not available, even if you press the shutter button halfway or press the
 button.
 - Subjects cannot be selected manually.
Movie Servo AF speed
You can set the AF speed for Movie Servo AF. This function is enabled with [Movie Servo AF] in [![]() : Movie Servo AF] set to [Enable] when you are using lenses compatible with slow focus transition during movie recording.*
: Movie Servo AF] set to [Enable] when you are using lenses compatible with slow focus transition during movie recording.*
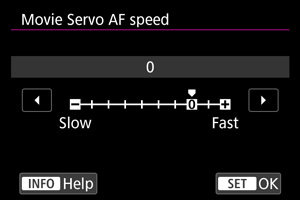
You can adjust the AF speed (focus transition speed) from the standard speed (0) to slow (one of seven levels) or fast (one of two levels) to obtain the desired effect for the movie creation.
* Lenses supporting slow focus transition during movie recording
USM and STM lenses released in and after 2009 are compatible. For details, refer to the Canon website ().
Caution
- With certain lenses, even if you adjust the AF speed, the speed may not change.
Note
- Operation when inactive is equivalent to when [AF speed] is set to [Standard (0)].
- An AF speed value to the right of [: Movie Servo AF speed] indicates that the default setting has been modified.
Movie Servo AF tracking sensitivity
You can adjust the tracking sensitivity (to one of seven levels), which affects responsiveness if the subject strays from the AF point during Movie Servo AF, as when interfering objects move across AF points or when you pan.
This function is available when [Movie Servo AF] in [![]() : Movie Servo AF] is set to [Enable].
: Movie Servo AF] is set to [Enable].
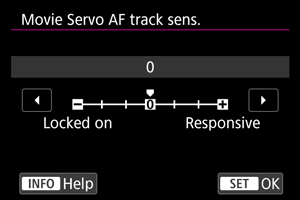
-
Locked on: –3/–2/–1
With this setting, the camera is less likely to track a different subject if the subject strays from the AF point. The closer the setting is to the minus (–) symbol, the less the camera is inclined to track a different subject. It is effective when you want to prevent the AF points from rapidly tracking something that is not the intended subject during panning or when an obstacle cuts across the AF points.
-
Responsive: +1/+2/+3
This makes the camera more responsive when tracking a subject that covers the AF point. The closer the setting is to the plus (+) symbol, the more responsive the camera is. It is effective when you want to keep tracking a moving subject as its distance from the camera changes or to rapidly focus on another subject.
Note
- Operation when inactive is equivalent to when set to [0].