Cropping JPEG/HEIF Images
You can crop a captured JPEG/HEIF image and save it as a new image. Cropping is available for JPEG or HEIF images. RAW images and frame-grab images from 4K or 8K movies cannot be cropped.
-
Select an image.
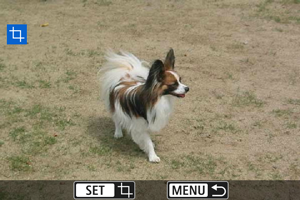
- Turn the
 dial to select the image to crop.
 - Press
 to display the cropping frame.
- Turn the
-
Set the cropping frame.

- The image area within the cropping frame will be cropped.
-
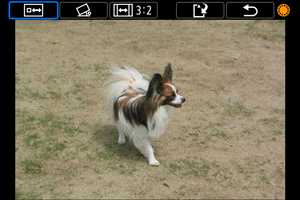
Resizing the cropping frame size
Turn the
 dial to resize the cropping frame size. The smaller the cropping frame, the more magnified the cropped image will look.
 -
Correcting tilt
You can correct image tilt by ±10°. Turn the
dial to select [ ], then press . While checking tilt relative to the grid, turn the dial (in 0.1° increments) or tap the left or right arrow (in 0.5° increments) in the upper left of the screen to correct tilt. After completing the tilt correction, press .
 -
Changing the cropping frame aspect ratio and orientation
Turn the
dial and select [ ]. Each press of changes the cropping frame aspect ratio and orientation.
 -
Moving the cropping frame
Use
 to move the cropping frame vertically or horizontally.
-
Check the image area to be cropped.
- Turn the dial to select [
 ], then press . The image area to crop is displayed.
- Turn the
-
Save.
- Turn the dial to select [
 ], then press .
 - Select [OK] to save the cropped image.
-
To upscale images that will be cropped, so that they will be saved at a higher resolution, press the
 button, then set [
 ] to [Enable] ().
- The current [] setting (enable/disable) is retained even after cropping, when you select other images. To change the setting, press the button again.
- The resulting image size after upscaling is shown to the right of [].
- Image processing may take some time.
- Shooting is not possible until processing is finished.
- The current [
- Check the destination folder and image file number, then select [OK].
- To crop another image, repeat steps 2 to 5.
- Turn the
Caution
- The position and size of the cropping frame may change depending on the angle set for tilt correction.
- Once a cropped image is saved, it cannot be cropped again or resized.
- AF point display information () and Dust Delete Data () will not be appended to the cropped images.
- Available aspect ratios vary depending on whether you use [
 : Cropping] or [
 : Add cropping information].