P: Program AE
The camera automatically sets the shutter speed and aperture value to suit the subject's brightness.
![]() stands for Program.
stands for Program.
AE stands for Auto Exposure.
-
Set the shooting mode to
 .
.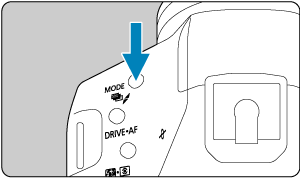

- Press the
 button and turn the
  or
or  dial to select .
- Press the
-
Focus on the subject.

- As you look through the viewfinder, aim the AF point over the subject, then press the shutter button halfway.
- After the camera focuses, the focus indicator
 in the lower right of the viewfinder lights up (in One-Shot AF mode).
 - The shutter speed and aperture value are set automatically and displayed in the viewfinder and on the top LCD panel.
-
Check the display.

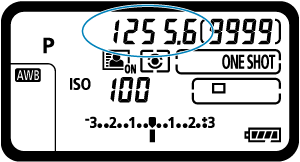
- Standard exposure is available unless the shutter speed and aperture value are blinking.
-
Take the picture.
- Compose the shot and press the shutter button completely.
Caution
-

-
If the “30"” shutter speed and the lowest aperture value blink, it indicates underexposure.
Increase the ISO speed or use flash.
-

-
If the “8000” shutter speed and the highest aperture value blink, it indicates overexposure.
Lower the ISO speed or use an ND filter (sold separately) to reduce the amount of light entering the lens.
Note
Program shift
- With Program AE, you can freely change the combination (program) of shutter speed and aperture value set by the camera while maintaining the same exposure. This is called Program shift.
- With Program shift, you can press the shutter button halfway, then turn the dial until the desired shutter speed or aperture value is displayed.
- Program shift will be canceled automatically when the metering timer (
 ) ends (exposure setting display turns off).
 - Program shift cannot be used with flash.
![]() Minimizing blurred photos
Minimizing blurred photos
- Effective options include Single Soft shooting () and mirror lockup ().
- Effective options for continuous shooting include Soft continuous shooting and Soft low speed continuous shooting ().
- Use a sturdy tripod that can bear the weight of the shooting equipment. Attach the camera securely to the tripod.
- Using a remote switch or similar accessory is recommended ().
![]() FAQ
FAQ
-
The focus indicator
blinks, and the camera cannot focus.Aim the Area AF frame over an area with good contrast, then press the shutter button halfway. If you are too close to the subject, move away and shoot again.
-
Multiple AF points are displayed simultaneously.
Focus has been achieved at all those points. It is fine to shoot, as long as at least one of the AF points is on the subject.
-
The focus indicator
does not light up.In this state, the camera focuses continuously with AI Servo AF, so the AF status indicator
 is displayed, but not the focus indicator .
Note that with AI Servo AF, shooting with the focus locked () is not possible.
-
Pressing the shutter button halfway does not focus on the subject.
If the lens focus mode switch is set to
 (manual focus), set it to
  (autofocus).
 -
The shutter speed and aperture value are blinking.
Since it is too dark, taking the picture may result in a blurred subject due to camera shake. Using a tripod or a Canon EL/EX series Speedlite (sold separately, ) is recommended.
-
The bottom of pictures taken with flash is unnaturally dark.
If a hood is attached to the lens, it may obstruct light from the flash. If the subject is close, detach the hood before taking the picture with flash.