Capture Window Functions
- Display details vary depending on the model and settings of the camera connected.
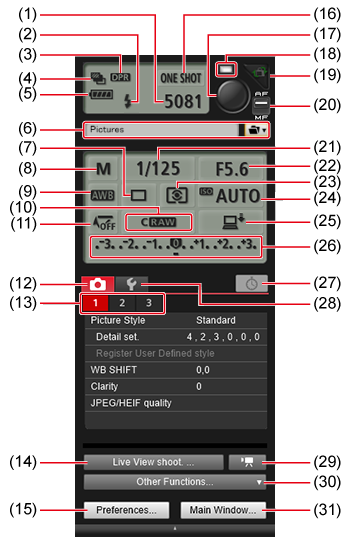
- (1) Available shots
- (2) Flash ready*1
- (3) Dual Pixel RAW shooting*2
- (4) Bracketing*3
- (5) Power status*4
- (6) Destination for captured images
- (7) Drive mode*5
- (8) Shooting mode*6
- (9) White balance
- (10) Image quality
- (11) Mirror lockup
- (12) Displays [Shooting menu] ()
- (13) Tabs 1–3
- (14) Displays the [Remote Live View window] (, )
- (15) Displays the [Preferences] window ()
- (16) AF mode
- (17) Shoot button*7 ()
- (18) Timer indicator*8
- (19) Rotates captured images*9
- (20) AF/MF switch*10
- (21) Shutter speed
- (22) Aperture value
- (23) Metering mode
- (24) ISO speed
- (25) Destination for captured images*11
- (26) Exposure/AEB level ()
- (27) Displays the [Timer shooting settings] window (, )
- (28) Displays [Set-up menu] ()
- (29) Displays the [Remote Live View window] (Movie)*12
() - (30) Displays the viewer window (, )
Shows/hides the [Quick Preview] window - (31) Displays the main window ()
- 1: Appears when the flash is charged and the cursor is over the Shoot button.
- 2: Displayed when shooting in Dual Pixel RAW.
- 3: The icon is displayed as [
 ] in HDR (High Dynamic Range) shooting on EOS 5Ds/5Ds R, 5D Mark IV, 5D Mark III, R3, R5, R5 C, R6, R/Ra, RP, 6D Mark II, 6D, 7D Mark II, 90D, or 80D,
in [HDR Backlight Control] shooting on EOS 6D, 90D, 80D, 77D, REBEL T6s/760D, REBEL T8i/850D, REBEL T7i/800D, REBEL SL2/200D, REBEL T6i/750D, M6 Mark II, M200, M50 Mark II, or M50,
and in shooting with Creative filter set to [HDR art standard], [HDR art vivid], [HDR art bold], or [HDR art embossed] on EOS 90D, 80D, M6 Mark II, M200, M50 Mark II, or M50.
The icon is displayed as [ ] when [Multi Shot Noise Reduction] is set on EOS 5Ds/5Ds R, 5D Mark IV, R3, R5, R5 C, R6, R/Ra, RP, 6D Mark II, 6D, 7D Mark II, 90D, 80D, 77D, REBEL T6s/760D, REBEL T8i/850D, REBEL T7i/800D, REBEL SL3/250D/200D II, REBEL SL2/200D, REBEL T6i/750D, M6 Mark II, M200, M50 Mark II, or M50.
 - 4: When the camera is on battery power, the remaining battery level is displayed.
- 5: [Custom high speed cont] can also be configured, depending on the connected camera.
- 6: You can set a Custom shooting mode.
- 7: Hover the cursor over the Shoot button to perform AF/AE when the AF/MF switch is set to [AF].
- 8: Green after successful shooting. Red if shooting fails or is not possible. Blinks during countdown in self-timer shooting.
- 9: Rotates the captured image 90 degrees each time the button is clicked. To make this function available, select [Rotate image] in the preferences (on the [Remote Shooting] tab; ).
- 10: Even when set to [MF], “AF” appears in shooting information for captured images.
- 11: You can choose where captured images will be saved. Note that in movie mode, captured movies are only saved to the camera's memory card.
- 12: Not displayed for EOS-1D X, 1D C, or R5 C.
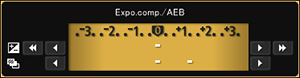
Exposure/AEB Level
- Clicking exposure/AEB level items changes display as follows.

- (1) 1 stop darker
- (2) Darkest exposure
- (3) Exposure level adjustment
- (4) AEB level setting
- (5) Setting range: 0
- (6) Narrow the setting range by 1 stop
- (7) 1 stop brighter
- (8) Brightest exposure
- (9) Maximum setting range
- (10) Widen the setting range by 1 stop
- (11) When the AEB bracketing setting exceeds the display area, [
 ]/[
]/[ ] icons are shown to indicate that there are bracketing indicators outside the scale.
-
Display appears as follows if [2 shots] is set for AEB shooting.
Note
- You can click to set the exposure level. If a value outside the maximum setting range is clicked, exposure is set to the nearest available value.