Settings Configured in the Capture Window
- Registering Picture Styles
- Configuring the Color Mode
- Configuring Clarity
- Configuring JPEG/HEIF Quality
- Correcting White Balance
- Configuring Cinema View
- Custom Pictures
- Configuring Silent Shutter
- Configuring the Shutter Mode
- HDR PQ Settings
- Anti-Flicker Shooting/HF Anti-Flicker Shooting
- AE for Priority Subjects During AF
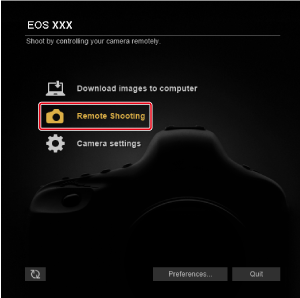
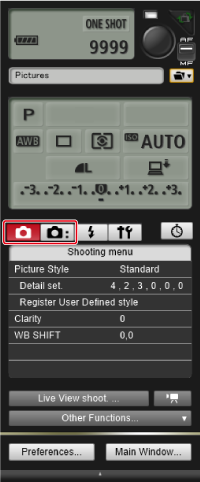
You can configure camera shooting menu functions from the capture window.
- Screen appearance and configurable functions vary depending on the camera connected.
- For details on available functions, refer to the instruction manual of the connected camera.
- Not available for EOS M6, M5, M3, M10, or M100.
Configurable functions
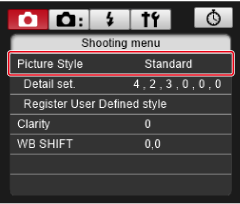
Registering Picture Styles
You can set a Picture Style in EU and register it on the camera.
In the user-defined settings on the camera, you can also register Picture Style files that you have downloaded from the Canon website or created with PSE and saved to your computer.
Selecting Picture Styles and registering them on the camera
-
Click [Picture Style].
-
Click the Picture Style to set on the camera.
Caution
- Camera Picture Style settings changed this way are not applied to movies recorded using Canon Log gamma.
- Registering Picture Styles may take some time.
- For the EOS R50 V, select an option in [Picture Style] in the [Color mode] setting.
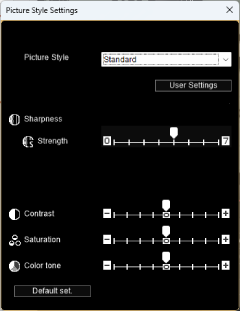
Editing Picture Styles and registering them on the camera
You can set Picture Style [Sharpness], [Contrast], [Saturation], and [Color tone] as you wish and apply your adjustments to the camera.
-
Click [Detail set.].
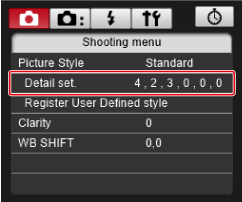
-
In the [Detail set.] dialog box, set by clicking level marks on the slider for each item.
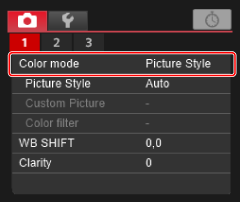
Configuring the Color Mode
You can set your preferred movie or still photo image characteristics from the Picture Style, Color Filter, or Custom Picture menu.
-
Click [Color mode] and select an option.
-
Click the option selected in [Color mode] and configure the setting details. (The following screen is shown for [Picture Style]).
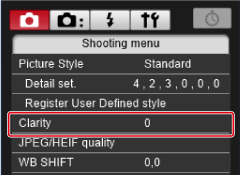
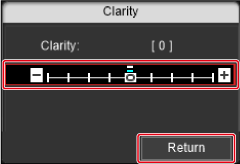
Configuring Clarity
Using this function, you can change the contrast at image edges.
-
Click [Clarity].
-
Configure the setting.
-
Select [Clarity] in the [Shooting menu], then set the level with the slider.
Click [Return] when finished to close the dialog box.
-
Configuring JPEG/HEIF Quality
You can set the image quality and apply it to the camera.
-
Click [JPEG Quality]/[JPEG/HEIF quality].
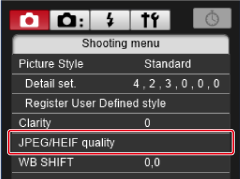
-
Configure the setting.
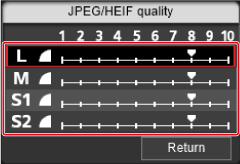
- At each any size, higher values reduce compression and offer higher image quality.
-
Click [Return].
Correcting White Balance
You can correct the white balance.
-
Click [WB SHIFT].
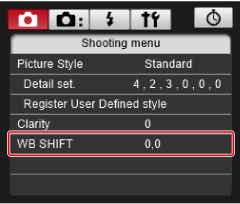
-
Click the position to shift the white balance to.
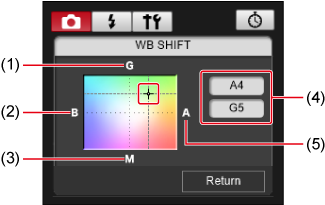
- Green bias
- Blue bias
- Magenta bias
- Indicates the amount of compensation
- Amber bias
-
Click [Return].
- To undo white balance correction, restore the original value in step 2.
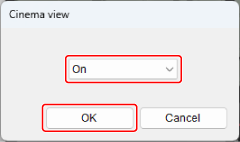
Configuring Cinema View
With this option set to [On], you can record movies with a cinematic angle of view and frame rate.
-
Click [Cinema view].
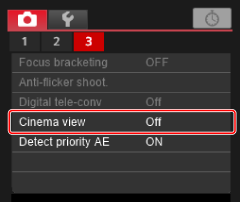
-
Select [On], then click [OK].
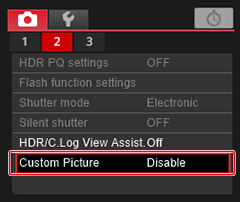
Custom Pictures
On cameras with custom picture files, you can adjust color tones in movie recording by applying a combination of settings (gamma/color space, color matrix, and look files) to record movies with your preferred image characteristics.
- For details on custom picture precautions and available functions, refer to the instruction manual of the connected camera.
-
Click [Custom Picture].
-
Complete the settings.
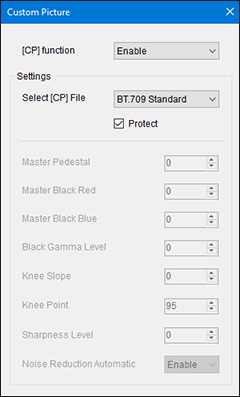
- Click [×] in the upper right to close the dialog box.
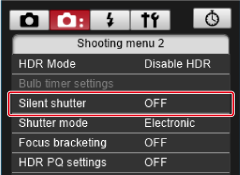
Configuring Silent Shutter
Silent shutter can be set in EU and applied to the camera. For details on silent shutter, such as the conditions when this feature is available, refer to the instruction manual of the connected camera.
-
Click [Silent shutter].
-
Select [Enable].
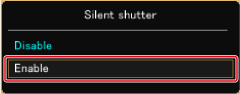
- To cancel silent shutter, select [Disable].
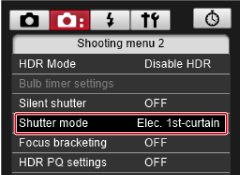
Configuring the Shutter Mode
You can set the shutter mode.
- Configurable functions vary depending on the camera connected.
- For details on precautions and available functions, refer to the instruction manual of the connected camera.
-
Click [Shutter mode].
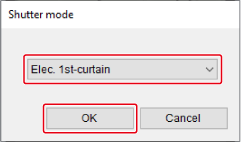
-
Configure settings as needed, then click [OK].
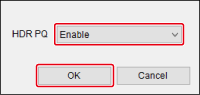
HDR PQ Settings
Shooting with HDR PQ settings produces HDR images conforming to the PQ specification defined in ITU-R BT.2100 and SMPTE ST.2084.
HDR stands for High Dynamic Range.
PQ stands for Perceptual Quantization.
- Shots are captured as HEIF or RAW images.
- Actual display depends on performance of the display device.
- Recording movies with HDR PQ settings is supported by some cameras.
- Configurable functions vary depending on the camera connected.
- For details on precautions and available functions, refer to the instruction manual of the connected camera.
HDR PQ Settings

Remote Live View Display
Windows
HDR environments
- In Windows 10, 10-bit HDR PQ display is used in the Remote Live View window in environments where the monitor is set to HDR display (HDR environments).
- [
 ] appears in the Remote Live View window in still photo shooting.
 - Note that with the EOS R6 Mark III or EOS C50, screen display corresponds to display in SDR environments.
SDR environments
- If the monitor in Windows 10 is not set to HDR display (SDR environments), display in the Remote Live View window is adjusted to resemble HDR PQ display in HDR environments. Note that color and gradation will seem somewhat different from HDR environments, because the range is narrower.
- [] and [
 /
/ ] or [
 ] appears in the Remote Live View window.
 - Click [
 ] when available in the Remote Live View window to switch between current display and View Assist display, as used on the camera at the time of shooting. Any View Assist option you switch to is also applied to the camera settings.
macOS
- Display in the Remote Live View window is adjusted to resemble HDR PQ display in HDR environments. Note that color and gradation will seem somewhat different from HDR environments, because the range is narrower.
- [] and [/] or [] appears in the Remote Live View window.
- Click [] when available in the Remote Live View window to switch between current display and View Assist display, as used on the camera at the time of shooting. Any View Assist option you switch to is also applied to the camera settings.
Caution
- Windows/macOS
- Images may not be displayed correctly depending on performance of the display device and GPU (video card).
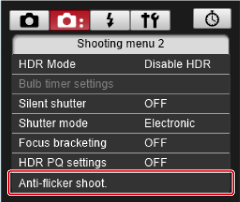
Anti-Flicker Shooting/HF Anti-Flicker Shooting
Anti-flicker shooting can reduce the effect of shooting under flickering light sources.
High-frequency anti-flicker shooting enables you to take pictures at suitable shutter speeds for high-frequency flickering, which minimizes the effect of this flickering on images.
- For details on anti-flicker and HF anti-flicker shooting precautions and available functions, refer to the instruction manual of the connected camera.
-
Click [Anti-flicker shoot.].
-
Complete the settings.
-
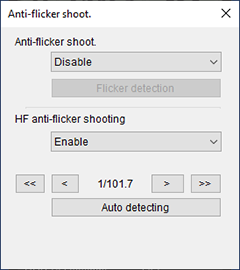
Anti-flicker shooting
- Set [Anti-flicker shoot.] to [Enable], then click [Flicker detection]. [Flicker detection Detected] is displayed if flicker is detected. If flicker is not detected, [Flicker detection Not detected] is displayed.
- Click [
 ] in the upper right to close the dialog box.
-
High-frequency anti-flicker shooting (EOS R1, EOS R3, EOS R5 Mark II, EOS R6 Mark III, EOS R6 V, EOS R6 Mark II, EOS R8, EOS C50)
- Set [HF anti-flicker shooting] to [Enable], then click [Auto detecting].
-
Click [OK] on the following screen to set the recommended shutter speed.
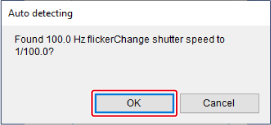
- If banding is still visible in the Live View window, click [
 ] or [
 ] to adjust the shutter speed.
 - Click [] in the upper right to close the dialog box.
-
AE for Priority Subjects During AF
Performs metering for subjects detected based on [AF: Subject to detect] as set on the camera.
-
Click [Detect priority AE].
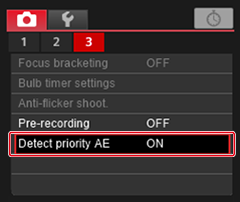
-
Select [Enable] or [Disable], then click [OK].