RAW Movie Playback, Editing, and Frame-Grabbing
- Changing Movie Thumbnails
- Grabbing the Current Frame
- Saving Multiple Still Photos
- Starting the RAW Movie Tool
- Playback
- Saving a Range of Still Photos
- Grabbing a Segment of Video
- Editing
You can work with RAW movies either as movies or as still photos in this version of DPP.
For details and precautions on RAW movies, refer to the instruction manual of cameras with this feature.
Caution
- RAW movies recorded with Canon Log or Canon Log 3 that you work with as still photos are processed with these versions of Canon Log deactivated.
Changing Movie Thumbnails
You can change RAW movie thumbnails to any frame in the file.
In DPP, RAW movie files can be edited, saved, printed, and so on as if they were individual RAW images.
-
Select a RAW movie file.
- Thumbnail icon: [
 ]
]
- Thumbnail icon: [
-
Display the Settings tool palette.
-
Select the frame in [RAW movie frame selection].
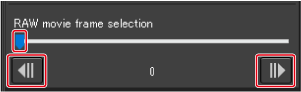
- After you select a frame with the slider or [
 ]/[
]/[ ], the thumbnail is updated.
- After you select a frame with the slider or [
Grabbing the Current Frame
You can grab and save the current RAW movie frame.
-
Select a RAW movie file.
- Thumbnail icon: []
- The thumbnail can be changed as described in Changing Movie Thumbnails.
- Thumbnail icon: [
-
Select [Grab current frame from RAW movie and save] in the [File] menu, then click [OK] in the dialog box.
-
Complete the settings as needed, then click [Save].
- Images can only be saved in CRM format.
Caution
- Newly saved files do not retain image editing details from the original movie files.
Saving Multiple Still Photos
You can save several still photos from a RAW movie file.
-
Select a RAW movie file.
- Thumbnail icon: []
- Thumbnail icon: [
-
Select [Save still image from RAW movie] in the [File] menu.
-
Complete the settings as needed.
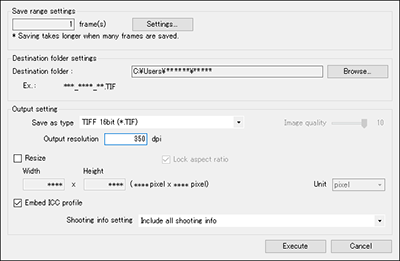
[Save Still Image from RAW Movie] dialog box
-
[Save range settings]: Set the range of frames to save. The default setting is only one frame, the current frame. To configure, click [Settings] and set the range in the [Save Settings] dialog box.
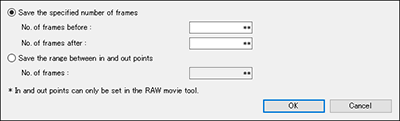
[Save Settings] dialog box
-
[Save the specified number of frames]: Set the number of frames to save.
[No. of frames before] indicates the number of frames before the current image (selected frame) to save.
[No. of frames after] indicates the number of frames after the current image (selected frame) to save.
The maximum in each setting is 10 frames.
- [Save the range between in and out points]: All frames in the range selected in the RAW movie tool are saved as still photos.
-
Click [OK] after the settings are configured.
- The [Save Settings] dialog box closes.
-
- [Destination folder settings]: Set the destination folder where still photos will be saved.
- [Output setting]: Complete settings for still photo output.
-
-
Save the files.
- Click [Execute] to create a folder in the destination folder with the same name as the movie file and save still photos based on the settings completed in step 3.
Caution
- Depending on your computing environment and the number of frames saved, saving may take some time.
Starting the RAW Movie Tool
Using the RAW movie tool, you can play and edit RAW movie files.
Caution
-
The RAW movie tool is not available in macOS 26 or later.
-
The following environment is recommended for the RAW movie tool.
Minimum system requirements for the tool are also noted below.
-
Windows
-
Recommended environment
- • CPU: Intel Xeon CPU E5-2687W v3 3.1 GHz x 2 or better
(max. 3.5 GHz with Turbo Boost) - • GPU: Nvidia GeForce RTX 2080
- • RAM: 32 GB or more
- • Storage: SSD with read speeds of 400 MB/s or faster
- • CPU: Intel Xeon CPU E5-2687W v3 3.1 GHz x 2 or better
-
Minimum environment
- • CPU: Intel Core i series or later
- • GPU: Compatible with NVIDIA CUDA (Compute Capability 5.0 or higher)
- • RAM: 4GB or more
- • VRAM: 4 GB or more (8 GB or more for images that are 6960×3672 or larger)
The RAW movie tool cannot run in non-Nvidia (AMD or Intel GPU) environments.
-
-
macOS
-
Recommended environment
- • CPU: iMac Pro 2.5 GHz 14-core Intel Xeon W-2170B or better
- • GPU: Radeon Pro Vega 64 (16 GB HBM2 memory)
- • RAM: 32 GB or more
- • Storage: SSD with read speeds of 400 MB/s or faster
or
- • CPU: Apple M1 Ultra or better
- • RAM: 64 GB or more
- • Storage: SSD with read speeds of 400 MB/s or faster
-
Minimum environment
- • CPU: Intel Core i series or better
- • GPU: AMD GPU
- • RAM: 4GB or more
- • VRAM: 4 GB or more (8 GB or more for images that are 6960×3672 or larger)
or
- • CPU: Apple M1 or better
- • RAM: 16 GB or more
Ensure that the latest display driver is installed before use.
-
-
-
Select a RAW movie file.
- Thumbnail icon: []
- Thumbnail icon: [
-
Select [Start RAW Movie Tool] in the [Tools] menu.

- To exit, click [Close].
Functions
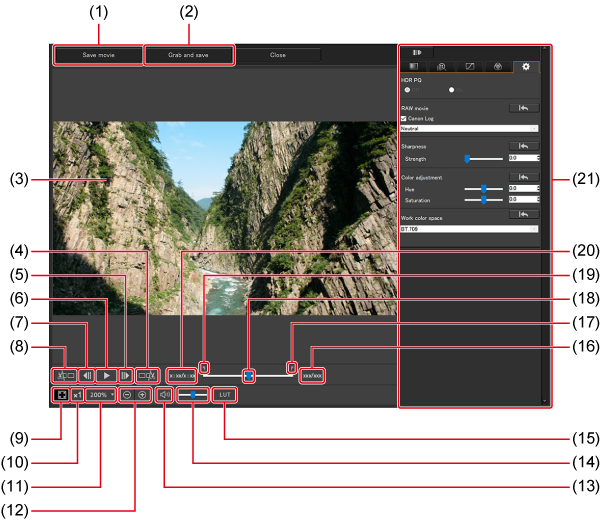
- (1) [Save movie] ()
- (2) [Grab and save] ()
- (3) Frame display area
- (4) Set last frame for saving ()
- (5) Next frame ()
- (6) Play/pause ()
- (7) Previous frame ()
- (8) Set start frame for saving ()
- (9) Fit frame display to window ()
- (10) Display frame at actual size ()
- (11) Set frame magnification ()
- (12) Reduce/enlarge the frame ()
Playback
The RAW movie tool can be used to play RAW movie files.
-
Select a RAW movie file.
- Start the RAW movie tool as described in Starting the RAW Movie Tool.
-
Control movie playback.
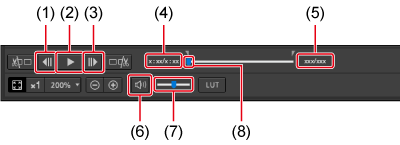
- (1) Previous frame
- (2) Play/pause
- (3) Next frame
- (4) Playback time indicator
- (5) Frame no./Total frames
- (6) Mute/unmute
- (7) Volume slider
- (8) Frame position slider
- Play/pause: Play or pause the selected movie.
- Next frame: Move forward one frame. When movies are paused, you can advance one frame at a time.
- Previous frame: Move back one frame. When movies are paused, you can rewind one frame at a time.
- Playback time indicator: Shows the playback time.
- Frame position slider: Drag the slider left or right to move the playback position while movies are playing or paused.
- Frame no./Total frames: Shows the current frame number in the movie playing or displayed and the total number of frames.
Note
-
RAW movies recorded as follows are displayed in the BT.709 color space.
- Canon Log (BT.2020 color space)
- Canon Log 3 (BT.2020/Cinema Gamut color space)
- Adjustment using this tool's tool palettes for RAW movies is not possible during RAW movie playback.
- You cannot use [
 ] to apply a viewing LUT during RAW movie playback.
Saving a Range of Still Photos
You can save a range of still photos from a RAW movie file.
-
Select a RAW movie file.
- Start the RAW movie tool as described in Starting the RAW Movie Tool.
-
Set the first frame.

- Use the slider or [
 ]/[
]/[ ] to show the frame to set as the first frame in the frame display area, then click [
 ].
]. - The in-point marker (
 ) moves, and the first frame in the movie is set.
- Use the slider or [
-
Set the last frame.

- Use the slider or []/[] to show the frame to set as the last frame in the frame display area, then click [
 ].
]. - The out-point marker (
 ) moves, and the last frame in the movie is set.
- Use the slider or [
-
Save the files.
- Click [Save movie], then complete the required settings and save the files.
- The range is saved in the destination folder, in a new folder with the same name as the movie file.
-
Files are saved as sequentially numbered JPG, TIFF, or DPX* still photos and WAV audio files.
Note the following about [Save as type] options.
- RAW movies recorded with [HDR PQ] set to [On]: Only DPX is available.
- RAW movies recorded using Canon Log 3 (BT.2020/Cinema Gamut color space): Only DPX
- When Canon Log (color space: BT.2020) is set for the RAW movie : Only DPX is selectable.
-
RAW movies recorded using Canon Log or Canon Log 3 (BT.709 color space): Only 16-bit TIFF format
Selecting DPX will prevent you from setting [Image quality], [Output resolution], [Embed ICC profile], or [Shooting info setting].
Files saved in DPX format cannot be viewed in DPP.
DPX: Digital Picture Exchange
- No WAV audio file is produced unless the movie was recorded with audio by the camera.
Grabbing a Segment of Video
You can grab a segment from a RAW movie file.
-
Specify the segment as described in steps 1–3 of Saving a Range of Still Photos.
-
Click [Grab and save].
-
Complete the settings as needed, then click [Save].
- Images can only be saved in CRM format.
Caution
- Newly saved files do not retain image editing details from the original movie files.
Editing
Using this tool's tool palettes for RAW movies, you can edit RAW movie files.
-
Select a RAW movie file.
- Start the RAW movie tool as described in Starting the RAW Movie Tool.
-
Edit as needed.
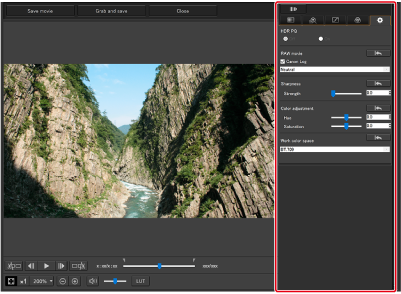
- Edit by using the tool palettes for RAW movies.
-
Tool palettes for RAW movies are essentially the same as the main tool palettes (), except for the Settings tool palette.
For details, see the tool palette instructions.
Also note the following differences.
- The following tool palettes are not available for RAW movies: Cropping/Angle Adjustment, Dust Delete/Copy Stamp, Partial Adjustment, Settings.
-
Adjustment using the Settings tool palette
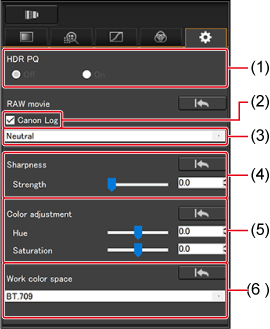
- HDR PQ setting
- Canon Log/Canon Log 3
- Color matrix selection
- Sharpness setting
- Color adjustment
- Selected working color space
- HDR PQ: HDR PQ is available. Setting this option to [On] in Windows enables HDR PQ playback of RAW movie files selected in the RAW movie tool. Display in non-HDR PQ environments involves SDR conversion based on the [HDR assist display (movies)] () setting in [Preferences]. In macOS, playback in the RAW movie tool also involves SDR conversion based on the [HDR assist display (movies)] () setting in [Preferences].
- Canon Log/Canon Log 3: When selected, color matrix selection, sharpness configuration, and color adjustment is possible with this tool palette. Only for movies from compatible cameras with RAW movie recording and Canon Log/Canon Log 3 set to On.
- Color matrix selection: Automatically set to Neutral for Canon Log 3. For Canon Log, choose EOS Original or Neutral.
- Sharpness setting: Set the sharpness.
- Color adjustment: Set the hue and saturation.
- Work color space: Selecting [Canon Log] or [Canon Log 3] gives you the option of choosing BT.709 or BT.2020 as the working color space, with Cinema Gamut also available for Canon Log 3. Note that BT.2020 display is not available in DPP, even if you choose BT.2020 or Cinema Gamut.
- Viewing LUT: Click [] in the RAW movie tool to apply a look-up table (LUT). This enables movie display resembling normal display.
Caution
- Display of images not compatible with [HDR assist display (movies)] involves SDR conversion that simulates how the images would look on an HDR display device.
-
Canon Log or Canon Log3 adjustments are not available for RAW movies from the following cameras.
- EOS R1, EOS R5 Mark II, EOS R6 Mark III, EOS R6 V, EOS C50
-
Save the movie.
- Click [Save movie], then complete the required settings and save the file.
-
Files are saved as sequentially numbered JPG, TIFF, or DPX* still photos and WAV audio files.
[Save as type] options are as follows.
- RAW movies recorded with [HDR PQ] set to [On]: Only DPX
- RAW movies recorded using Canon Log 3 (BT.2020/Cinema Gamut color space): Only DPX
- RAW movies recorded using Canon Log (BT.2020 color space): Only DPX
-
RAW movies recorded using Canon Log or Canon Log 3 (BT.709 color space): Only 16-bit TIFF format
Selecting DPX will prevent you from setting [Image quality], [Output resolution], [Embed ICC profile], or [Shooting info setting].
Files saved in DPX format cannot be viewed in DPP.
DPX: Digital Picture Exchange
- No WAV file is produced unless the movie was recorded with audio by the camera.
- To exit, click [Close].
Caution
- After this editing, settings cannot be restored to the states in [Revert to shot settings] or [Revert to last saved settings] in the [Adjustment] tab in the menu.
- RAW movies with [HDR PQ] set to [On] are converted and displayed in SDR. A [
 ] is displayed.
 -
Display involves SDR conversion in non-HDR PQ Windows environments.
In macOS, playback is in SDR based on the [HDR assist display (movies)] () setting in [Preferences].