Multi-Layout
Multi-Layout Display
By switching the main window to a multi-layout, you can use the preview control panel to check images in detail.
In the main window, click one of the buttons to change the layout (A).
- To view part of the image at full size, showing the actual pixels, click that area on the preview. Click again to show the entire image.
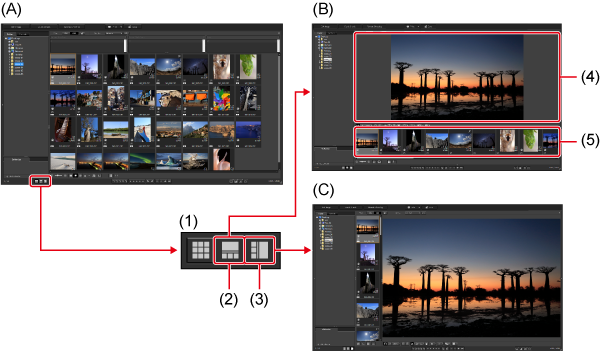
- (1) Layout-switching buttons
- (2) Horizontal thumbnails
- (3) Vertical thumbnails
- (4) Preview display area
- (5) Thumbnail display area
Using the preview control panel
With the preview control panel, you can check images in detail. Note that different control panel functions are shown when movies are selected. For details, see Movie Playback and Frame-Grabbing.
Note
- To display the preview control panel if it is not shown, select [Preview control panel] in the [Preview] menu.
Changing the magnification

- Show the entire image
- Full-size display, showing the actual pixels
- Display at the magnification set by clicking [
 ]
] - Magnify or reduce image display
Comparison with a pinned image
Pinning an image to the left side makes it easier to browse other images on the right when comparing images.

-
Select an image and click [
 ].
].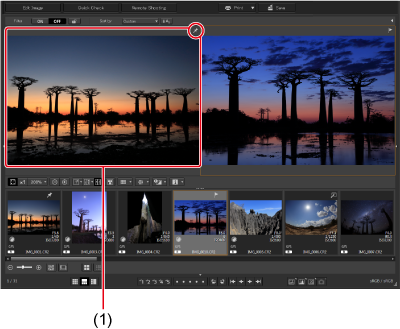
- The windows are horizontally tiled, with the selected image pinned.
- Browsing with an image pinned keeps the image pinned at left (1) while the image at right changes, which is convenient when selecting images.
- To pin a different image, right-click the image and select [Pin].
- After an image is pinned, you can switch between horizontal and vertical tiling by clicking [].
Displaying multiple images at the same time

-
Select multiple images, then click [
 ].
].- Up to eight images can be displayed this way.
Displaying grid lines

-
Click [
] next to [ ], and then set the spacing between grid lines.
- To set the spacing, enter values or move the slider.
- Click [Close] after the setting is configured.
-
Select an image, then click [
].
Displaying AF points

-
Next to [
 ], click [] and select a display option.
- Select [Show only AF points in focus] or [Show all AF points].
-
Select an image, then click [
].
Caution
- AF points are not displayed for these images:
- Images saved after resizing and conversion to another format
- Images for which fish-eye lens distortion correction was set to an effect other than [Shot settings]
- Images for which in-camera RAW image processing was set to distortion correction or chromatic aberration correction
- Multiple-exposure images
- HDR images
Highlight/shadow warning display for areas beyond threshold values
Image areas beyond your specified thresholds are displayed in red in image highlights and blue in shadows, which helps you check for clipped highlights or shadows and prevent excessive adjustment.

-
Next to [
 ], click [] and configure the settings in the dialog box displayed.
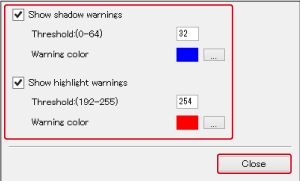
- Select [Show highlight warnings] and [Show shadow warnings], then enter the warning threshold values.
To choose different warning colors, click [ ] (in Windows) or the [Warning color] boxes (in macOS).
 - Click [Close] after the setting is configured, then close the dialog box.
- Select [Show highlight warnings] and [Show shadow warnings], then enter the warning threshold values.
-
Select an image, then click [
].- Any image areas that exceed your threshold values entered in step 1 are displayed in red in image highlights and blue in shadows. Your custom warning colors are used, if applicable.
Comparing images before and after adjusting: Single-thumbnail display

-
Select an image you are adjusting, then click [
 ] repeatedly for comparison.
- Each click of the [] button switches display between the current, edited image and the original, unedited image.
- Each click of the [
Comparing images before and after adjusting: Tiled/split display
By displaying the original image next to the version you are adjusting, you can check the results of adjusting.

-
Select an image you are adjusting, then click [
 ].
].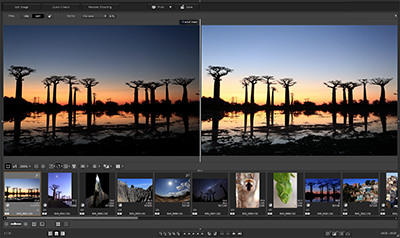
- The original image is shown at left, with the adjusted image at right.
-
Switch how images are displayed, as needed.
- Click [] repeatedly to cycle through image display options as follows. Arrange horizontally (left/right) → Arrange vertically (top/bottom) → Split vertically (left/right) → Split horizontally (top/bottom)
- Click [
Displaying image properties
Image properties indicate shooting and recipe information.

-
Click [
] next to [ ].
]. -
Configure properties display.

- Select [Display settings for preview properties] from the [Properties to display] pull-down menu.
-
Use the [Add >>] and [<< Remove] buttons to specify items to display. Available items are listed at left, with the current items listed at right. You can also change the display order, by clicking [Move Up] or [Move Down].
Click [OK] after the setting is configured.
- With the [Preview properties font] option, you can specify the font used for information displayed in the preview window.
-
Select an image, then click [
].- Recipe details are shown in red for images you are adjusting with a before/after comparison (tiled/split display) if they are affected by your adjusting.
Note
- Not all property details may be shown, depending on the combination of window, preview window, and thumbnail size.