Tool Palettes
- Basic Adjustment Tool Palette
- Tone Adjustment Tool Palette
- Color Adjustment Tool Palette
- Detailed Adjustment Tool Palette
- Cropping/Angle Adjustment Tool Palette
- Lens Correction Tool Palette
- Partial Adjustment Tool Palette
- Dust Delete/Copy Stamp Tool Palette
- Settings Tool Palette
You can switch between a variety of tool palettes in DPP as needed in editing.
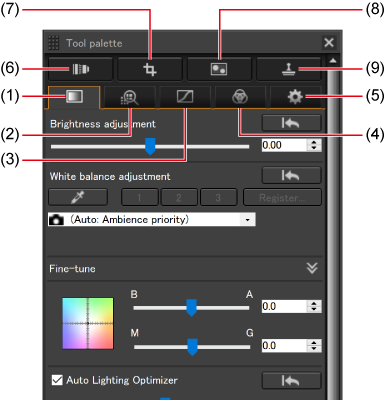
- (1) Basic Adjustment tool palette
- (2) Detailed Adjustment tool palette
- (3) Tone Adjustment tool palette
- (4) Color Adjustment tool palette
- (5) Settings tool palette
- (6) Lens Correction tool palette
- (7) Cropping/Angle Adjustment tool palette
- (8) Partial Adjustment tool palette
- (9) Dust Delete/Copy Stamp tool palette
-
Basic Adjustment tool palette
-
Tone Adjustment tool palette
Adjusts the tone curve and applies Auto Lighting Optimizer ().
-
Color Adjustment tool palette
Adjusts image hue, saturation, and luminance in the specified gamut. The hue and saturation for an entire image can also be adjusted ().
-
Detailed Adjustment tool palette
-
Cropping/Angle Adjustment tool palette
-
Lens Correction tool palette
Corrects lens aberration in the image () and applies Digital Lens Optimizer ().
-
Partial Adjustment tool palette
-
Dust Delete/Copy Stamp tool palette
Erases dust and corrects by copying pixels from one image area to another ().
-
Settings tool palette
Note
- For RAW image editing, the Basic Adjustment tool palette is often sufficient.
- If initial editing with the Basic Adjustment tool palette is not sufficient, or if you wish to use features of the Tone Adjustment tool palette (), consider keeping any adjustments with the Tone Adjustment tool palette to a minimum.
- For noise reduction () and lens aberration correction (), edit with the Basic Adjustment and Tone Adjustment tool palettes before using the Detailed Adjustment () and Lens Correction () tool palettes.
- To show or hide [Tool palette], click [
 ] in the lower right of the main window.
Basic Adjustment Tool Palette
- Adjusting brightness
- Switching picture styles
- Using picture style files
- Adjusting color tone by changing white balance
- Adjusting color tone by click white balance
- Adjusting white balance by setting a color temperature
- Fine-tuning white balance
- Adjusting contrast
- Adjusting brightness of shadows/highlights
- Adjusting color tone and saturation
- Adjusting dynamic range
- Automatic gradation and luminance adjustment
- Using Auto Lighting Optimizer
- Adjusting face lighting
- Adjusting image sharpness
- Adjusting clarity
The Basic Adjustment tool palette enables basic RAW image editing.
Note that for JPEG or TIFF images, you can only apply Auto Lighting Optimizer or adjust image sharpness.
Adjusting brightness
Image brightness can be adjusted. Drag the slider right to brighten images and left to darken them.
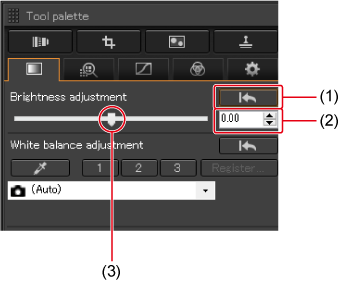
- Undo
- Enter a setting value (in hundredths of a unit)
- Drag left or right
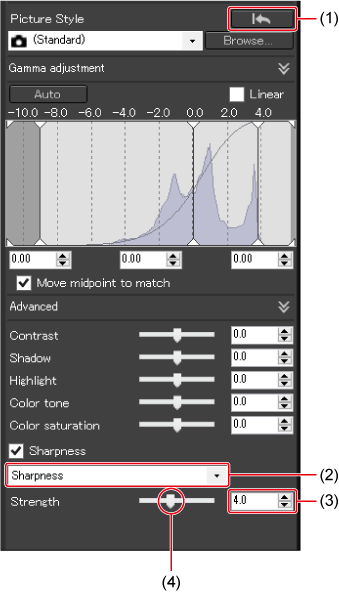
Switching picture styles
By switching Picture Styles, you can give images a different look and feel. Select a Picture Style option listed in (2). To undo this change, click (1). Images you change to monochrome can be changed back to color by selecting a different Picture Style.
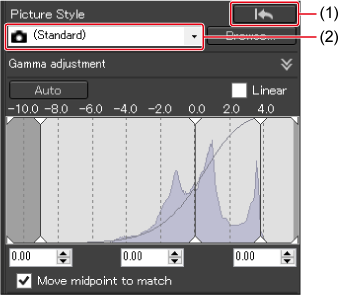
- Undo
- Select
Note
- You can retain [Color tone], [Color saturation], [Contrast], [Unsharp mask], and [Sharpness] settings even when switching Picture Styles.
-
[Auto] is not available for images from the following cameras.
- EOS-1D Mark IV, EOS-1Ds Mark III, EOS-1D Mark III, EOS-1D Mark II N, EOS-1Ds Mark II, EOS-1D Mark II, EOS-1D, EOS-1Ds, EOS 5D Mark II, EOS 5D, EOS 7D, EOS 60D/EOS 60Da, EOS 50D, EOS 40D, EOS 30D, EOS 20D/EOS 20Da, EOS 10D, EOS D2000, EOS D6000, EOS D30, EOS D60, EOS REBEL T2i/550D, EOS REBEL T1i/500D, EOS DIGITAL REBEL XSi/450D, EOS DIGITAL REBEL XS/1000D, EOS REBEL T3/1100D, EOS DIGITAL REBEL XTi/400D, EOS DIGITAL REBEL XT/350D, and EOS DIGITAL REBEL/300D
- PowerShot G3 X, PowerShot G1 X Mark II, PowerShot G7 X, PowerShot G9 X, PowerShot SX60 HS, PowerShot G5 X, PowerShot G16, PowerShot S120, PowerShot G1 X, PowerShot G15, PowerShot S110, PowerShot S100, PowerShot G9, PowerShot G10, PowerShot G11, PowerShot G12, PowerShot S90, PowerShot S95, PowerShot SX1 IS, PowerShot SX50 HS, and PowerShot SX70 HS
-
[Fine Detail] is not available for images from the following cameras.
- PowerShot G3 X, PowerShot G1 X Mark II, PowerShot G7 X, PowerShot G9 X, PowerShot SX60 HS, PowerShot G5 X, PowerShot G16, PowerShot S120, PowerShot G1 X, PowerShot G15, PowerShot S110, PowerShot S100, PowerShot G9, PowerShot G10, PowerShot G11, PowerShot G12, PowerShot S90, PowerShot S95, PowerShot SX1 IS, and PowerShot SX50 HS
- [Auto] is not available for multiple-exposure RAW images created on the camera.
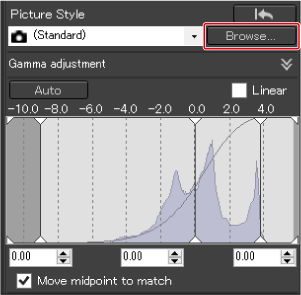
Using picture style files
In RAW image editing with DPP, you can apply Picture Style files downloaded from the Canon website or created with Picture Style Editor.
-
Click [Browse] on the [Picture Style] panel.
-
Select a Picture Style file saved on your computer, then click [Open].
- To apply a different Picture Style file, repeat step 2.
Note
- Supported Picture Style files have a .PF2 or .PF3 file extension.
Adjusting color tone by changing white balance
By changing the white balance, you can make image colors look more natural.
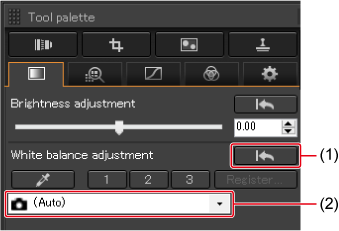
- Undo
- Select
-
The white balance set on the camera at the time of shooting is indicated in parentheses after the camera icon (
 ).
).- The camera white balance in Creative Zone modes is shown in parentheses.
- [Shot settings] is shown in parentheses if the camera was in a Basic Zone mode, and image characteristics for the selected shooting mode are applied.
- For white balance details, refer to the camera instruction manual.
Caution
Note
- If image colors still do not look natural after you change the white balance, try editing it by click white balance ().
- To fine-tune colors after adjusting the white balance, you can use [Color tone] ().
- For more in-depth white balance information, refer to the instruction manual of the camera used.
Adjusting color tone by click white balance
For more natural-looking images, you can adjust white balance by sampling an image area as the basis of white. This is effective when you sample image areas where the color tone of white has been altered by the light source.
-
Click [
 ] (1).
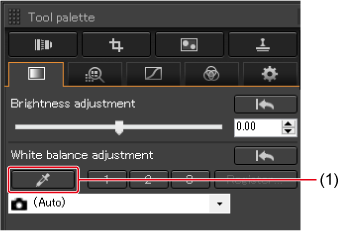
-
Click an area that will be the basis of white.
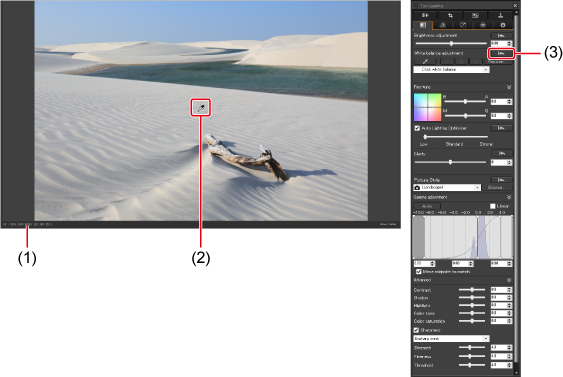
- Cursor coordinates and corresponding RGB values (converted to 8 bits)
- Click
- Undo
- To adjust white balance again, click a different image area.
- Click a gray area if there is no white in the image.
- To exit, click [] again. In Windows, you can also exit by right-clicking.
Note
- White balance cannot be changed or adjusted for multiple-exposure RAW images created on the camera.
Adjusting white balance by setting a color temperature
Select [Color temperature] from the [White balance adjustment] list box.
-
Set the color temperature.
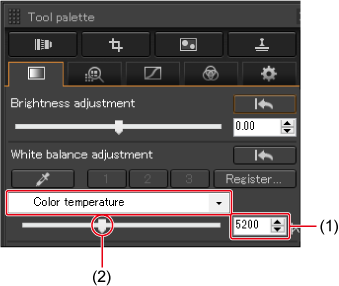
- Enter a setting value
- Drag left or right
Note
- The adjustment range is 2000–10000 K (in 10 K increments).
Fine-tuning white balance
Fine-tuning white balance has the same effect as using a commercially available color temperature conversion filter or color compensating filter.
-
Adjust by dragging the point in the adjustment area of the [Fine-tune] panel.
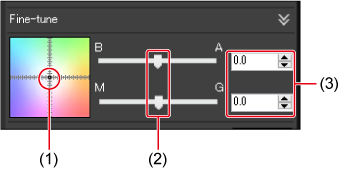
- Drag
- Drag left or right
- Enter a setting value (in tenths of a unit)
- B stands for blue, A for amber, M for magenta, and G for green. White balance is adjusted in the direction you drag.
- Fine-tuning is also possible by using the sliders or entering values.
Caution
- To register your adjustment results as a personal white balance (), select a setting other than [
 ( )] in the [White balance adjustment] list box before fine-tuning the white balance. A personal white balance cannot be registered from results of fine-tuning if you selected [( )] in the list box initially.
 - White balance cannot be changed or adjusted for multiple-exposure RAW images created on the camera.
Adjusting contrast
Color contrast can be adjusted.
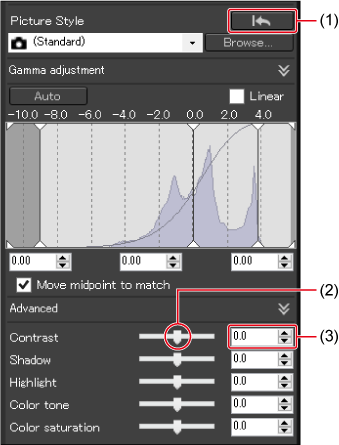
- Undo
- Drag left or right
- Enter a setting value (in tenths of a unit)
Adjusting brightness of shadows/highlights
Adjustment focused on image shadows or highlights enables you to reduce loss of detail in shadows and highlights.
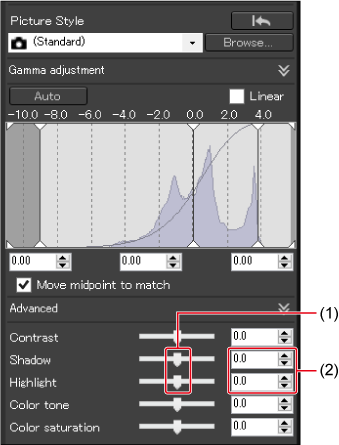
- Drag left or right
- Enter a setting value (in tenths of a unit)
Caution
- Images may look unnatural after significant changes to highlight or shadow areas.
Adjusting color tone and saturation
Note that setting the Picture Style () to [Monochrome] will change [Color tone] and [Color saturation] to [Filter effect] and [Toning effect].
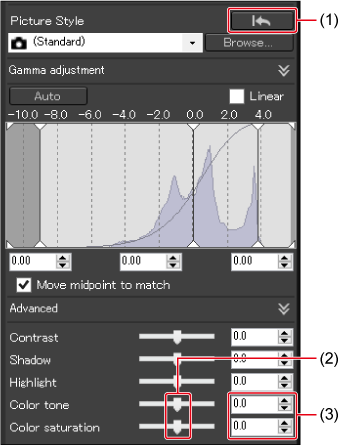
- Undo
- Drag left or right
- Enter a setting value (in tenths of a unit)
-
Color tone
Drag the slider right to make colors yellower and left to make them redder.
-
Color saturation
Adjust the overall color saturation. Drag the slider right to make colors more saturated and left to make them duller.
Adjusting monochrome
Setting the Picture Style () to [Monochrome] enables monochrome photos with effects similar to applying filters or creating monochromatic photos.
Select [Monochrome] in the [Picture Style] list box.
-
Configure the settings as needed.

- Undo
- Enter a setting value
-
Filter effect
Creates monochrome photos emphasizing image areas such as the whites of clouds or greens of trees.
Filter Example of Effect None Normal monochrome image without a filter effect. Yellow Blue sky looks more natural, and white clouds look crisper. Orange Blue sky becomes somewhat darker. Sunsets look more brilliant. Red Blue sky becomes quite dark. Fall leaves look brighter. Green Skin tones and lips appear muted. Green tree leaves look brighter. -
Toning effect
Creates monochrome photos with a single color added.
Choose from [No], [Sepia], [Blue], [Purple], or [Green].
Note
- To emphasize the filter effect, set the [Contrast] slider to the right.
Adjusting dynamic range
You can adjust the dynamic range from image shadows to highlights.
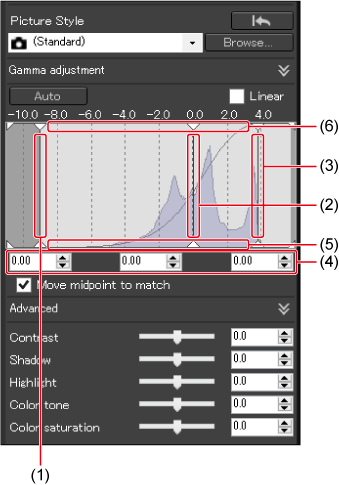
- Drag left or right: Input black point
- Drag left or right: Input midpoint
- Drag left or right: Input white point
- Enter a setting value (in hundredths of a unit)
- Drag up or down: Output black point
- Drag up or down: Output white point
- The horizontal axis shows input levels, and the vertical axis, output levels.
- Select [Move midpoint to match] to link the midpoint to your adjustments to input white and black points.
- Use [Linear] in conjunction with other advanced image editing software. Note that selecting [Linear] reduces image brightness.
- Values entered in (4) are applied as the input black point, midpoint, and white point.
Automatic gradation and luminance adjustment
For appealing gradation and luminance, click [Auto] to apply automatic adjustment of dynamic range.
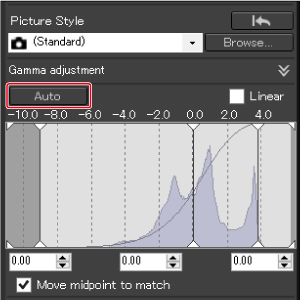
- Automatically adjusts white points, midpoints, and black points on the [Gamma adjustment] panel as well as [Highlight] and [Shadow] on the [Advanced] panel.
-
Settings are either reset or retained as follows.
Settings that are reset
- Auto Lighting Optimizer
- [Contrast] on the [Advanced] panel
Settings that are not reset
- Brightness adjustment
- White balance adjustment
- Linear*
White points and black points are automatically adjusted.
Note
- If edited images look unnatural, reduce the amount of shadow and highlight adjustment.
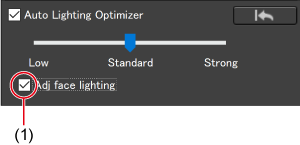
Using Auto Lighting Optimizer
Use Auto Lighting Optimizer to automatically correct the brightness and contrast of dark, low-contrast images.
You can also change the ALO setting of images that were captured with this feature set on the camera.
-
Select [Auto Lighting Optimizer] (1).
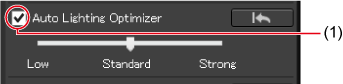
- [Auto Lighting Optimizer] is already selected for images captured with ALO set on the camera.
-
Adjust the setting as needed.
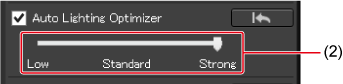
- (2) Choose from three levels: Low/Standard/Strong
- The image is automatically corrected based on the setting.
- The default value shown corresponds to the value set on the camera at the time of shooting with ALO.
- To cancel Auto Lighting Optimizer, clear the [Auto Lighting Optimizer] checkmark.
Caution
- ALO is not available for RAW images from compatible cameras other than the EOS-1D Mark IV, EOS 5D Mark II, EOS R1, EOS R3, EOS R5 Mark II, EOS R6 Mark III, EOS R6 V, EOS R6 Mark II, EOS R7, EOS R8, EOS R10, EOS R50, EOS R50 V, PowerShot V1, or EOS C50 when [Highlight tone priority] is set to an option other than [Disable].
- ALO is not available for multiple-exposure RAW images created on the camera.
- Results of correction may differ when ALO is applied to RAW+JPEG images captured at the same time.
Adjusting face lighting
Select [Adj face lighting] (1) to enable effective correction of lighting on faces in images captured with oblique lighting or illuminated by flash.
It can be used under the following conditions.
- RAW images from the EOS R1, EOS R3, EOS R5, EOS R5 Mark II, EOS R5 C, EOS R6, EOS R6 Mark II, or EOS R7
- [Auto Lighting Optimizer] selected
Caution
- [Adj face lighting] may not be available or suitable adjustment may not be possible in some shooting situations, unless faces can be detected in detail and are sufficiently bright.
- This feature may increase noise.
- Adjustment may be less effective at high ISO speeds.
- Adjustment of face lighting is not available for RAW images captured in RAW burst mode.
- For RAW images captured with the EOS R1, EOS R5 Mark II, and EOS R6 Mark II, [Adj face lighting] is available in Windows 11, and in macOS versions listed in the system requirements.
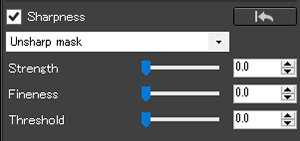
Adjusting image sharpness
You can make the atmosphere of images sharper or softer.
Select [Sharpness] or [Unsharp mask] from the list box (2).
- Undo
- Select an item
- Enter a setting value (in tenths of a unit)
- Drag left or right
-
[Sharpness]
Controls the sharpness of images by adjusting the emphasis of image outlines.
Drag the slider (4) right to increase the value, emphasize edges, and sharpen the image.
-
[Unsharp mask] (RAW images only)
More detailed adjustment of image sharpness.
-
[Strength]
Shows the level of emphasis for image outlines. Drag the slider right to increase the value, emphasize edges, and sharpen the image.
-
[Fineness]
Shows the fineness of the emphasized outline. Drag the slider left to reduce the value and make it easier to emphasize fine details.
-
[Threshold]
Sets the threshold level of contrast between outlines and surrounding image areas that determines when to enhance edges.
-
Note
- Set the magnification to [400%], [200%] or [100%] when adjusting image sharpness. It may be difficult to discern the results of adjustment correctly with magnification set to [Fit to window] (showing the entire image).
Adjusting clarity
Using this function, you can change the contrast at image edges. Available for images from cameras with a clarity setting.
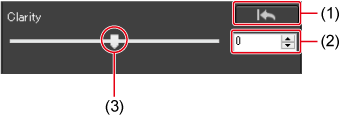
- Undo
- Enter a setting value
- Drag left or right
- Drag the slider right to increase clarity.
Tone Adjustment Tool Palette
- Adjusting brightness and contrast
- Adjusting color tone by click white balance
- Adjusting tone curves
- Adjusting dynamic range
- Using Auto Lighting Optimizer
Adjusting brightness and contrast
Image brightness and contrast can be adjusted. Note that excessive adjustment may make image colors too saturated and affect image quality.
- Undo
- Enter a setting value (in tenths of a unit)
- Drag left or right
-
Brightness
Drag the slider right to brighten images and left to darken them.
-
Contrast
Color contrast can be adjusted. Drag the slider right to increase contrast and left to lower it.
Adjusting color tone by click white balance
For more natural-looking images, you can adjust white balance by sampling an image area as the basis of white. This is effective when you sample image areas where the color tone of white has been altered by the light source.
-
Click [
].
-
Click an area (1) that will be the basis of white.
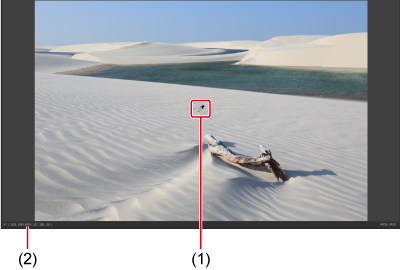
- Cursor coordinates and corresponding RGB values (converted to 8 bits)
- To adjust white balance again, click a different image area.
- Click a gray area if there is no white in the image.
- To exit, click [] again. In Windows, you can also exit by right-clicking.
Note
- Histogram display is updated as you edit images, and you can also display a histogram for the original image.
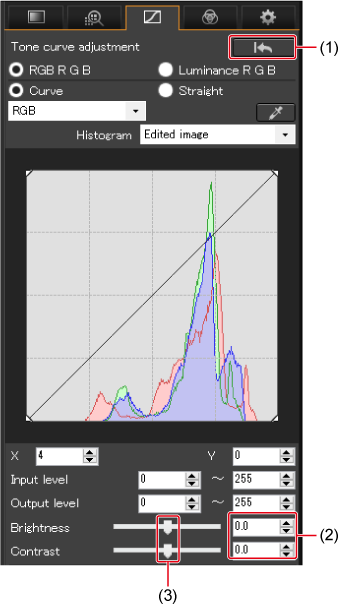
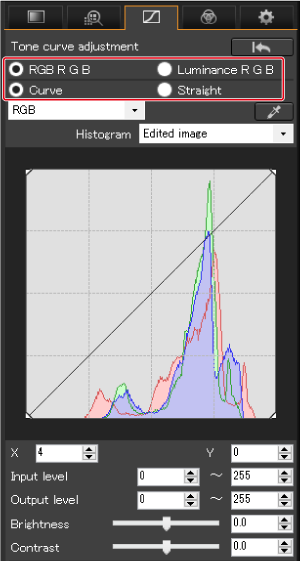
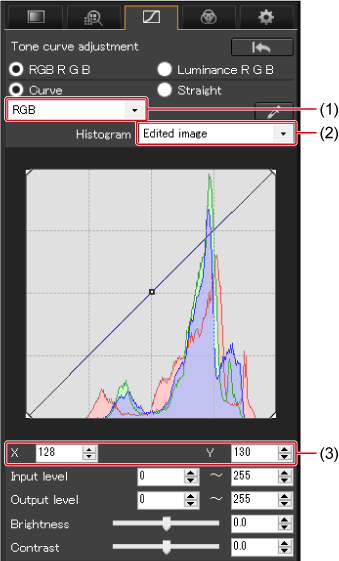
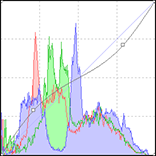
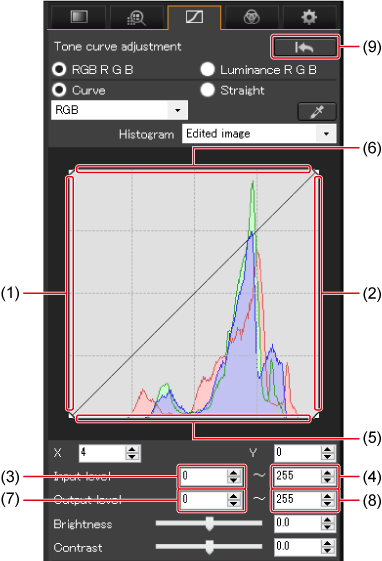
Adjusting tone curves
You can adjust the brightness, contrast, and color of specific image areas by changing the tone curve ().
-
Select the tone curve mode and interpolation method.
-
Adjust the tone curve.
-
RGB: Adjusts R, G, and B together
R, G, B: Adjusts individual channels
- Shows a histogram for the original or edited image
- Coordinates of the adjustment point ([
 ]) set most recently
- The horizontal axis represents the input level, and the vertical axis, the output level.
- Up to eight adjustment points [] can be set.
- To remove an adjustment point [], either double-click the point or press the Delete key.
-
Example of tone curve adjustments
Brightens midtones
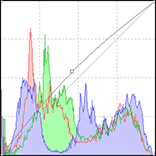
Darkens midtones
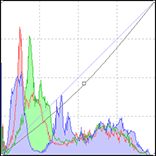
Sharpens the image
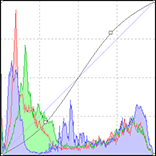
Softens the image
Adjusting dynamic range
You can adjust the dynamic range from image shadows to highlights.
- Drag right: Input black point
- Drag left: Input white point
- Input black point value
- Input white point value
- Drag up: Output black point
- Drag down: Output white point
- Output black point value
- Output white point value
- Undo
- The horizontal axis shows input levels, and the vertical axis, output levels.
Using Auto Lighting Optimizer
For ALO instructions, see Using Auto Lighting Optimizer in Basic Adjustment Tool Palette.
Color Adjustment Tool Palette
You can use the Color Adjustment tool palette to adjust hue, saturation, and luminance in eight separate color gamuts: red, orange, yellow, green, aqua, blue, purple, and magenta. You can also adjust the overall hue and saturation and change images to monochrome for further adjustment.
Adjusting specific color gamuts
- H: Hue
- S: Saturation
- L: Luminosity
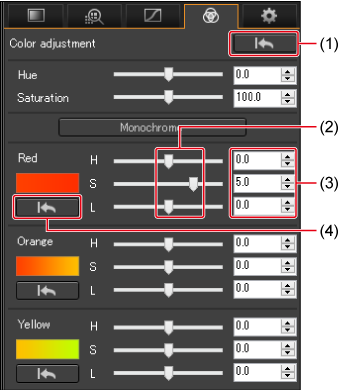
- Undo
- Drag left or right
- Enter a setting value (in tenths of a unit)
- Undo changes to individual color gamuts
Adjusting overall hue and saturation
- Hue: Drag the slider right to make colors yellower and left to make them redder.
- Saturation: Adjust the overall color saturation. Drag the slider right to make colors more saturated and left to make them duller.
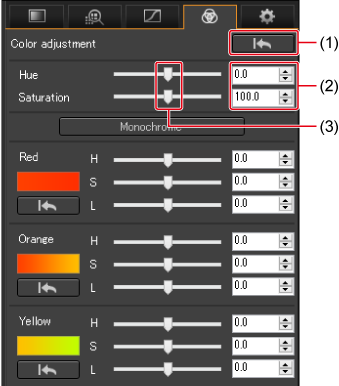
- Undo
- Enter a setting value (in tenths of a unit)
- Drag left or right
Adjusting to monochrome
Click [Monochrome] to create a monochrome image, with all eight color gamuts set to the lowest saturation (-10). You can then edit the monochrome image by dragging the H and L sliders for each color gamut to adjust hue and brightness.
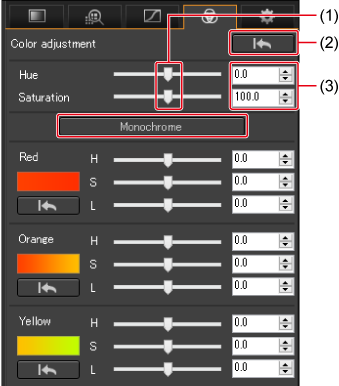
- Drag left or right
- Undo
- Enter a setting value (in tenths of a unit)
Detailed Adjustment Tool Palette
You can use the Detailed Adjustment tool palette to reduce image noise in evening scenes or at high ISO speeds. This tool palette can also be used in conjunction with sharpness adjustment.
Reducing noise
You can reduce image noise from high ISO speeds or other factors.
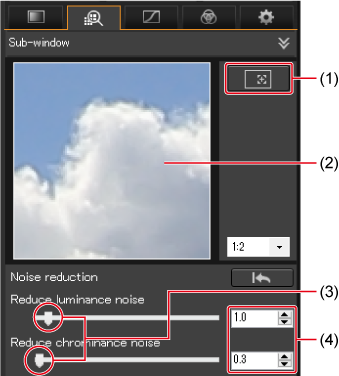
- Magnified area position
- Close-up window
- Drag left or right
- Enter a setting value (in tenths of a unit)
- For stronger noise reduction, set higher values.
- Multiple images can be edited the same way simultaneously by selecting all images before adjusting [Reduce luminance noise] and [Reduce chrominance noise].
Caution
- [Reduce luminance noise] adjustments may reduce resolution along with noise.
- [Reduce chrominance noise] adjustments may cause color fringing as noise is reduced.
Reducing color moiré in images
You can reduce color artifacts known as color moiré.
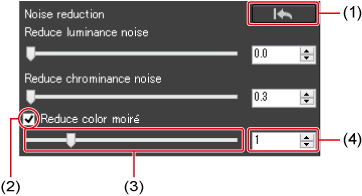
- Undo
- Select
- Drag left or right
- Enter a setting value (in one-unit increments)
Caution
- It may not be possible to reduce color moiré in some images.
- Hues in some images may change. If hues change too much, reduce the adjustment level.
Cropping/Angle Adjustment Tool Palette
You can crop images, adjust the angle, and change the aspect ratio.

- Undo
-
Set a cropping aspect ratio (can be entered in hundredths of a unit)
- [Free]: Free-form configuration of aspect ratio
- [Custom]: Cropping to your specified aspect ratio
- Set the size of the cropping frame (can be entered in one-unit increments)
- Adjust the angle (can be entered in hundredths of a unit)
- Outlines the cropping frame
- Adjusts image opacity outside the cropping frame
- Shows a grid inside the cropping frame
- Set the spacing between grid lines
- Centers the cropping frame on the screen
- Copies the cropping frame
- Pastes the cropping frame on a different image
- Clear the cropping frame
Note
- You can crop images captured horizontally to make them look like vertical shots by adjusting [Aspect ratio].
Cropping
Drag the cropping frame into position.
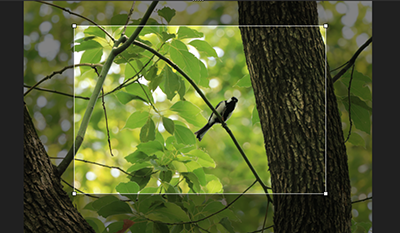
- Drag the cropping frame to move it.
- You can resize the cropping frame by dragging the four corners.
Angular adjustment
Drag the slider (4) to adjust.
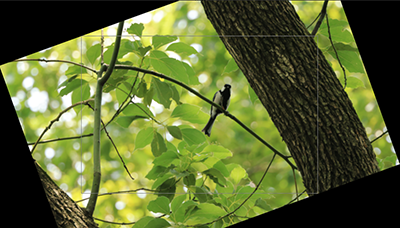
- Images are cropped at the largest size in your specified aspect ratio.
- For best results, perform any lens aberration correction before angular adjustment.
Image rotation
Right-click an image and select [Rotate Left] or [Rotate Right].

Caution
- Image noise may make it difficult to check details of images captured at expanded ISO speeds.
Note
- To undo your changes, click [
 ] (1) or follow the steps in Undoing Edits.
 - Cropping images are displayed with lines indicating the cropped area.
- Thumbnails reflect cropping and angle adjustment.
- Images in Preview and Edit Image windows are shown as you have cropped them.
- Converting a cropped RAW image to a JPEG or TIFF and saving it () will crop the resulting image.
- You can apply cropping information to another image by clicking [Copy] (10), displaying the other image, then clicking [Paste] (11). You can also apply the cropping information to multiple selected images by clicking [Paste].
- To clear all cropping frame adjustments, click [Clear] (12).
Lens Correction Tool Palette
- Correcting lens aberration
- Making corrections
- Shooting distance information slider
- Correcting multiple images at a time
- Digital lens optimizer
- Sharpness and unsharp mask
You can correct lens aberration and make images look sharper by using these features and Digital Lens Optimizer. Use of this palette requires installation of EOS Lens Registration Tool (version 1.4.20 or later).
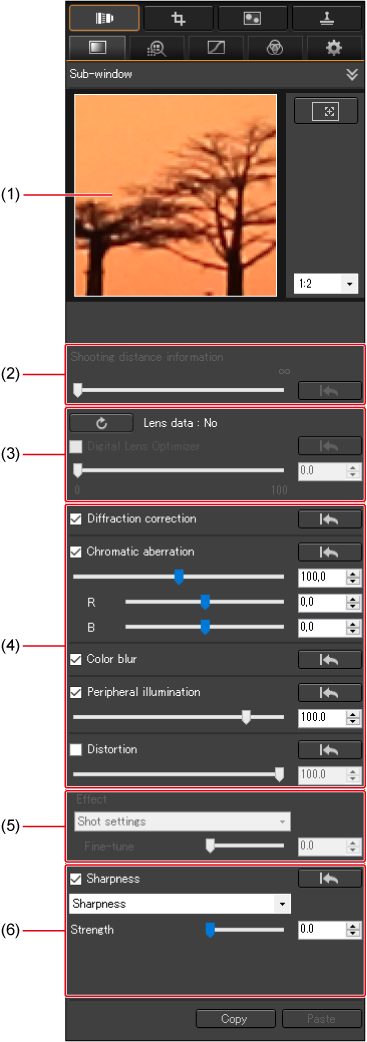
- Magnified view
- Distance information
- Digital Lens Optimizer
- Lens aberration correction
- Effect
- Sharpness
Correcting lens aberration
These five types of aberration from lens optical characteristics can be corrected separately or at the same time.
- Diffraction
- Chromatic aberration (color fringing around subjects)
- Color blur (blue or red color blur which sometimes occurs at the edge of the highlighted area of an image)
- Low peripheral illumination
- Distortion aberration
Use of lens aberration correction requires RAW images from cameras equipped with this feature and lenses listed in the [Add or Remove lens data] window ().
Caution
-
Not available for these images:
- Multiple-exposure RAW images
- Images captured with EF Cinema (CN-E) lenses (depending on the camera model)
Making corrections
-
Select an image.
-
Select the items to correct.
- Thumbnails of lens aberration corrected images are labeled with [
 ] in the main window ().
 - To reduce correction, drag the slider left.
- Use the [R] and [B] sliders below [Chromatic aberration] to correct red and blue chromatic aberration.
- Select any extender used at the time of shooting if a list box is displayed for extender selection.
- For distortion correction of images captured with fisheye lenses (EF8–15mm f/4L USM Fisheye, EF15mm f/2.8 Fisheye, or RF7-14mm F2.8-3.5 L FISHEYE STM), you can choose options in the [Effect] list box besides the [Shot settings] option. The effects can be adjusted with the slider below [Distortion].
- For images captured with EF8–15mm f/4L USM Fisheye or EF15mm f2.8, you can use the fine-tuning slider when selecting [Emphasize Linearity] from the [Effect] list box. Use the fine-tuning slider if the main slider does not provide enough adjustment.
- Thumbnails of lens aberration corrected images are labeled with [
Checking correction results
-
Peripheral illumination and distortion aberration
Use full-screen display to check.
-
Chromatic aberration and color blur
Check by clicking the area of interest on the image and then examining it in the magnified view.
Adjusting correction results
- Peripheral noise from [Peripheral illumination] can be alleviated with luminance or chrominance noise reduction (). However, this may not alleviate the noise if you have applied significant peripheral illumination correction to images captured at night or at high ISO speeds.
- To restore sharpness to images that are blurrier after [Distortion] correction, try increasing the sharpness with sharpness adjustment ().
- To restore vibrancy to images that are faded after [Color blur] correction, try increasing saturation ( or ). Note that [Color blur] is effective for correcting blue or red color blur at the edges of image highlights. Correction is not effective under other conditions.
Caution
- Diffraction correction only applies to images from cameras equipped with diffraction correction. Note that this function cannot be used at the same time as Digital Lens Optimizer.
- Distortion correction may remove some peripheral image detail.
Note
- The adjustment range for distortion correction varies depending on the camera used.
Distortion aberration correction for fisheye lenses
-
Shot settings
Distortion correction is limited to compensation for optical distortion. Optical characteristics at the time of shooting are shown in the example image.
-
Emphasize linearity
Gives images an appearance resembling the “central projection” produced by most lenses. Although it enables wide, panoramic images, peripheral stretching reduces sharpness.
-
Emphasize distance
Gives images an appearance resembling an “equidistant projection,” which maintains relative distances.
With this projection, all points in the image are at proportionally correct distances and angles relative to the center. Used in astrophotography of the celestial sphere (for applications such as star maps or solar path diagrams), it enables equidistant projection of objects at the same height from the horizon, or declination.
-
Emphasize periphery
Gives images the appearance of a “stereographic projection.” Peripheral stretching may reduce sharpness.
Used for world maps or images from surveillance cameras, because it enables relative positions on a spherical surface to be accurately depicted.
-
Emphasize center
Gives images the appearance of an “orthographic projection.” Central stretching may reduce sharpness.
Used in photography for celestial luminance distributions and fisheye images of animals, because subjects that are equally bright can be depicted as taking up the same amount of space in the image.
-
Emphasize solid angles
Gives images the appearance of an “equisolid projection,” which maintains solid angles (area) on a spherical surface.
With this projection, all points in the image are at proportionally correct distances and angles relative to the center. Useful when area will be measured, for example, because area can be represented uniformly across the screen.
Caution
- Images edited using [Emphasize Linearity], [Emphasize Distance], [Emphasize Periphery], [Emphasize Center], [Emphasize Solid Angles] and will resemble these projection methods. However, they are not suitable for scientific or academic purposes.
Note
- Example images are shown for each setting option.
- Available [Effect] options vary depending on the type of lens.
Shooting distance information slider
- This slider is automatically set to match any shooting distance information saved in the RAW images you are editing. It can be used to fine-tune the shooting distance of images that do not have a shooting distance set to infinity.
- For RAW images without shooting distance information, [<!>] appears above the slider, which is automatically set to infinity at the right end.
-
The slider is automatically set to infinity at the right end in editing of RAW images from the following cameras.
- EOS-1D Mark II N, EOS-1Ds Mark II, EOS-1D Mark II, EOS-1D, EOS-1Ds, EOS 5D, EOS 30D, and EOS DIGITAL REBEL XTi/400D
- The slider indicator changes to [Magnification Factor] for RAW images captured using MP-E65mm f/2.8 1-5x Macro Photo lenses or EF50mm f/2.5 Compact Macro lenses with a Life-Size Converter EF.
- The setting of the [Shooting distance information] slider is applied to all selected adjustment items.
- The [Shooting distance information] slider cannot be used for RAW images captured using lenses that do not require adjustment with the slider.
Correcting multiple images at a time
By selecting multiple images before you make corrections (), you can apply the same corrections to all of the images at once. You can also apply same corrections by copying the recipe of a corrected image and pasting it onto multiple images ().
Digital lens optimizer
Various aberrations from lens optical characteristics can be corrected, along with diffraction and low-pass filter-induced loss of resolution.
Note that Digital Lens Optimizer requires RAW images captured using lenses listed in the [Add or Remove lens data] window.
For best results, set [Sharpness] or [Strength] for [Unsharp mask] to 0 for RAW images you will edit with Digital Lens Optimizer.
Caution
- Use of this function requires installation of EOS Lens Registration Tool (version 1.4.20 or later).
-
Digital Lens Optimizer is not available for the following images.
- Images from EOS 20D/20Da, EOS 10D, EOS D2000, EOS D6000, EOS D30, EOS D60, EOS DIGITAL REBEL XT/350D, or EOS DIGITAL REBEL/300D
- Images captured using EF Cinema (CN-E) lenses
- Multiple-exposure RAW images created on the camera
Note
- Digital Lens Optimizer can be applied to images from the EOS 5D with firmware version 1.1.1 or later and the EOS 30D with firmware version 1.0.6 or later installed.
-
Select an image.
-
Download the lens data.
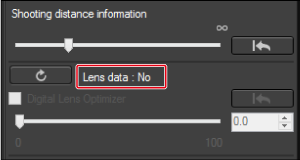
- If [Lens data: Yes] is displayed, go to step 4.
- If [Lens data: No] is displayed, click [
 ].
].
-
Select the lens used at the time of shooting.
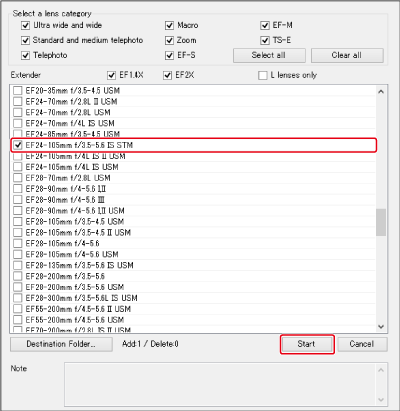
- Click [Start].
Caution
- Digital Lens Optimizer cannot be applied to images if [Not Available] is displayed.
- Downloading lens data may not be possible, depending on the state of your computer. Wait a while before you try downloading again.
- If you will change the lens data storage location and have already downloaded lens data, manually move the downloaded lens data from the original folder to the new folder.
Note
- To delete lens data, clear the checkmark next to the lens name and click [Start].
-
Select [Digital Lens Optimizer].
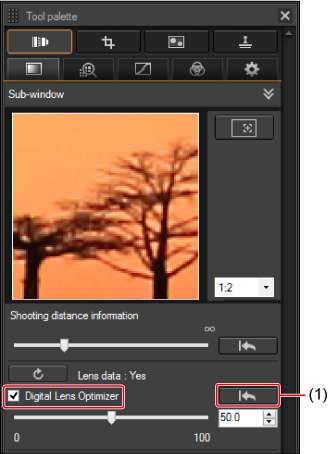
- Drag the slider to adjust the effect. To undo this change, click (1).
- The thumbnail is now labeled with [
 ].
].
Caution
- Lens data downloaded with versions of the software before Digital Photo Professional 4 cannot be used. Use lens data downloaded with Digital Photo Professional 4.
- Digital Lens Optimizer cannot be applied at the same time as [Diffraction correction].
- Images cannot be corrected with [Chromatic aberration] on the Lens Correction tool pallet if Digital Lens Optimizer has been applied.
Note
- Any adjustment of [Sharpness] or [Unsharp mask] should be done after applying Digital Lens Optimizer.
Sharpness and unsharp mask
See Adjusting image sharpness.
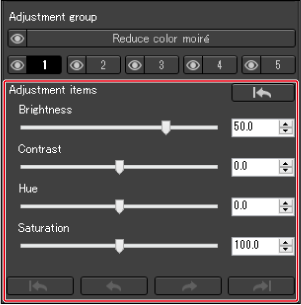
Partial Adjustment Tool Palette
- Making partial adjustments to images: [Brightness], [Contrast], [Hue], [Saturation]
- Making partial adjustments to images: [Reduce color moiré]
- Adjustment groups
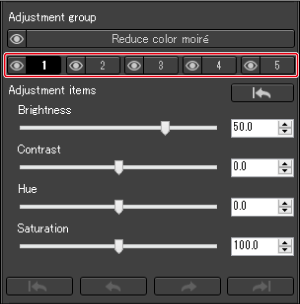
On the Partial Adjustment tool palette, you can adjust brightness, contrast, hue, saturation, and color moiré reduction for your selected image areas. Note that feature availability varies by image format.
Making partial adjustments to images: [Brightness], [Contrast], [Hue], [Saturation]
-
Select an option in [Adjustment group].
-
Select an adjustment group.
For information on adjustment groups, see Adjustment groups.
-
-
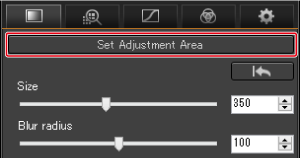
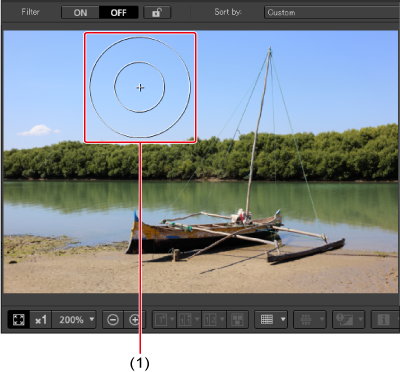
Click [Set Adjustment Area].
-
A circular cursor (1) appears in the window.
-
-
Drag the sliders to adjust [Size] and [Blur radius] for the circular cursor.

- [Size] determines the size of the selected area.
- [Blur radius] determines blurring at the border of the selected area.
-
Click or drag the circular cursor to select an area to adjust.
-
Drag the [Adjustment items] sliders to set the levels.
- To review your adjustments to areas selected with the circular cursor, click [
 ] (Undo All), [
 ] (Undo), [
 ] (Redo), and [
 ] (Redo All).
- To review your adjustments to areas selected with the circular cursor, click [
Caution
-
These adjustments are not shown on the following images.
- Adjustments with this palette are not reflected in DPP histogram display.
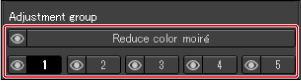
Making partial adjustments to images: [Reduce color moiré]
You can reduce color moiré in your selected image areas.
For details on reducing color moiré, see Reducing color moiré in images.
-
Click [Reduce color moiré] in [Adjustment group].
- The [Reduce color moiré] panel appears.
-
Click [Set Adjustment Area], and drag the [Size] and [Blur radius] sliders to configure the circular cursor.
-
Click with the circular cursor or drag it on the image to select an area to adjust.
-
Drag the [Reduce color moiré] slider in [Adjustment items] to set the level.
- The area selected in step 5 is adjusted accordingly.
- To review the positions you selected with the circular cursor, click [], [], [], and [] below [Adjustment items]. Available buttons, from the left, are [Undo All], [Undo], [Redo], and [Redo All].
Caution
-
These adjustments are not shown on the following images.
- Adjustments with this palette are not reflected in DPP histogram display.
Adjustment groups
-
On the Partial Adjustment tool palette, you can adjust [Brightness], [Contrast], [Hue], and [Saturation] for five separate groups of your selected image areas, and [Reduce color moiré] adjustments apply to another group.
- Your adjustments only apply to areas you have selected for the current group.
- Even for the same adjustment item, you can set different values for adjustment groups [
 ], [
], [ ], [
], [ ], [
], [ ], and [
 ].
].
- By default, adjustments to all adjustment groups are applied to the image, but you can click [
 ] to selectively apply adjustments from individual groups.
 - To review the areas you selected for each group with the circular cursor, click [], [], [], and [] below [Adjustment items].
- Adjustments for [Reduce color moiré] are applied to the image first, followed by adjustments to groups [], [], [], [], and [], in this order.
Dust Delete/Copy Stamp Tool Palette
This image editing enables you to erase dust and correct similar flaws.
Dust Delete/Copy Stamp tool palette
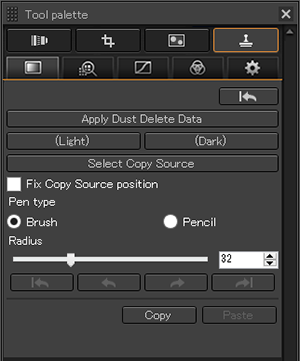
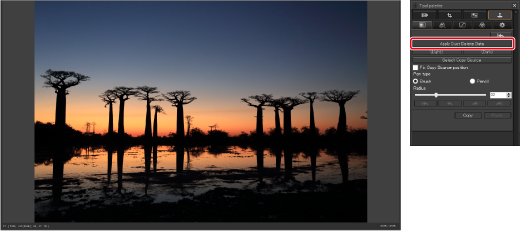
Automatically erasing dust
Dust Delete Data appended to images by cameras can be used in automatic erasure of these spots.
-
Select an image with appended Dust Delete Data.
-
Click [Apply Dust Delete Data].
Note
- Dust can be automatically edited out of multiple selected images, as long as Dust Delete Data has been appended to them.
- To undo your changes, click [] or follow the steps in Undoing Edits.
- Individual flaws that are not automatically erased can be corrected using repair () or copy stamp functions ().
- You can erase dust from the same position on other images by clicking [Copy] on an affected area, switching images, then clicking [Paste].
- To print images with dust erased, click [
 ] in the main window.
 - Dust you erase from RAW images is erased in any JPEGs or TIFFs saved after conversion ().
Manually erasing dust
You can erase dust spots on an image by selecting them one by one. To erase linear specks, see Erasing unwanted image areas.
-
Click the area with dust to erase (1).
- The image is displayed at full size, centered on the area clicked.
- The display position can be changed by dragging.
-
Select a method of erasure.
- Click [
 ] for dark spots or [
 ] for light spots.
 - Moving the cursor will show the area for erasure, indicated by [
 ].
].
- Click [
-
Using [
] (2), select a spot.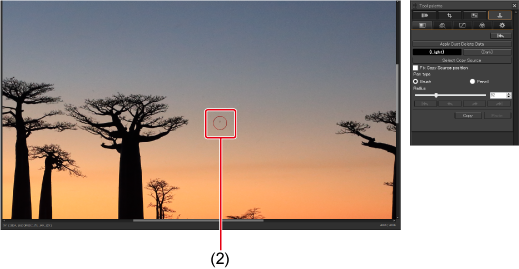
- Spots enclosed by [] are erased.
- Click another part of the image to keep erasing spots.
- To erase spots in other areas, momentarily cancel erasure by right-clicking or by clicking the button you clicked in step 2, then follow these steps from the beginning.
- [
 ] is displayed if a dust spot cannot be erased. Note that clicking repeatedly may erase spots that were not erased after your first click.
- Spots enclosed by [
Caution
- This function is not recommended for images captured at expanded ISO speeds, because noticeable image noise makes spots difficult to find in this window.
Note
- To undo your changes, click [] or follow the steps in Undoing Edits.
- To print images with dust erased, click [] in the main window.
- Dust you erase from RAW images is erased in any JPEGs or TIFFs saved after conversion ().
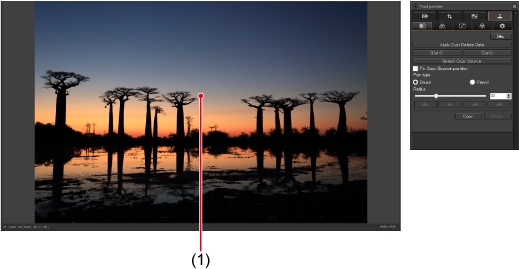
Erasing unwanted image areas
This editing enables you to cover unwanted image areas with sections of the image copied from other areas.
-
Specify a section to copy.
- Click [Select Copy Source], then click a section of the image to copy.
- Repeat this step if you wish to copy from a different area.
- To prevent the copy source from moving as you click or drag on the destination, select [Fix Copy Source position].
-
Correct the image.
- Click or drag on the part of the image to modify. [+] in the window indicates the copy source, and [
 ], the destination.
 - The copied section is pasted where you drag.
- To paste with a brush-like outline, select [Brush] in [Pen type], or select [Pencil] to paste with sharper edges.
- Click or drag on the part of the image to modify. [+] in the window indicates the copy source, and [
-
Return to the main window.
Note
- To undo your changes, click [] or follow the steps in Undoing Edits.
- To print edited images, click [] in the main window.
- RAW image editing is applied to any JPEGs or TIFFs saved after conversion ().
Settings Tool Palette
- Setting the working color space
- Soft-proofing colors
- Specifying the opening size for RAW images
- Viewing and saving RAW images
Setting the working color space
For each image, in [Work color space] you can set a different color space to work in.
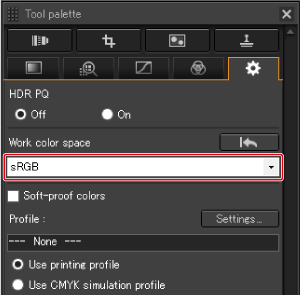
Note
- Your individually set color space is always applied, even if you change the default setting in [Color management].
- You can change the color space of RAW images as often as needed.
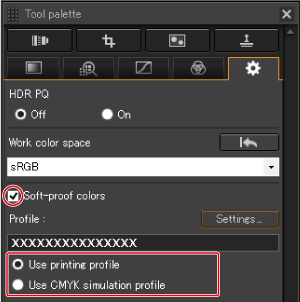
Soft-proofing colors
Selecting [Soft-proof colors] enables you to apply the current printing or CMYK simulation profile to the image shown.
-
Click [Settings].
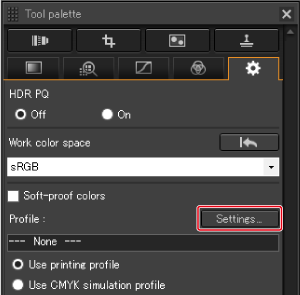
-
Select a profile to apply.
-
Choose an option in the [Printing profile] or [CMYK simulation profile] list box.
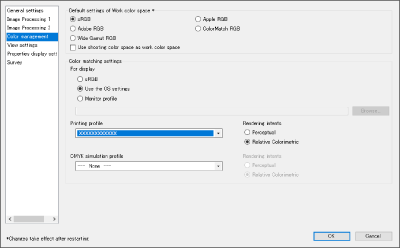
- After selection, click [OK].
-
-
Select the profile to use in soft proofing, then select [Soft-proof colors].
Note
- Reliability of soft-proofing depends on monitor quality, monitor and printer profiles, lighting conditions where you are working, and other factors.
- Profiles are not applied to image display in the Quick Check window.
Specifying the opening size for RAW images
Set the size used by DPP when opening RAW images captured in [![]() ] mode, with a .CR3 file extension.
] mode, with a .CR3 file extension.
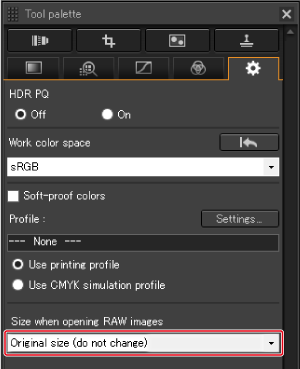
- The setting applies to individual images and is saved as part the recipe.
- This size is also used when saving JPEGs or TIFFs converted from the RAW image.
Caution
- Does not apply to images captured in Dual Pixel RAW mode.
- Not available for
 images captured with the EOS R1, EOS R5 Mark II, EOS R6 Mark III, EOS R6 V, EOS R6 Mark II, EOS R8, EOS R50, EOS R50 V, EOS R100, PowerShot V1, or EOS C50.
Viewing and saving RAW images
Applies to RAW images from these cameras.
- EOS-1D X Mark III, EOS R1, EOS R3, EOS R5, EOS R5 Mark II, EOS R5 C, EOS R6, EOS R6 Mark III, EOS R6 V, EOS R6 Mark II, EOS R7, EOS R8, EOS R10, EOS R50, EOS R50 V, PowerShot V1, EOS C50
-
Select an image.
-
Select an option.
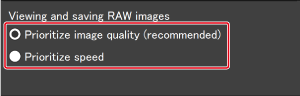
- [Prioritize image quality]: Displays and saves images in normal DPP quality.
- [Prioritize speed]: Enables faster RAW image display and saving. Note that noise may be noticeable in some images.
Caution
- Selecting [Prioritize speed] will prevent you from using Specifying the opening size for RAW images.