Creating HDR Images
You can create images with a wide dynamic range that preserves detail in highlights and shadows, as well as HDR* images that resemble paintings.
HDR stands for High Dynamic Range.
Note
- Ideally, three source images of the same scene with low, normal, and high exposure should be used to create an HDR image.
- HDR images can be generated from all image formats except HEIF.
- No image information is added to HDR images.
-
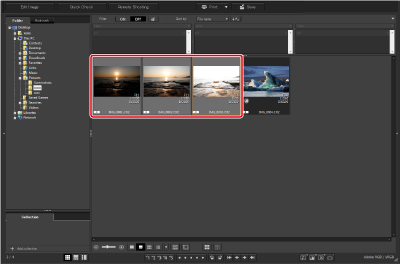
Select images.
-
Select [Start HDR compositing tool] in the [Tools] menu.
- You can also select images after starting the tool.
-
Complete the required settings, then click [Start HDR compositing].
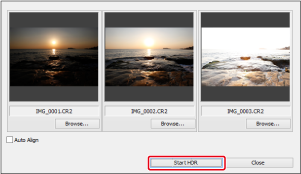
- To change selected images or add others, click [Browse], then select the image file and click [Open].
- Selecting two or more images of the same size enables you to select [Auto Align] for auto image alignment. Note that auto image alignment may not work correctly for patterned images (with a lattice or stripes, for example) or images that are generally flat and uniform.
- Once you click the [Start HDR compositing] button, the [Adjust Image] window appears.
Caution
- Auto image alignment removes some peripheral image areas.
-
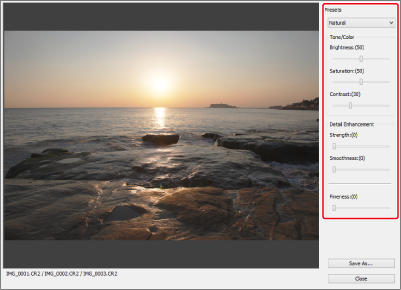
Configure the settings as needed.
-
[Adjust Image] sliders
[Tone/Color]
-
[Brightness]:
Adjusts overall image brightness. Drag the slider right to brighten images and left to darken them.
-
[Saturation]:
Adjusts overall color saturation. Drag the slider right to make colors more saturated and left to make them duller.
-
[Contrast]:
Adjusts overall contrast. Drag the slider right to increase contrast and left to lower it.
[Detail Enhancement]
-
[Strength]:
Adjusts both overall contrast and the contrast of details. Drag the slider right to increase the effect.
-
[Smoothness]:
Adjusts overall smoothness. Drag the slider right for a smooth, natural appearance.
-
[Fineness]:
Adjusts clarity of image details. Drag the slider right for a sharper outline.
-
-
[Presets] effects
You can choose from the following five preset effects in the [Presets] pull-down menu instead of adjusting each slider. Selecting a preset moves the sliders accordingly. You can also adjust the sliders after selecting a preset.
-
[Natural] (default):
Corrects rendering in areas of high-contrast scenes where detail is often lost in highlights or shadows, to preserve more of this detail.
-
[Art standard]:
An impressive finish with the rich tonality of a painting.
-
[Art vivid]:
More vibrant than [Art standard].
-
[Art bold]:
Also more vibrant than [Art standard], for subjects that “pop.”
-
[Art embossed]:
Tones down vibrancy, relative to [Art standard], for retro ambiance.
-
-
-
Click [Save As].
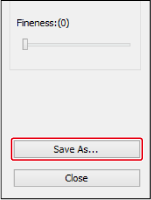
- Click [Save As], then complete the required settings and click [Save].