Tek Alıcı ile Otomatik Flaş
- Çoklu Alıcı Üniteli Otomatik Flaşlı Fotoğrafçılık
- Kablosuz Özelliklerin Uygulandığı Flaşlı Fotoğrafçılık
- Birden Fazla Gönderici Kullanma
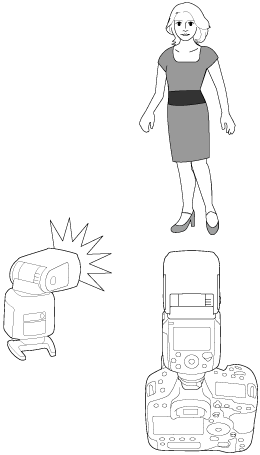
Bu bölümde, fotoğraf makinesine gönderici olarak takılan bir EL-1 (2. Sürüm) ve alıcı olarak ayarlanan bir EL-1 (2. Sürüm) ile temel tam otomatik kablosuz çekim anlatılır.
-
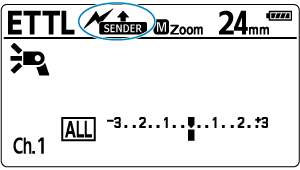
Bir üniteyi gönderici olarak ayarlayın.
-
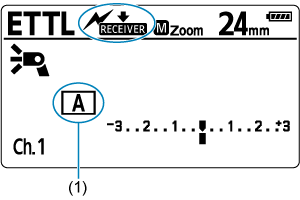
Bir üniteyi alıcı olarak ayarlayın.
-
Kanalı kontrol edin.
-
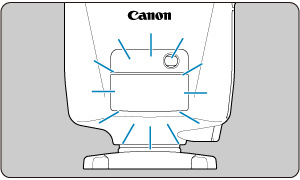
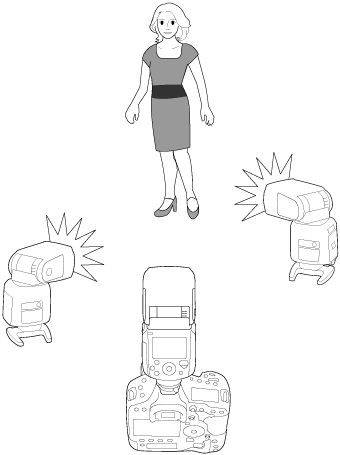
Fotoğraf makinesini ve diğer Speedlite flaşı konumlandırın.
- Bunları Pozisyonlandırma ve Mesafe Ayarı konusunda gösterilen aralıkta konumlandırın.
-
Gönderici üzerinde joystick tuşunu kullanarak
 seçimi yapın.
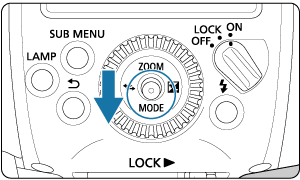
-
Flaş modunu
 konumuna ayarlayın.
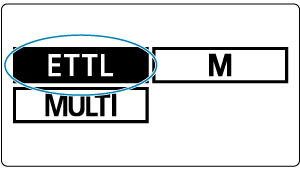
- Joystick tuşuna dikey/yatay yönde basarak veya
 kadranını çevirerek
  seçimi yapın, sonra doğrudan joystick tuşuna basın.
 - Alıcı, gönderici tarafından kumanda edildiği gibi çekim sırasında otomatik olarak konumuna ayarlanır.
- Patlama grubu kontrolünün
 ayarında olduğunu onaylayın.
- Joystick tuşuna dikey/yatay yönde basarak veya
-
Flaş şarjının bittiğini onaylayın.
- Alıcı flaş ünitesi hazır olduğunda, AF yardımcı ışığı yaklaşık 1 saniyelik aralıklarla yanıp söner.
- Gönderici ünitenin flaş hazır lambasının yandığından emin olun.
-
İşlemi kontrol edin.
-
Fotoğrafı çekin.
- Makineyi yapılandırdıktan sonra normal flaşlı fotoğrafçılıkta olduğu gibi çekim yapın.
Önlem
- Alıcı üniteye yakın floresan ışığı veya bir bilgisayar monitörü varsa, ışık kaynakları alıcı ünitenin arızalanmasına ve hatalı patlamasına neden olabilir.
- Optik aktarımlı kablosuz çekim sırasında gönderici ve alıcı üniteler (patlama grubu) tam şarjlı olmasa bile, radyo aktarımlı kablosuz çekimden farklı olarak gönderici ünitenin LCD panelinde
 simgesi görüntülenmez (gönderici flaş patlaması KAPALI iken). Ayrıca gönderici ünitenin LCD panelini, gönderici ünite ve alıcı ünitelerin şarj durumuna göre aydınlatma veya kapatmak için bir işlev yoktur.
 - Gönderici ünitede K.İş-06-0 ayarlandığında (), gönderici ünite tam şarjlı ise bip sesi duyulur (Bu bip sesi, radyo aktarımlı kablosuz çekimde olduğu gibi tüm flaş ünitelerinin şarjının tamamlandığını göstermez).
Not
- Gönderici ve alıcının flaş kapsamı 24 mm olarak ayarlanmıştır. Flaş kapsamını manuel olarak da ayarlayabilirsiniz.
- Gönderici de patlayabilir ().
- Fotoğraf makinesinin alan derinliği önizleme tuşuna basarak modelleme flaşını patlatabilirsiniz ().
- Otomatik kapanma modunda olan bir alıcıyı açmak için gönderici deneme flaşı tuşuna basın.
- Bir fotoğraf makinesinin flaş zamanlayıcısı veya benzer işlevleri etkin durumdayken deneme flaşı patlatılamaz.
- Bir alıcıda otomatik kapanma etkinleşene kadar geçecek süreyi Ö.İş-10 içinde değiştirebilirsiniz.
- Alıcı ünite tam şarj olduğunda AF yardımcı ışığının yanıp sönmesini devre dışı bırakabilirsiniz (Ö.İş-23).
Çoklu Alıcı Üniteli Otomatik Flaşlı Fotoğrafçılık
Birden fazla flaş çıkışına ihtiyacınız olduğunda veya daha kolay ışıklandırma elde etmek istediğinizde, alıcı ünitelerin sayısını artırabilir ve bunlar tek bir flaş gibi patlatabilirsiniz.
Bir alıcı ekleyin ve “Tek Alıcı ile Otomatik Flaş” konusunda listelenen prosedürün aynısını izleyin (). Patlama grubu olarak A, B veya C’yi kullanabilirsiniz.
Alıcı ünite sayısı artırıldığında veya gönderici flaşı patlatma AÇIK olarak ayarlandığında, tüm flaşları aynı flaş çıkışında patlatmak ve toplam flaş çıkışında standart poz elde edilmesini garantilemek için otomatik kontrol gerçekleştirilir.
Kablosuz Özelliklerin Uygulandığı Flaşlı Fotoğrafçılık
Kablosuz sistem, gönderici ayarlarına göre otomatik olarak yapılandırılan alıcılarda aşağıdaki özelliklerin ayarlanması ihtiyacını ortadan kaldırır. Bu, normal flaşlı fotoğrafçılıkta olduğu gibi kablosuz flaşlı fotoğrafçılık yapılabilmesini sağlar.
Önlem
- Optik aktarımlı kablosuz çekim sırasında stroboskopik flaşın flaş frekansı 1 Hz - 199 Hz aralığında ayarlanabilir (250 Hz - 500 Hz aralığı kullanılamaz).
Not
- Ayrıca her alıcıda flaş pozlama telafisini ve flaş kapsamını manuel olarak ayarlayabilirsiniz.
Birden Fazla Gönderici Kullanma
Birden fazla cihaz gönderici olarak ayarlanabilir. Aynı aydınlatma düzeneği altında (aynı alıcılarla) kablosuz flaşlı fotoğrafçılık, göndericinin bağlı olduğu fotoğraf makinesini değiştirerek başka makineler kullanarak da yapılabilir.