RAW Image Processing
You can process ![]() or
or ![]() images with the camera to create JPEG images. RAW images are not affected, so different conditions can be applied to create JPEGs.
images with the camera to create JPEG images. RAW images are not affected, so different conditions can be applied to create JPEGs.
You can also use Digital Photo Professional (EOS software) to process RAW images.
-
Select [
 : RAW image processing].
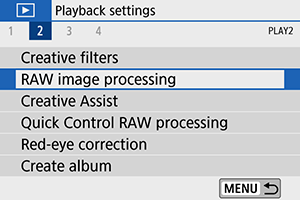
-
Select an item, then select images.
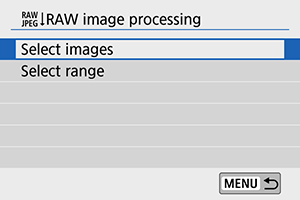
- You can select multiple images to process at once.
Selecting images
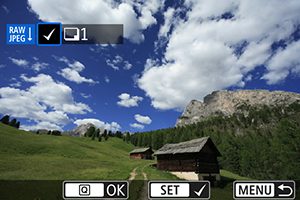
- Use the

 keys to select images to process, then press
  .
. - Press the
 button.
Selecting range
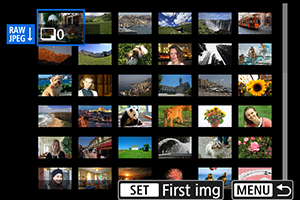
- Select the first image (start point).
- Next, select the last image (end point).
- Press the button.
-
Set the desired processing conditions.
Use shot settings
- Images are processed using image settings at the time of capture.
Customize RAW processing
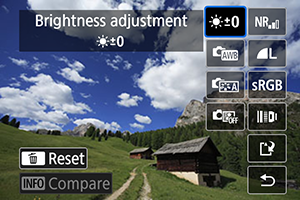
- Select an item with the

 keys.
keys. - Turn the
 or
or  dial to switch the setting.
 - Press to access the function setting screen.
- To return to the image settings at the time of shooting, press the
 button.
Comparison screen
- You can switch between the [After change] and [Shot settings] screens by pressing the
 button and turning the dial.
 - Items in orange on the [After change] screen have been modified since the time of capture.
- Press the
 button.
-
Save the image.
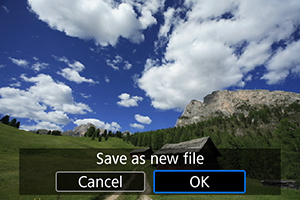
- When using [Customize RAW processing], select [
 ] (Save).
 - Read the message and select [OK].
- To process other images, select [Yes] and repeat steps 2–4.
- When using [Customize RAW processing], select [
-
Select the image to display.
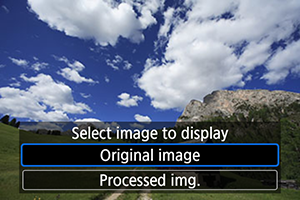
- Select [Original image] or [Processed img.].
Magnified View
You can magnify images displayed for [Customize RAW processing] by pressing the ![]() button. Magnification varies depending on the [Image quality] setting. With the
button. Magnification varies depending on the [Image quality] setting. With the ![]()
![]()
![]()
![]() keys, you can scroll around the magnified image.
keys, you can scroll around the magnified image.
To cancel the magnified view, tap [![]()
![]() ] or press the
] or press the ![]() button.
button.
Processing Images with Specified Aspect Ratios
JPEG images at the specified aspect ratio are created when you process RAW images shot with [![]() : Still img aspect ratio] () set to an option other than [3:2].
: Still img aspect ratio] () set to an option other than [3:2].
RAW Image Processing Options
-
 Brightness adjustment
You can adjust the image brightness up to ±1 stop in 1/3-stop increments.
-
You can select the white balance. If you select [
 ], you can select [Auto: Ambience priority] or [Auto: White priority]. If you select [
 ], you can set the color temperature.
 -
You can select the Picture Style. You can adjust the sharpness, contrast, and other parameters.
-
You can set the Auto Lighting Optimizer.
-
You can set the noise reduction processing for high ISO speeds. If the effect is difficult to discern, magnify the image ().
-
You can set the image quality when creating a JPEG image.
-
You can select either sRGB or Adobe RGB. Since the camera screen is not compatible with Adobe RGB, the difference in the image will hardly be perceptible when either color space is set.
-
 Lens aberr correction
-
A phenomenon that makes the image corners look darker due to the lens characteristics can be corrected. If [Enable] is set, the corrected image will be displayed. If the effect is difficult to discern, magnify the image () and check the four corners. The peripheral illumination correction applied with the camera will be less pronounced than that applied with the Digital Photo Professional (EOS software) at maximum correction amount. If the effects of correction are not apparent, use Digital Photo Professional to apply the peripheral illumination correction.
-
Image distortion due to lens characteristics can be corrected. If [Enable] is set, the corrected image will be displayed. The image periphery will be trimmed in the corrected image.
Since the image resolution may look slightly lower, adjust the sharpness with the Picture Style's [Sharpness] parameter setting as necessary.
-
Correct lens aberration, diffraction, and low-pass filter-induced loss of sharpness by applying optical design values. Selecting [Enable] corrects both chromatic aberration and diffraction, although these options are not displayed.
-
Chromatic aberrations (color fringing along the subject's outline) due to the lens characteristics can be corrected. If [Enable] is set, the corrected image will be displayed. If the effect is difficult to discern, magnify the image ().
-
The diffraction by the lens aperture degrading the image sharpness can be corrected. If [Enable] is set, the corrected image will be displayed. If the effect is difficult to discern, magnify the image ().
-
Caution
- Processing RAW images in the camera will not produce exactly the same results as processing RAW images with Digital Photo Professional (EOS software).
- If you perform [Brightness adjustment], noise, banding, etc. may be intensified with the effects of adjustment.
- When [Digital Lens Optimizer] is set, noise may be intensified together with the effects of correction. Image edges may also be emphasized. Adjust Picture Style sharpness or set [Digital Lens Optimizer] to [Disable], as needed.
- Dust Delete Data is not added to images when processing is performed with [Distortion correction] set to [Enable].
Note
- Lens correction data for lenses compatible with this feature is registered (stored) on the camera.
- The effect of the lens aberration correction varies depending on the lens used and shooting conditions. Also, the effect may be difficult to discern depending on the lens used, shooting conditions, etc.
- For details on the correction data used with Digital Lens Optimizer, see Digital Lens Optimizer.