
Transferring files
Caution
-
For the following models, after files are transferred from the camera to the smartphone, file status is not updated to "Sent to smartphone."
EOS R3, EOS R5, EOS R5 C, EOS R6, EOS-1D X Mark III, and EOS-1D X Mark II
Configuring importing
To access the setting screen for importing images, tap [ ], [
 ], or [
 ] on the main screen, and from [], tap the [Import settings] tab.

-
Select a method for importing files.
[Auto]: Files matching your specified conditions are imported when the camera is connecting or connected.
[Manual]: Files on the camera are listed in CTP, and your selected images are imported.
- If you select [Auto], set the importing conditions.
Importing files
Import captured files to the smartphone.
Importing automatically
To import files automatically when the camera is connecting or connected, configure settings on the [Import settings] tab before you connect the camera ().
Importing manually
If you select [Manual], select files to import, then import them.
-
Tap [
 ] on the main screen or [Browse files on camera] on the [Import settings] tab.
-
Files on the camera are listed.

-
Select the card with the captured images (1).
-
Select files to import (2).
- Tap [
 ] to filter file display by your specified conditions.
- Tap [
 ] to select all files in the group at once.
- Tap [
-
Tap [Import] (3).
Configuring uploading
Tap [ ] on the main screen to access the setting screen for uploading files.
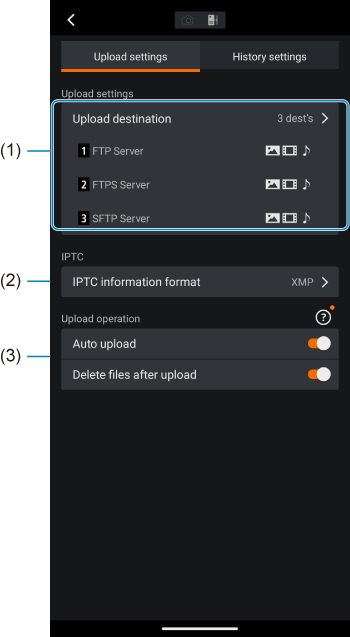
- Set the upload destination.
- Set the IPTC information format.
- Select your preferred file uploading options.
Uploading files
Upload files you have imported to the smartphone to an FTP server.
Uploading automatically
For automatic file uploading after importing, configure settings on the [] tab before you shoot ().
Uploading manually
Use controls on the main screen to upload imported files.
-
On the main screen, select files to upload ().
- Tap [Select] or [
 ], or long-press thumbnails.
- Files awaiting uploading or currently being uploaded cannot be selected.
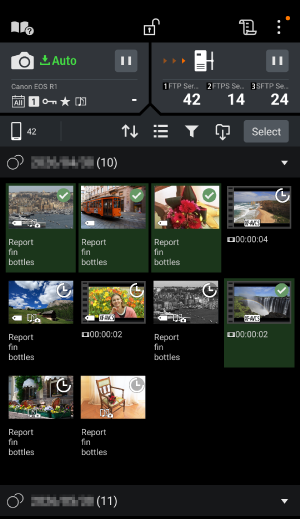
- Tap [Select] or [
-
Make sure files to upload are selected.
- Tap the thumbnails or [] to select or clear files.
- Tap [Back] to return to the previous screen.
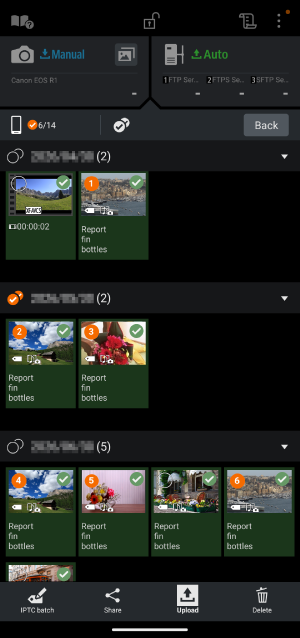
- Tap the thumbnails or [
-
Tap [
 ].
- Uploading now begins.
Screen during image transfer
To access this screen, tap the upload status area on the main screen.
Overall progress display
Currently configured upload destinations (up to three) are listed.

- Tap each section to access information for that FTP server.
- Upload status is indicated by icons.
 : Files uploaded successfully
 : Files that could not be uploaded
 : Files for which uploading was canceled
Progress display for individual servers
Shows upload status for that FTP server.
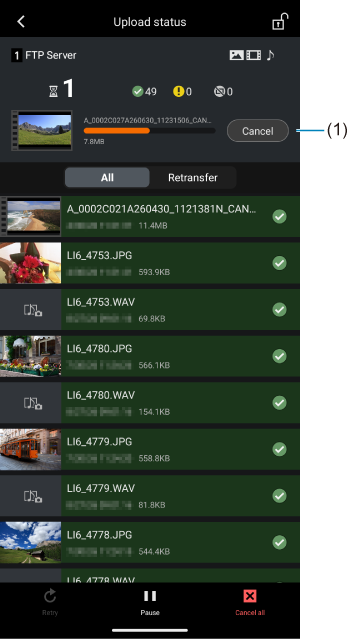
- Tap to cancel uploading. Only movies (except those recorded in chunks) are displayed during uploading. While uploading is paused, all files except chunks are displayed.