Selecting the AF Area and AF Point (Viewfinder Shooting)
- AF Area Selection Mode
- Selecting the AF Area Selection Mode
- Selecting the AF Point or Zone Manually
- Meaning of Lit or Blinking AF Points
- Shooting Conditions That Make Focusing Difficult
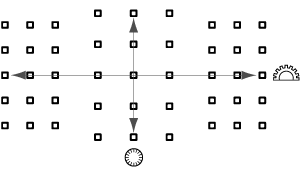
The number of available AF points, the focusing patterns, and the Area AF frame shape vary by lens. For details, refer to Compatible Lenses and Autofocusing (Viewfinder Shooting).
AF Area Selection Mode
Four AF area selection modes are available. For instructions on choosing a mode, see Selecting the AF Area Selection Mode.
 Manual selection:1 pt AF

The camera focuses using a single AF point.
 Manual select.:Zone AF

- The camera focuses in a zone consisting of nine AF points. Subjects are easier to acquire than with 1-point AF.
- Generally focuses on the nearest subject. Note that any detected faces are given priority in focusing.
- With [AI Servo AF], focusing continues as long as subjects can be tracked within the zone.
 Manual select.:Large Zone AF

- The AF area is divided into three focusing zones (left, center, and right) for focusing.
- Subjects are easier to acquire than with Zone AF.
- Generally focuses on the nearest subject. Note that any detected faces are given priority in focusing.
- With [AI Servo AF], focusing continues as long as subjects can be tracked within the large zone.
 Auto selection AF

- The Area AF frame (entire AF area) is used to focus.
- With [One-Shot AF], generally focuses on the nearest subject. Note that any detected faces are given priority in focusing.
- With [AI Servo AF], focusing continues as long as the Area AF frame can track the subject.
Caution
- AF points may not track subjects under some shooting conditions when [AI Servo AF] is used with [Manual select.:Zone AF], [Manual select.:Large Zone AF], or [Auto selection AF].
- Focusing may be difficult when using a peripheral AF point or a wide-angle or telephoto lens. In such a case, use the center AF point or an AF point close to the center.
- When the AF point(s) light up, part or all of the viewfinder may light up in red, which is a characteristic of AF point display.
- In low temperatures, the AF point display may be difficult to see or have a slower tracking response due to the nature of the AF point display device (using liquid crystal).
Selecting the AF Area Selection Mode
-
Press the
 or
or  button (
 ).
).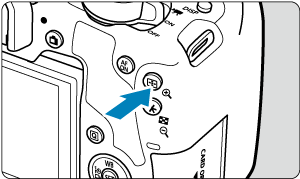

-
Press the
button.- Each time you press the button, the AF area selection mode changes.
- Each time you press the
Selecting the AF Point or Zone Manually
-
Press the
or button (). -
Select an AF point or zone.
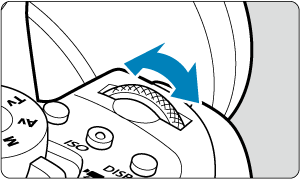
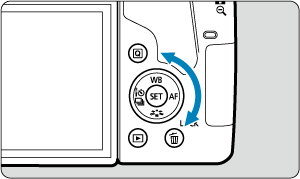
- To select AF points horizontally and vertically, you can turn the
 dial and
  dial, respectively.
 - Turning the or dial switches zones (or cycles through Zone AF zones) in Zone AF and Large Zone AF modes.
- To select AF points horizontally and vertically, you can turn the
Note
- When you keep holding down the
 button and turn the dial, you can select an AF point vertically.
 -
The following information is displayed in the viewfinder when you press the
or button.- Manual select.:Zone AF, Manual select.:Large Zone AF, Auto selection AF:
 AF
AF - Manual selection:1 pt AF: SEL
 (center), SEL AF (off center)
- Manual select.:Zone AF, Manual select.:Large Zone AF, Auto selection AF:
Meaning of Lit or Blinking AF Points
Pressing the ![]() or
or ![]() button lights up the AF points that are cross-type AF points for high-precision autofocusing. The blinking AF points are horizontal-line or vertical-line sensitive.
button lights up the AF points that are cross-type AF points for high-precision autofocusing. The blinking AF points are horizontal-line or vertical-line sensitive.
Shooting Conditions That Make Focusing Difficult
-
Subjects with very low contrast.
(Example: Blue skies, solid-color flat surfaces, etc.)
- Subjects in very low light.
-
Strongly backlit or reflective subjects.
(Example: Cars with highly reflective surfaces, etc.)
-
Near and distant subjects positioned close to an AF point.
(Example: Animals in cages, etc.)
-
Light source such as dots of light positioned close to an AF point.
(Example: Night scenes, etc.)
-
Subjects with repetitive patterns.
(Example: Skyscraper windows, computer keyboards, etc.)
-
Subjects with finer patterns than an AF point.
(Example: Faces or flowers as small as or smaller than an AF point, etc.)
In such cases, focus in either of the following two ways.
- With [One-Shot AF], focus on an object at the same distance as the subject and lock the focus, then recompose the shot ().
- Set the lens's focus mode switch to
 and focus manually ().
Note
- Depending on the subject, focus can be achieved by slightly recomposing the shot and performing AF operation again.