Custom Functions (C.Fn)
Setting Custom Functions
-
Select [
 : Custom Functions(C.Fn)].
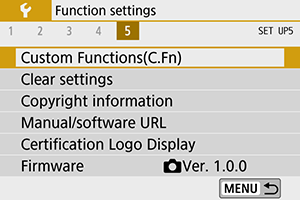
-
Select a Custom Function number.
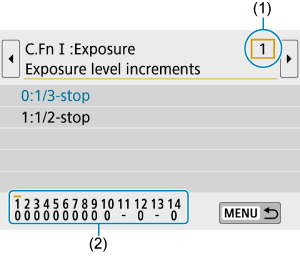
- Use the

 keys to select a function number (1), then press
  .
. - Current Custom Function settings are indicated below the respective function number at the bottom of the screen (2).
- Use the
-
Change the setting as desired.
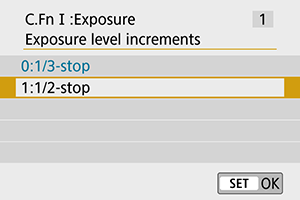
- Select a setting option.
- To set up another Custom Function, repeat steps 2–3.
Note
- To clear all Custom Function settings you have configured (except [Custom Controls]), select [Clear all Custom Func. (C.Fn)] in [: Clear settings].
Custom Functions
![]() Shaded Custom Functions do not function during Live View (LV) shooting or movie recording. (Settings are disabled.)
Shaded Custom Functions do not function during Live View (LV) shooting or movie recording. (Settings are disabled.)
-
C.Fn I: Exposure
 LV Shooting
 Movie Recording
(1) Exposure level increments ○ ○ (2) ISO expansion ○ ○ (3) ISO speed setting increments ○ In  mode
mode(4) Safety shift ○ (5) Exposure comp. auto cancel ○ ○ -
C.Fn II: Autofocus/Drive
LV Shooting Movie Recording(1) Auto AF pt sel.:EOS iTR AF (2) AF area selection method ○ ○ (3) AF point display during focus (4) VF display illumination (5) Mirror lockup -
C.Fn III: Operation/Others
LV Shooting Movie Recording(1) Warnings  in viewfinder
(2) Screen display when power ON (3) Custom Controls Varies by settings (4) Retract lens on power off ○ ○
Custom Function Setting Items
Custom Functions are organized into three groups based on the type of function: C.Fn I: Exposure, C.Fn II: Autofocus/Drive, C.Fn III: Operation/Others.
C.Fn I: Exposure
C.Fn 1: Exposure level increments
Sets 1/2-stop increments for the shutter speed, aperture value, exposure compensation, AEB, flash exposure compensation, etc.
- 0:1/3-stop
- 1:1/2-stop
Note
-
When set to [1:1/2-stop], exposure level display is as follows.

C.Fn 2: ISO expansion
Makes “H” (equivalent to ISO 25600) available as an ISO speed you can set. Note that “H” is not available when [![]() : Highlight tone priority] is set to [Enable] or [Enhanced].
: Highlight tone priority] is set to [Enable] or [Enhanced].
- 0:Disable
- 1:Enable
C.Fn 3: ISO speed setting increments
You can change the manual ISO speed setting increments to a whole-stop.
- 0:1/3-stop
- 1:1-stop
Note
- Even if [1:1-stop] is set, ISO speed will be automatically set in 1/3-stop increments when ISO Auto is set.
C.Fn 4: Safety shift
You can shoot with the shutter speed and aperture value automatically adjusted to enable standard exposure if standard exposure would not be available under your specified shutter speed or aperture value in ![]() or
or ![]() mode.
mode.
- 0:Disable
- 1:Enable
C.Fn 5: Exposure comp. auto cancel
-
0:Enable
When you set the power switch to
 , the exposure compensation setting will be canceled.
 -
1:Disable
The exposure compensation setting will not be canceled even if you set the power switch to
.
Note
- The exposure compensation setting is not canceled after auto power off, even when set to [0:Enable].
C.Fn II: Autofocus/Drive
C.Fn 6: Auto AF pt sel.:EOS iTR AF
Use this function to autofocus in viewfinder shooting by recognizing people. Applies when the AF area selection mode is set to [Manual select.:Zone AF], [Manual select.:Large Zone AF], or [Auto selection AF].
-
0:EOS iTR AF (Face priority)
Faces are given greater priority than with [1:Enable] when the camera selects AF points automatically.
In [One-Shot AF] mode, this makes it easier to focus on faces of still human subjects in the AF area.
Also makes it easier to focus on faces in the AF area in [AI Servo AF] mode.
Once focus is achieved, AF points are automatically selected to keep focusing on the faces initially in focus.
-
1:Enable
The camera selects AF points automatically based on AF information and information on recognized people.
In [One-Shot AF] mode, focusing on a still human subject in the AF area is made easier.
In [AI Servo AF] mode, focusing on a human subject in the AF area is made easier. If no people are detected, the camera focuses on the nearest subject. Once focus is achieved, AF points are automatically selected so that the camera continues to focus on the color of the area it focused on first.
-
2:Disable
AF points are automatically selected based only on AF information.
Caution
- With a setting of [0:EOS iTR AF (Face priority)] or [1:Enable], focusing will take slightly longer than with setting [2:Disable].
- Even with a setting of [0:EOS iTR AF (Face priority)] or [1:Enable], the expected result may not be obtained depending on the shooting conditions and subject.
- Under low light, where external Speedlites for EOS cameras automatically emit an AF-assist beam, AF points are selected automatically based only on AF information. (Information on recognized people is not used for AF.)
C.Fn 7: AF area selection method
-
0:
 →AF area selection button
After you press the
or  button in viewfinder shooting, pressing the button changes the AF area selection mode. In Live View shooting, pressing the button changes the AF method.
 -
1:
→Main DialAfter you press the
or button, turning the  dial changes the AF area selection mode.
Note
- When [1:→Main Dial] is set, use the keys to move the AF point horizontally.
C.Fn 8: AF point display during focus
You can set whether to display AF points during AF point selection, before AF begins (shooting standby), when AF begins, during AF, and when subjects are in focus.
| ○: Displayed, ×: Not displayed | ||||
| AF point display during focus |
AF point selected |
Before AF (shooting standby) |
During AF | Focus achieved |
|---|---|---|---|---|
| 0:Selected (constant) | ○ | ○ | ○ | ○ |
| 1:All (constant) | ○ | ○ | ○ | ○ |
| 2:Selected (pre-AF,focused) | ○ | ○ | × | ○ |
| 3:Selected AF pt (focused) | ○ | × | × | ○ |
| 4:Disable display | ○ | × | × | × |
C.Fn 9: VF display illumination
-
0:Auto
The AF points achieving focus in low light or with a dark subject will automatically light up in red.
-
1:Enable
The AF points light up in red regardless of the ambient light level.
-
2:Disable
The AF points do not light up in red.
Note
- When you press the or button, the AF points will light up in red regardless of this setting.
- The aspect ratio lines, electronic level, and grid in the viewfinder will also light up in red.
C.Fn 10: Mirror lockup
You can prevent the camera vibration blur due to the mechanical vibrations (mirror shock) inside the camera during shooting with super telephoto lenses or shooting close-ups (macro photography). See Mirror Lockup for the mirror lockup procedure.
- 0:Disable
- 1:Enable
C.Fn III: Operation/Others
C.Fn 11: Warnings ![]() in viewfinder
in viewfinder
The ![]() icon can be displayed in the field of view of the viewfinder when any of the following functions are set ().
icon can be displayed in the field of view of the viewfinder when any of the following functions are set ().
Select the function for which you want the warning icon to appear, then press ![]() to add a checkmark [
to add a checkmark [![]() ]. Select [OK] to register the setting.
]. Select [OK] to register the setting.
-
When monochrome
 set
setIf the [
 : Picture Style] is set to [Monochrome] (), the warning icon will appear.
 -
When WB is corrected
The warning icon appears when white balance correction is set ().
-
When
 is set
If [
: High ISO speed NR] is set to [Multi Shot Noise Reduction] (), the warning icon will appear.
Note
C.Fn 12: Screen display when power ON
-
0:Display on
When you turn on the power, the Quick Control screen will appear ().
-
1:Previous display status
When you turn on the power, the camera starts up with the same screen display as before the power was turned off. For this reason, if you turn off the camera with the screen off, the screen remains blank the next time the camera is turned on, which helps conserve battery power. The menu operations and image playback will be available as usual.
C.Fn 13: Custom Controls
You can assign frequently used functions to camera buttons or dials according to your preferences for easy operations.
-
Select a camera control.
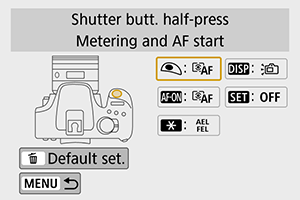
-
Select a function to assign.
- Press to set it.
- Press
Note
- With the screen in step 1 displayed, you can press the
 button to restore the Custom Control settings to their defaults. [Custom Controls] settings are not cleared even if you select [Clear all Custom Func. (C.Fn)].
Functions available for camera controls
-
AF
| Function | ||||||
|---|---|---|---|---|---|---|
| Metering and AF start | ○ | ○ | ○ | |||
| AF stop | ○ | ○ | ||||
-
Exposure
| Function | ||||||
|---|---|---|---|---|---|---|
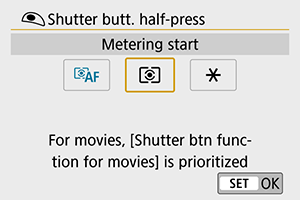
| Metering start | ○ | |||||
| AE lock/FE lock | ○ | ○ | ||||
| AE lock (while button pressed) | ○ | |||||
| AE lock | ○ | ○ | ||||
| FE lock | ○ | ○ | ||||
| Expo comp (hold btn, turn |
○ | |||||
| Flash exp. comp | ○ | |||||
-
Movies
| Function | ||||||
|---|---|---|---|---|---|---|
| Pause Movie Servo AF | ○ | |||||
-
Image
| Function | ||||||
|---|---|---|---|---|---|---|
| Image quality | ○ | |||||
-
Operation
| Function | ||||||
|---|---|---|---|---|---|---|
| Screen On/Off | ○ | ○ | ||||
| Wi-Fi/Bluetooth connection | ○ | |||||
| Maximize screen brightness (temp) | ○ | |||||
| Menu display | ○ | |||||
| Flash function settings | ○ | |||||
| Depth-of-field preview | ○ | |||||
| No function (disabled) | ○ | ○ | ○ | |||
C.Fn 14: Retract lens on power off
You can set whether to retract gear-type STM lenses (such as EF40mm f/2.8 STM) automatically when the camera's power switch is set to ![]() .
.
-
0:Enable
-
1:Disable
Caution
- With auto power off, the lens will not retract regardless of the setting.
- Before detaching the lens, make sure that it is retracted.
Note
- When [0:Enable] is set, this function takes effect regardless of the lens's focus mode switch setting (AF or MF).