Fine-Tuning Specific Colors
You can use the [Specific Colors] pane of the [Tool palette] to fine-tune Picture Style colors.
- Fine-tuning specific colors can bring image colors closer to your preferred palette.
- You can also define the extent of impact these adjustments have on nearby colors.
-
Select the [Specific Colors] pane.
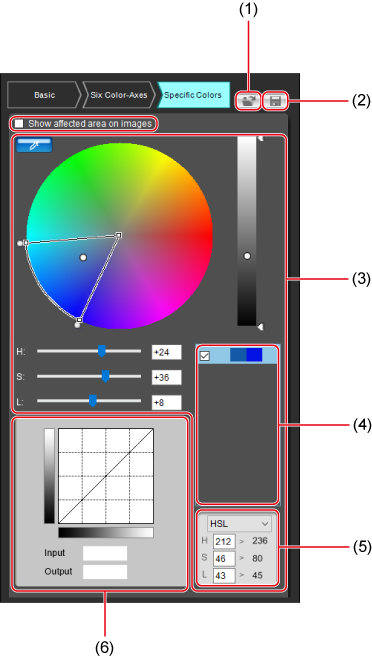
- (1) Load a Picture Style file ()
- (2) Save a Picture Style file ()
- (3) Fine-tune specific colors ()
- (4) Adjustment color list ()
- (5) Color mode ()
- (6) Adjust the luminance curve ()
Note
- Image characteristics may not be as expected if you make adjustments on the [Specific Colors] pane before adjustments on the [Six Color-Axes] or [Basic] pane, which will alter color characteristics again.
-
We recommend that you make adjustments in the following order.
- Adjustments on the [Basic] pane
- Adjustments on the [Six Color-Axes] pane
- Adjustments on the [Specific Colors] pane
-
Specify the color to adjust.
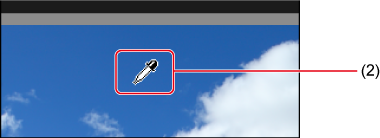
- Click the [
 ] button (1), and in the image, click the color to adjust (2).
 - You can also enter color values directly on a screen accessed by selecting [Specify the numerical values for color adjustment] in the [Edit] menu.
- The selected color is displayed as an adjustment point [
 ] on the color wheel.
- Click the [
-
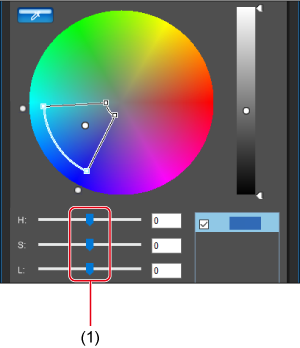
Define the range of nearby colors affected by these adjustments.
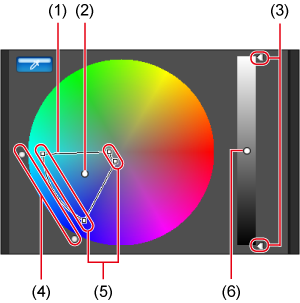
- Defines the scope of your adjustments
- Color of the adjustment point selected in step 2
-
Range of luminosities affected
- Drag up or down to adjust
-
Range of hues affected
- Drag the outer points of the pie wedge to adjust
-
Range of saturations affected
- Drag the outer points inward or outward to adjust
- Luminosity of the adjustment point selected in step 2
-
The following ranges are available for the hues, saturations, and luminosities affected.
Setting Range Hue 30–180 degrees Saturation 30–100 Luminosity 30–100
-
Adjust the color.
- Drag left or right to adjust
- Colors in the ranges defined in step 3 are adjusted accordingly and updated in the sample image.
- Points before [] and after adjustment [
 ] are shown on the color wheel as you drag the sliders.
-
Check the extent of adjustment.
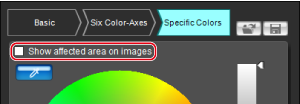
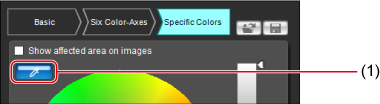
- To view the extent of colors affected by your adjustments (indicated by blinking on the image), select [Show affected area on images].
-
Repeat steps 2–5 as needed to adjust multiple colors.
- You can select and adjust colors by using up to 100 adjustment points.
Note
- The [Show affected area on images] checkbox is not displayed when PSE is used with Remote Live View in EOS Utility for Picture Style editing. Moreover, it is not possible to review the extent of colors affected by adjustments.
Using the Adjustment Color List
The adjustment color list () shows before-and-after samples of adjusted colors ((1) and (2), respectively), warnings if adjustments to multiple colors overlap each other (3), and checkboxes to apply adjusted colors (4).
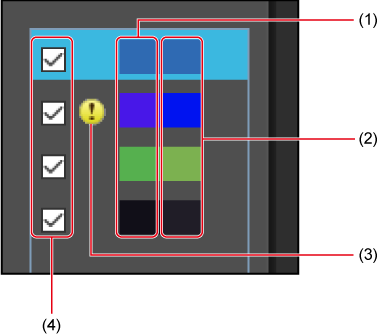
Warnings about overlapping adjustments
- If adjustments for a color selected in the adjustment color list affect other listed colors, [
 ] is displayed next to the affected colors.
 - On the color wheel, areas affected by more than one adjustment are shown in gray.
- To avoid settings that cause overlapping adjustments, readjust colors labeled with [] so that the hue and saturation do not overlap.
Removing adjusted colors
- In the adjustment color list, select a color to remove and press the Delete key.
- Note that colors you remove cannot be restored.
Color Modes
You can select a color mode to use for color adjustments, and the before/after values are indicated in that mode.
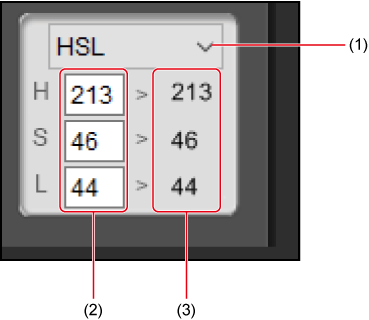
- Switch color modes
- Color value before adjustment
- Color value after adjustment
Note
- HSL is a color mode based on the three elements of hue, saturation, and luminosity. Selecting HSL enables direct input of original color values, before adjustment.
- Lab is a color mode developed by the International Commission on Illumination (CIE) in which L represents lightness, a color components from green to magenta, and b components from blue to yellow.
- RGB is a color mode expressed by the three primary additive colors of visible light – red, green, and blue.
Adjusting Luminance Curves
Use the tone curve on the [Specific Colors] pane to adjust luminance. Adjust luminance if additional adjustment of contrast and brightness is needed after adjustments on the [Six Color-Axes] or [Specific Colors] pane.

- The horizontal axis represents the input level, and the vertical axis, the output level.
- Click the tone curve (1) to add an adjustment point ([
 ]). Drag adjustment points to edit the tone curve. You can also set adjustment points by entering values in (2).
 - Up to 10 adjustment points can be set.
- To remove an adjustment point, either double-click the point or click a point and press the Delete key.
- Points can also be arranged by clicking a point and entering values directly in (2).