Bağlantılı Çekim
2012 yılı veya daha sonrasında kullanıma sunulan bir EOS dijital fotoğraf makinesi kullanıyorsanız (EOS 4000D/3000D, EOS 1500D/2000D, EOS 1300D ve EOS 1200D hariç), bağlantılı çekim özelliği desteklenir. Bu özellikte, gönderici fotoğraf makinesiyle çekim yapıldığında alıcı fotoğraf makinelerinin deklanşörü otomatik olarak tetiklenir. Toplamda 16 adede kadar gönderici ve alıcı fotoğraf makinesi ile bağlantılı çekim yapabilirsiniz. Bu, bir konuyu aynı anda farklı açılardan çekerken kullanışlıdır.
Bağlantılı çekim için, fotoğraf makinelerine radyo aktarımlı kablosuz flaşlı fotoğrafçılığı destekleyen Speedlite'lar veya Speedlite Aktarıcılar takın. 2011 yılı veya öncesinde kullanıma sunulan bir fotoğraf makinesi* veya EOS 4000D/3000D, EOS 1500D/2000D, EOS 1300D veya EOS 1200D ile kullanıldığında, ünite yalnızca “gönderici fotoğraf makinesi ünitesi” olarak kullanılabilir. Ünite alıcı fotoğraf makinesi ünitesi olarak kullanılamaz.
Bazı fotoğraf makineleri desteklenmez.
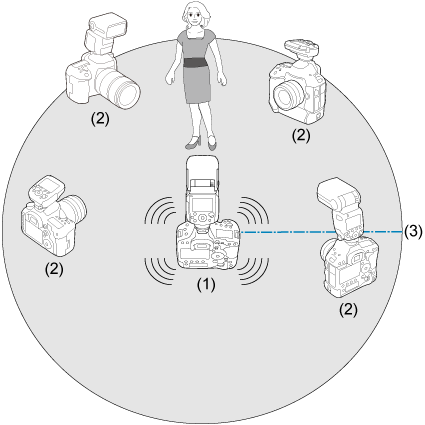
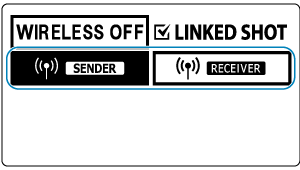
(1) Gönderici fotoğraf makineleri
(2) Alıcı fotoğraf makineleri
(3) Aktarım aralığı: Yaklaşık 30 m / 98,4 fit
Not
- Bu kılavuzda kolaylık sağlamak için EL-1 (2. Sürüm) ve bağlantılı çekim için ayarlanan diğer fotoğraf makineleri sırasıyla "gönderici fotoğraf makinesi" ve "alıcı fotoğraf makineleri" olarak anılacaktır.
Bu adımları uygulamadan önce, bağlantılı çekimde kullanacağınız tüm fotoğraf makinelerine bir Speedlite veya aktarıcı takın. Diğer cihazlardaki ayarla ilgili talimatlar için cihazların kullanım kılavuzlarına bakın.
-
Joystick ile
 seçimi yapın.
-
Normal çekim modunu ayarlayın.
- Joystick tuşuna dikey/yatay yönde basarak veya
 kadranını çevirerek
  seçimi yapın, sonra doğrudan joystick tuşuna basın.
- Bundan sonra ekran,
 olarak değişir.
- Joystick tuşuna dikey/yatay yönde basarak veya
-
Gönderici veya alıcı olarak ayarlayın.
- Joystick tuşuna dikey/yatay yönde basarak veya kadranını çevirerek

 veya
veya  seçimi yapın, sonra doğrudan joystick tuşuna basın.
- Joystick tuşuna dikey/yatay yönde basarak veya
-
Aktarım kanalını ve kablosuz radyo kimliğini ayarlayın.
- Talimatlar için , Aktarım Kanalını / Radyo Kimliğini Ayarlama konusuna bakın.
-
Fotoğraf makinesinde çekimi ayarlayın.
-
Tüm Speedlite’ları ayarlayın.
- Bağlantılı çekim ayarında, bağlantılı çekimde kullanacağınız tüm Speedlite'ları gönderici veya alıcı olarak ayarlayın.
- Aynı işlemi kullanacağınız aktarıcılar için de yapın.
- 2. Adımda bir Speedlite’ın alıcı konumundan gönderici konumuna çevrilmesi, alıcı olarak ayarlanan diğer Speedlite’ları (veya aktarıcıları) otomatik olarak değiştirir.
-
Alıcı fotoğraf makinelerini konumlandırın.
- Tüm alıcı fotoğraf makinelerini, gönderici fotoğraf makinelerine yaklaşık 30 m / 98,4 fit'lik kapsamda konumlandırın.
- Alıcıların
 lambasının yeşil renkte yandığını onaylayın.
-
Fotoğrafı çekin.
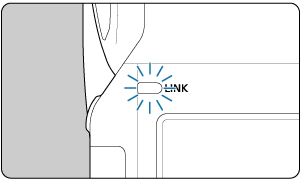
- Çekimden önce göndericinin lambasının yeşil renkte yandığını onaylayın.
- Gönderici fotoğraf makinesi ile çekim yapıldığında, alıcı fotoğraf makinelerinden çekim otomatik olarak etkinleştirir.
 simgesi, bağlantılı çekimde kullanılan alıcıların LCD panelinde görüntülenir.
- Çekimden önce göndericinin
Not
- Bağlantılı çekimi iptal etmek için 2. Adımda her Speedlite’ta ayarı
 olarak değiştirin.
 - Bu özellik, gönderici Speedlite'ı bir fotoğraf makinesine takmadan dahi bağlantılı çekimi uzaktan kumanda etmek için kullanılabilir. Tüm alıcı fotoğraf makinelerinden flaş patlatmak için göndericinin joystick tuşuna doğrudan basın, sonra dikey veya yatay yönde basarak veya kadranını çevirerek
 seçimi yapın.
 - Otomatik kapanma, hem göndericiler hem de alıcılar için bağlantılı çekimde yaklaşık 5 dakika içinde etkinleşir. Bağlantılı çekimde çekimler arasında bundan daha fazla zaman geçecekse, hem göndericilerde hem de alıcılarda otomatik kapanma ayarını [Kapalı] olarak ayarlayın (Ö.İş-01-1).
- K.İş-06’te [0]’a ayarlanan () her bir Speedlite’tan (gönderici ve alıcılar), tam şarj sonrasında bip sesi duyulur.
Önlem
- Bağlantılı çekim öncesinde alıcı fotoğraf makinelerinde lens odak modu düğmesini
 konumuna ayarlayın ve manuel odaklanın. Alıcı fotoğraf makineleri AF ile konulara odaklanamadıkları sürece bağlantılı çekim yapamazlar.
 - Alıcı fotoğraf makinesi ünitesinin tetiklenmesi ile gönderici fotoğraf makinesi ünitesinin tetikleme zamanlaması arasında çok kısa bir gecikme olur. Kusursuz şekilde eşzamanlı çekim yapmak mümkün değildir.
- Bağlantılı çekimde K.İş-03, [1] () olarak ayarlandığında flaş patlayabilir ancak birden fazla sayıda Speedlite birlikte patlatılırsa, uygun pozlamayı engelleyebilir veya dengesiz pozlamaya neden olabilir.
- Gönderici fotoğraf makinesi ünitesinde [Harici Speedlite kontrolü] veya [Flaş kontrolü] altında [Flaş çakma] [Kapalı] olarak ayarlandığında bağlantılı çekim yapılamaz ().
- K.İş-03-0 olarak ayarlandığında (), canlı izleme çekimi izlenirken bağlantılı çekim mümkün değilse, gönderici fotoğraf makinesi ünitesinin menüsünde [Yumuşak Cİ çekimi] veya [Sessiz Cİ çekim] seçeneğini [Kapalı] olarak ayarlayın. Fotoğraf makinesi modeline bağlı olarak, alıcı fotoğraf makinesi ünitesi [Mod 1] veya [Mod 2] olarak ayarlanmışsa bağlantı kurulmayabilir.
- Speedlite'ın konumlandırılması, çevredeki ortam ve hava koşulları gibi faktörlere bağlı olarak aktarım aralığı daha kısa olabilir.
- Bu bağlantılı çekim, WFT serisi kablosuz dosya aktarıcılarıyla bağlantılı çekime eşdeğerdir. Ancak, bu bağlantılı çekimde WFT serisi aktarıcılar kullanılamaz. Ayrıca deklanşöre basma gecikmesinin WFT serisinden farklı olduğunu unutmayın.
Önlem
Canlı İzleme işleviyle bağlantılı çekim
- K.İş-03-0 olarak ayarlandığında (), aşağıdaki fotoğraf makineleri birleştirilir ve gönderici makineler olarak ayarlanırsa, Canlı İzleme modunda bağlantılı çekim mümkün değildir.
- Canlı İzleme çekimini vizörlü çekime geçirdikten veya Speedlite'ı K.İş-03-1 konumuna ayarladıktan sonra bağlantılı çekim yapın.
EOS 760D, EOS 750D, EOS 700D, EOS 650D, EOS 600D, EOS 550D, EOS 500D, EOS 450D, EOS 1000D