Kablosuz Ayarlar
- Gönderici Olarak Ayarlama
- Alıcı Olarak Ayarlama
- Aktarım Kanalını / Radyo Kimliğini Ayarlama
 Lamba ve Bağlantı Göstergesi
- Gönderici Flaş Patlatması Açma / Kapatma
- Bellek İşlevi
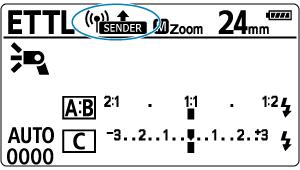
E-TTL II / E-TTL otomatik flaşlı radyo aktarımlı kablosuz flaşlı fotoğrafçılık için gönderici ve alıcıyı aşağıdaki gibi ayarlayın.
Gönderici Olarak Ayarlama
-
Joystick ile
 seçimi yapın.
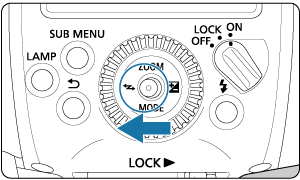
-

 ayarı yapın.
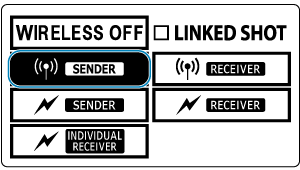
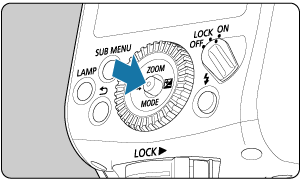
- Joystick tuşuna dikey/yatay yönde basarak veya
 kadranını çevirerek seçimi yapın, sonra doğrudan joystick tuşuna basın.
- Joystick tuşuna dikey/yatay yönde basarak veya
-
Patlatma yöntemini seçin.

- Doğrudan joystick tuşuna basın.
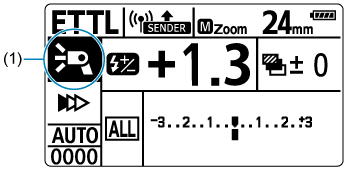
- Joystick tuşuna dikey/yatay yönde basarak veya kadranını çevirerek öğeyi (1) seçin, sonra doğrudan joystick tuşuna basın.
- Joystick tuşuna yatay yönde basarak veya kadranını çevirerek
 ,
,  veya
veya  seçimi yapın, sonra doğrudan joystick tuşuna basın.
Alıcı Olarak Ayarlama
-
 ayarı yapın.
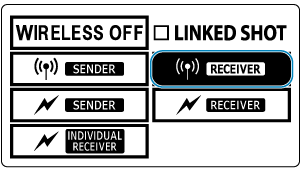
- Alıcı olarak kullanmak için Speedlite'larda bu ayarı yapılandırın.
- Göndericiyi ayarladığınız gibi seçimi yapın.
Önlem
- Normal flaşlı fotoğrafçılıktan önce
 seçimi yaparak kablosuz (gönderici / alıcı) ayarlarını temizleyin.
Aktarım Kanalını / Radyo Kimliğini Ayarlama
Göndericinin aktarım kanalını ve kablosuz radyo kimliğini ayarlayın. Hem gönderici hem de alıcılar için aynı kanalı ve kimliği ayarlayın. Alıcı talimatları için, radyo aktarımlı kablosuz alıcı işlevine sahip Speedlite'ların kullanım kılavuzuna bakın.
Önlem
- Her kanal için farklı kablosuz radyo kimlikleri ayarlayın, çünkü üniteler farklı aktarım kanallarına ayarlanmış olsa bile radyo aktarımı ile kontrol edilen Speedlite'ları olan sistemler arasında parazit oluşabilir.
-
Doğrudan joystick tuşuna basın.
-
Öğe (1) seçin.
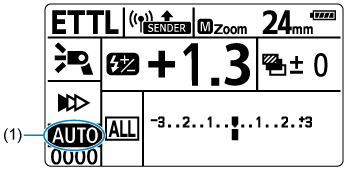
- Joystick tuşuna dikey/yatay yönde basarak veya kadranını çevirerek kanal ögesini seçin, sonra doğrudan joystick tuşuna basın.
- Joystick tuşuna dikey/yatay yönde basarak veya
-
Bir aktarım kanalı ayarlayın.
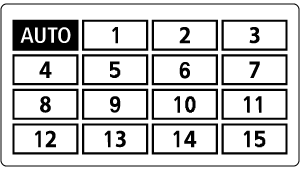
- Joystick tuşuna dikey/yatay yönde basarak veya kadranını çevirerek
 veya 1–15 kanalları arasından seçim yapın, sonra doğrudan joystick tuşuna basın.
- Joystick tuşuna dikey/yatay yönde basarak veya
-
Öğe (2) seçin.
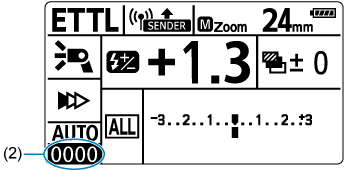
- Aktarım kanalını ayarladığınız gibi kimlik öğesini seçin, ardından doğrudan joystick tuşuna basın.
-
Kablosuz radyo kimliğini ayarlayın.
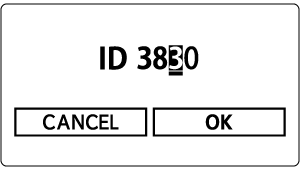
- Ayarlanacak pozisyonu (basamak) seçmek için joystick tuşuna yatay yönde basın veya kadranını çevirin, sonra doğrudan joystick tuşuna basın.
- 0–9 aralığında bir rakam seçmek için joystick tuşuna dikey yönde basın veya kadranını çevirin, sonra doğrudan joystick tuşuna basın.
- Aynı şekilde 4 basamaklı bir rakam belirleyin, sonra
 seçimi yapın.
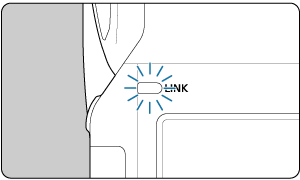
- Gönderici ve alıcı arasında iletişim kurulduğunda
 lambası yeşil renkte yanar.
- Ayarlanacak pozisyonu (basamak) seçmek için joystick tuşuna yatay yönde basın veya
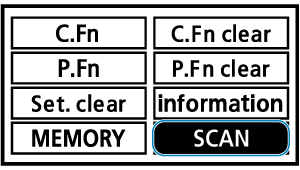
Gönderici aktarım kanallarını tarama ve ayarlama
Radyo sinyal koşullarını tarayabilir ve sonra gönderici aktarım kanalını otomatik veya manuel olarak ayarlayabilirsiniz. Kanalı [Otomatik] olarak ayarlamanız, Speedlite'ı otomatik olarak en güçlü sinyale sahip kanala sıfırlayacaktır. Kanalı manuel olarak ayarlarken, sıfırlama sırasında tarama sonuçlarını gözden geçirebilirsiniz.
-
[Otomatik] ayarındayken tarama
-
 tuşuna basın.
-
Taramayı çalıştırın.
- Joystick tuşuna dikey/yatay yönde basarak veya kadranını çevirerek
 seçimi yapın, sonra doğrudan joystick tuşuna basın.
 - seçimi yapın.
- Tarama gerçekleştirilir ve ayar en güçlü sinyale sahip kanala sıfırlanır.
- Joystick tuşuna dikey/yatay yönde basarak veya
-
-
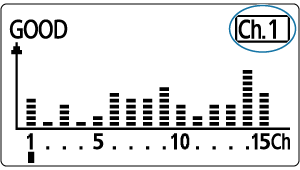
Bir kanal (1–15) ayarındayken tarama
-
tuşuna basın.

-
Taramayı çalıştırın.
- Joystick tuşuna dikey/yatay yönde basarak veya kadranını çevirerek seçimi yapın, sonra doğrudan joystick tuşuna basın.
- seçimi yapın.
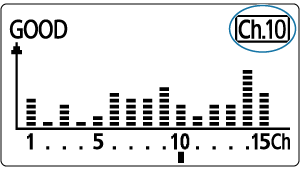
- Tarama gerçekleştirilir ve sinyal koşullarının grafiği görüntülenir.
-
Grafikteki daha yüksek noktalar daha güçlü sinyalleri gösterir.
- Joystick tuşuna dikey/yatay yönde basarak veya
-
Kanalı ayarlayın.
- Kanal 1 - 15 arasından seçim yapmak için joystick tuşunu yukarı/aşağı/sola ve sağa doğru itin veya kadranını çevirin.
-
Kanalı ayarlamak için doğrudan joystick tuşuna basın.
- Kanal 1 - 15 arasından seçim yapmak için joystick tuşunu yukarı/aşağı/sola ve sağa doğru itin veya
-
Lamba ve Bağlantı Göstergesi
Bağlantı durumunu ![]() lambasının durumundan veya LCD paneldeki simgeden belirleyebilirsiniz.
lambasının durumundan veya LCD paneldeki simgeden belirleyebilirsiniz.
| Durum | Tanım | Eylem |
|---|---|---|
| Yanar | Bağlı | – |
| Kapalı | Bağlı değil | Kanalı ve kimliği kontrol edin |
| Kapalı | Çok fazla ünite var | Birlikte, 16 gönderici ve alıcıyı geçmeyin |
| Kapalı | Hata | Göndericileri ve alıcıları yeniden başlatın |
| Yanar | Bağlı*1 | – |
| Yanar | Bağlı*2 | – |
1: Gönderici tarafı, alt göndericiye bağlandığında
2: Gönderici tarafı, bağlantılı çekim için bağlandığında
| Ekran | Tanım | Eylem |
|---|---|---|
| Bağlı | – | |
| Bağlı değil | Kanalı ve kimliği kontrol edin | |
| Çok fazla ünite var | Birlikte, 16 gönderici ve alıcıyı geçmeyin | |
| Hata | Göndericileri ve alıcıları yeniden başlatın | |
| Bağlı*1 | – |
1: Gönderici tarafı, alt göndericiye bağlandığında
Önlem
- Gönderici ve alıcı kanalları eşleşmediği sürece alıcılar patlamaz. Her ikisini de aynı numaraya ayarlayın veya her ikisini de [Otomatik] olarak ayarlayın.
- Alıcılar, gönderici ve alıcı kablosuz radyo kimlikleri eşleşmediği sürece patlama yapmaz. Aynı numaraya ayarlayın.
Gönderici Flaş Patlatması Açma / Kapatma
Göndericinin kablosuz olarak kontrol ettiği alıcılarla birlikte patlayıp patlamayacağını ayarlayabilirsiniz. Gönderici flaş patlatması açık olduğunda gönderici, patlama grubu A olarak patlar.
-
Doğrudan joystick tuşuna basın.

-
(1) ile gösterilen öğeyi seçin.
- Joystick tuşuna dikey/yatay yönde basarak veya kadranını çevirerek öğeyi seçin, sonra doğrudan joystick tuşuna basın.
- Joystick tuşuna dikey/yatay yönde basarak veya
-
Gönderici flaş patlatmasını ayarlayın.
- Gönderici flaş patlatmasını açmak veya kapatmak için kadranını çevirin, sonra doğrudan joystick tuşuna basın.
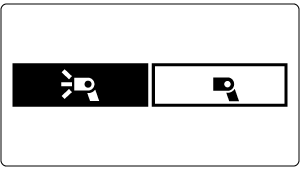
 : Gönderici flaşı patlatma AÇIK
 : Gönderici flaş patlatma KAPALI
- Gönderici flaş patlatmasını açmak veya kapatmak için
Bellek İşlevi
Kablosuz ayarlarını gönderici üniteye ve alıcı üniteye kaydedebilir ve bu ayarları daha sonra çağırabilirsiniz. Ayarlarını kaydetmek veya geri çağırmak için her bir gönderici veya alıcı ünitede ayrı ayrı işlem yapın.
-
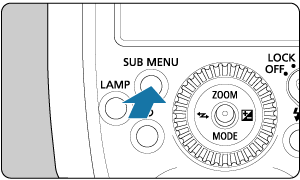
tuşuna basın.
-
 seçimi yapın.
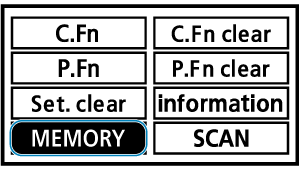
- Joystick tuşuna dikey/yatay yönde basarak veya kadranını çevirerek seçimi yapın, sonra doğrudan joystick tuşuna basın.
- Joystick tuşuna dikey/yatay yönde basarak veya
-
Ayarları kaydedin veya yükleyin.
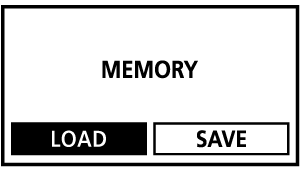
Kaydet
- Joystick tuşuna yatay yönde basarak veya kadranını çevirerek
 seçimi yapın, sonra doğrudan joystick tuşuna basın.
 - Joystick tuşuna yatay yönde basarak veya kadranını çevirerek seçimi yapın, sonra doğrudan joystick tuşuna basın.
- Ayarlar kaydedilir (bellekte saklanır).
Yükle
- Joystick tuşuna yatay yönde basarak veya kadranını çevirerek
 seçimi yapın, sonra doğrudan joystick tuşuna basın.
 - Joystick tuşuna yatay yönde basarak veya kadranını çevirerek seçimi yapın, sonra doğrudan joystick tuşuna basın.
- Kaydedilen ayarlar ayarlanır.
- Joystick tuşuna yatay yönde basarak veya