Labeling
- Labeling Images
- Sorting Thumbnails
- Single-Thumbnail Display of RAW+JPEG Images
- Checking Image Information
Labeling Images
You can label images by adding checkmarks or setting ratings (indicated by [![]() ] marks) for easy sorting.
] marks) for easy sorting.
Adding checkmarks
-
Display an image to add a checkmark to in the Quick Check window () or elsewhere, then click an option from [
 ] to [
 ].
].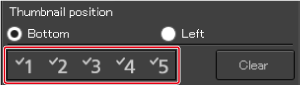
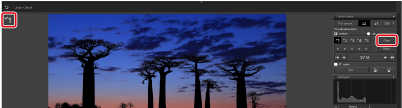
- Your selected checkmark label appears in the upper left of the window.
- Click [Clear] to remove checkmarks.
Note
- Checkmark values added in versions of the software before Digital Photo Professional 4 are not transferred to later versions.
- You can also add checkmarks by right-clicking (in Windows) or Control-clicking (in macOS) the image.
Setting ratings
-
Display an image to rate, then click one of the [
 ] marks.
- The rating is set, and icons for the [
 ] mark selected appear in the upper left of the window. (In the following example, the window shows a rating of three [].)
 - To set [Reject], click [Reject]. Click [Reject] again to cancel.

- To clear a rating and remove the [] label, click the current [] mark at the right of the window.
Caution
- Setting a rating may prevent you from checking the image information in third-party software.
- The rating is set, and icons for the [
Note
- To select multiple images, Control-click (Windows) or
 -click (macOS) each image.
 - To select multiple consecutive images, click the first image, then click the last image while holding down the Shift key.
- Ratings set on cameras that support rating display can be viewed or changed in DPP.
- You can also add checkmarks and set ratings from the [Label] menu.
- Ratings you set in DPP can also be viewed or changed in other EOS software and on cameras other than the following models.
- Ratings set on cameras other than the following models can be viewed or changed in DPP.
-
Ratings set in DPP are displayed on the playback screen of cameras other than the following models. These ratings can also be changed, but [Reject] ratings cannot be displayed or changed.
- EOS-1D Mark IV, EOS-1Ds Mark III, EOS-1D Mark III, EOS-1D Mark II N, EOS-1Ds Mark II, EOS-1D Mark II, EOS-1D, EOS-1Ds, EOS 5D Mark II, EOS 5D, EOS 7D (with firmware earlier than ver. 2.0.0), EOS 50D, EOS 40D, EOS 30D, EOS 20D/EOS 20Da, EOS 10D, EOS D2000, EOS D6000, EOS D30, EOS D60, EOS REBEL T2i/550D, EOS REBEL T1i/500D, EOS DIGITAL REBEL XSi/450D, EOS DIGITAL REBEL XS/1000D, EOS DIGITAL REBEL XTi/400D, EOS DIGITAL REBEL XT/350D, and EOS DIGITAL REBEL/300D
Sorting Thumbnails
You can sort images by checkmark label, shooting date/time, or other criteria, and you can freely rearrange individual images as needed.
Sorting by type
-
Select a criterion from [Sort] in the [Thumbnails] menu.
Main Sort Items Description File name: ascending order Images are sorted by file name in alphanumeric order (0 to 9 → A to Z). Extension: ascending order Images are sorted in the following order: RAW images → JPEG images → TIFF images → MOV movies → MP4 movies. Shooting date/time: ascending order Images are sorted by shooting date and time from the earliest. Checkmark: ascending order Images with checkmark labels are listed before others and in ascending numerical order. Rating: ascending order Sorted from fewest to most [ ] marks.Camera model name: ascending order Sorted in ascending order by camera model name.
(Ex.: EOS-1D X → EOS 6D)Lens: ascending order Sorted by lens focal length, shortest length first. ISO speed: ascending order Sorted by ISO speed, slowest first. Shutter speed: ascending order Sorted by shutter speed, fastest first. Aperture value: ascending order Sorted by aperture value, lowest first. Focal length: ascending order Sorted by focal length set on the lens, shortest first. Blur/out-of-focus image detection Images can be sorted by [Blur/Out-of-Focus image detection] levels. Four detection levels are available, ranging from [*] for images that are greatly blurred/out of focus to [****] for images with minimal blurring or lack of focus. - You can also sort images by [Image Size], [RAW Type], and [Recipe editing status].
Freely rearranging
-
Drag images to move them.

- You can also select multiple images and move them all at once.
- The sort order of images you have freely rearranged is temporarily registered as [Custom] in the [Filter/Sort pane] and maintained until you exit DPP or select another folder in the folder area.
- To restore the default sort order, select both [File name] and [Ascending] from [Sort] in the [Thumbnails] menu.
Single-Thumbnail Display of RAW+JPEG Images
You can display a RAW image and JPEG image captured at the same time as a single image by selecting [Group RAW and JPG versions] in the [Thumbnails] menu.
This makes it easier to check images, because only half the total number of these thumbnails will be displayed.
-
In the [Thumbnails] menu, select [Group RAW and JPG versions].
Caution
- Single-thumbnail display is not available for images captured together by cameras that save RAW images with a .CRW or .TIF file extension.
- With single-thumbnail display, the RAW image is shown in all windows. Note that editing in DPP only applies to the RAW image.
-
The following functions apply to both RAW and JPEG images.
Note
- Adding the RAW and JPEG images that are displayed as a single image to the [Collection] window increases the number of images indicated on the [Collection] tab sheet by two.
Checking Image Information
-
Select an image.
-
Select [Info] in the [View] menu.
-
Select a tab.
[Exif Information] tab
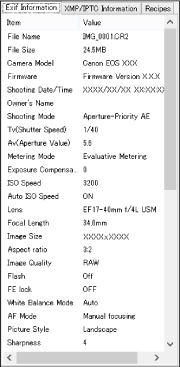
- Shows shooting information. Note that the details shown vary by camera model.
[XMP/IPTC Information] tab

-
Shows IPTC* metadata that images are tagged with after capture.
International Press Telecommunications Council metadata includes image comments such as captions, credits, and the shooting location. Five sections can be viewed by selecting [Description], [IPTC Contact], [IPTC Image], [IPTC Content], or [IPTC Status] from the list box.
[Recipes] tab
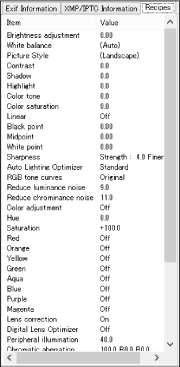
- Shows details about the recipes applied to images.
Note