Using Browser Remote
Using Browser Remote, you can shoot remotely with a sender camera linked to receiver cameras that are set to shoot consecutively.
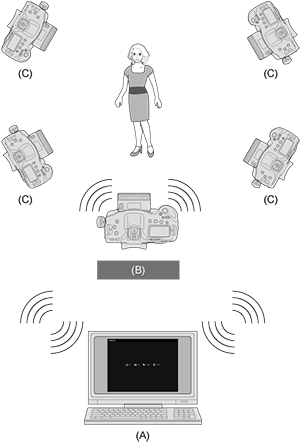
- (A) Browser Remote
- (B) Sender Camera
- (C) Receiver Camera
- Connecting the Sender Camera and Receiver Cameras
- Checking the Camera's IP Address and SSID
- IP Addresses Assigned to a Computer
- Connecting the Sender Camera with a Computer
- Viewing Images and Shooting Remotely
Connecting the Sender Camera and Receiver Cameras
-
Prepare the sender camera.
- Perform Step 1 through 7 for "Preparing Sender Camera" described in Basic Linked Shooting.
-
Select [Manual connect].
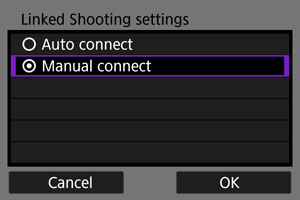
- Select [OK] to proceed to the next screen.
-
Specify the channel.
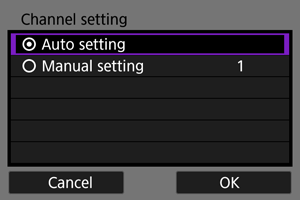
- When selecting [Manual setting], specify the same channel on the sender camera and receiver cameras, as well as on the computer.
- Select [OK] to proceed to the next screen.
-
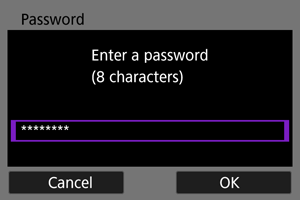
Specify the password.
-
Prepare the receiver cameras.
- Perform Step 2 and 3 for "Preparing Receiver Cameras" in Basic Linked Shooting.
-
Connect the sender camera and receiver cameras.
- Perform Step 2 and 3 for "Connecting the Sender Camera and Receiver Cameras" described in Basic Linked Shooting.
Checking the Camera's IP Address and SSID
To access the camera from a computer, the camera's IP address and SSID displayed in Step 5 must be entered.
-
Select [
: Network settings].
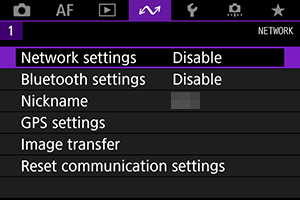
-
Select [Connection settings].

-
Select [LinkedShot].
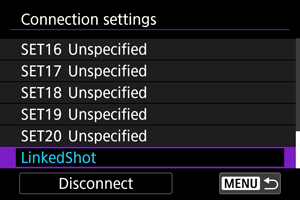
- Use
and select [LinkedShot] located at the bottom.
- Use
-
Select [Confirm settings].
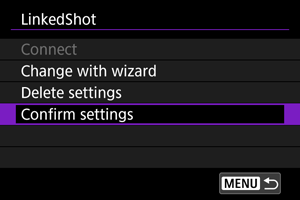
- The settings are displayed.
-
Check the settings.
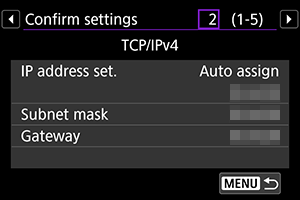
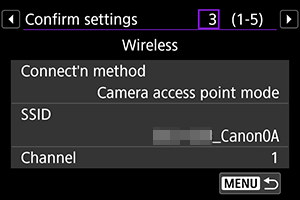
- Use
to switch pages.
- Write down the IP address and SSID.
- The SSID is the same for all cameras.
- Once you have verified the settings, press the
button to exit the confirmation dialog.
- Use
- Confirm the settings on the sender camera and all the receiver cameras with the same procedure.
IP Addresses Assigned to a Computer
If you set the computer's IP address setting to auto acquisition or manual setting, assign an IP address that is different from the IP addresses of the sender camera and receiver camera that you noted in Step 5 of Checking the Camera's IP Address and SSID.
Connecting the Sender Camera with a Computer
To connect the sender camera with your computer, use the wireless LAN device search function that is available on the computer.
- For details of the wireless LAN search function, refer to the computer's instruction manual.
- Before you perform this operation, set up your WFT account on the [Browser Remote settings] screen in advance ().
-
From your computer, find the sender camera on the network.
- Use your computer's wireless LAN device search function that is available on the computer.
-
Connect to the sender camera.
- Select a device having the same ID as the sender camera's SSID you noted in Step 5 of Checking the Camera's IP Address and SSID.
- In the password field, enter the password specified in Step 4 of Connecting the Sender Camera and Receiver Cameras.
- Your computer is now connected to the sender camera.
-
Display Browser Remote.
- For the operation procedure, see Operating the Camera Using Browser Remote.
- For the URL entry field, enter the IP address of the sender camera you noted in Step 5 of Checking the Camera's IP Address and SSID.
- To log in, enter the WFT account information ([Login name] (user name) and [Password]) you set up in advance.
Viewing Images and Shooting Remotely
- For the operation procedure of Browser Remote, see Operating the Camera Using Browser Remote.
- You can switch the camera to connect by entering the IP address of the sender camera on a web browser.