Bounce
Pointing the flash head at a ceiling or wall to use the light reflected from it can soften subject shadows, enabling more natural-looking shots. This shooting method is referred to as bounce flash photography.
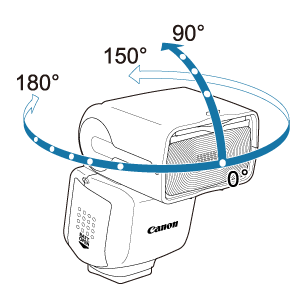
Setting the orientation of the flash head
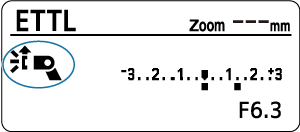
- You can turn or tilt the flash head as shown. Turning or tilting the flash head changes the display to
 .
. - With the Speedlite set to
 (Auto) flash coverage, turning the flash head sets flash coverage to 50 mm, and --- is displayed.
 - You can also set the flash coverage manually ().
Note
- Bouncing light off ceilings or walls that are too far away may not provide sufficient exposure, because not enough light will reach the subject.
- If your shots are too dark, reduce the aperture value (f/number) to open the aperture and try again. You can also try increasing the ISO speed.
- Choose a plain white or off-white ceiling or wall to bounce the light off, because these are more reflective. Reflections off non-white surfaces may not provide sufficient exposure – not enough light may reach the subject, and your shots may be affected by the color of surface used.
- Using Quick flash in bounce flash photography is more likely to cause underexposure, from the reduced flash output.
Catchlight Shooting
Using the catchlight panel when shooting a portrait enables you to capture reflected light in a person's eyes and create a more vivid expression.
-
Tilt the flash head up 90°.
-
Pull up the wide panel.
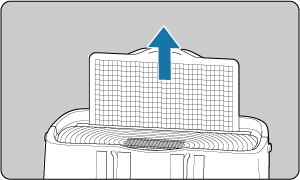
- Lift the tab in the middle of the wide panel.
- The white catchlight panel comes out with it.
-
Push back the wide panel.
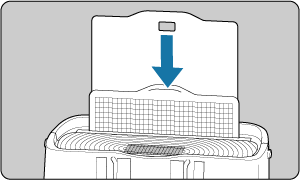
- Push back the wide panel by itself, leaving only the catchlight panel up.
- Shooting is the same as in normal bounce flash photography.
Caution
- Position the flash head toward the front and 90° up. When the flash head is rotated to the left or right, the catchlight is not very effective.
- To effectively obtain the catchlight in a person's eyes, shoot within approx. 1.5 m / 4.9 ft. from the subject (at ISO 100 with f/2.8).
- Do not pull up the wide panel with excessive force. Doing so may detach the wide panel from the Speedlite.
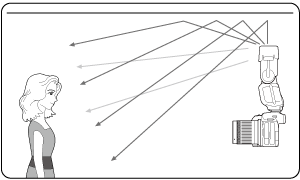
Shooting with a Bounce Adapter
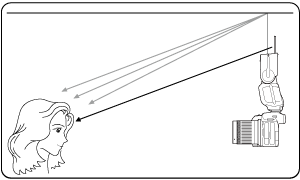
By attaching a bounce adapter (sold separately) to the Speedlite, the flash can be bounced off the ceiling, walls, etc. when shooting to diffuse it over a wider area for a softer flash and reduce subject shadows.
When the flash head is positioned at 90° to bounce off the ceiling, etc., diffused lighting from the side of the bounce adapter will hit the subject from the front (approximate shooting distance: within 1.5 m / 4.9 ft., at ISO 100 and f/2.8), further reducing subject shadows. When shooting people, this can also create catchlights.
-
Attach the bounce adapter.
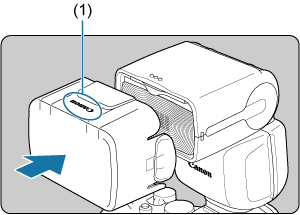
(1) Canon logo

- Securely attach the adapter to the flash head as shown in the figure until you hear a “click.”
- Make sure that the display shows
 .
. - To remove the adapter, lift the left and right ejector tabs to release and remove the adapter from the flash head.
-
Take the picture.
- Bounce off the ceiling, walls, etc. while shooting.
Caution
- When using a bounce adapter or a bounce adapter with a wide panel, the guide number will drop and underexposure is more likely. As necessary, raise the camera ISO speed or use flash exposure compensation ().
- As using Quick flash () with a bounce adapter attached may result in insufficient flash output, in such cases it is recommended to wait for the flash-ready lamp to lit in red before shooting.
- Flash coverage is set automatically when a bounce adapter is attached. It cannot be changed manually.