Remote Live View Window Functions
- Focusing Using AF
- Focusing Manually
- Checking Depth of Field and Exposure
- Setting the White Balance
- Electronic Level Display
- Changing the Aspect Ratio
- Audio Recording Setting
- Overlaid Display Function
- Grid Display
- Guide Display
- Guide Display (Angled)
- Powered Zooming
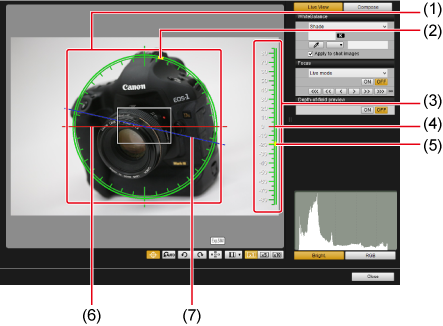
Focusing Using AF
You can set the AF method, AF area, and other functions used in autofocus shooting.
-
Configurable functions vary depending on the camera connected.
-
For details on AF precautions and available functions, refer to the instruction manual of the connected camera.
-
Set the lens's focus mode switch to AF.
-
Set the AF/MF switch in the capture window to [AF].
-
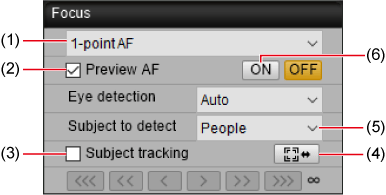
Choose an AF method or area.
- Select from the list box (1).
-
Configure other functions.
- When [Eye detection] is displayed, the corresponding AF conditions can be selected from the list box.
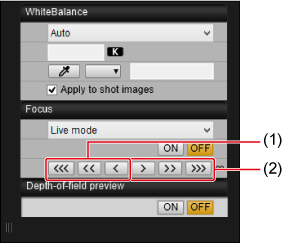
- For continuous AF when these options are shown, select [Continuous AF] or [Preview AF] (2).
- For Movie Servo AF when this option is shown, select [Movie Servo AF].
- Select [Subject tracking] (3), when displayed, to show a tracking frame ([
 ]) for the main subject detected. You can start and stop tracking with [
 ] (4).
 - You can set conditions for automatic selection of the main subject to track in the subject detection list box (5), when this option is displayed.
-
Set the focal position.
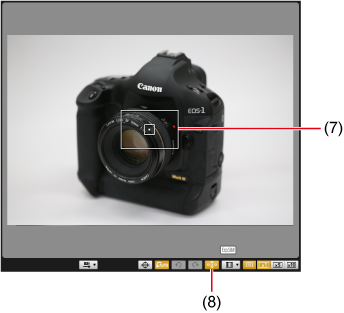
- Drag the magnifying frame (7) or click where you wish to focus.
- You can switch between showing and hiding the AF points by clicking [
 ] (8).
-
Click [ON] (6).
Caution
- Set [Orientation linked AF point] to [Same for both vert/horiz]. Autofocusing may not work correctly when set to [Select separate AF points].
Note
- Autofocusing continues even if an AF point is double-clicked.
- To stop AF operation, click [OFF].
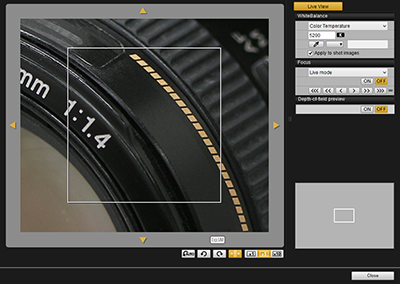
Focusing Manually
You can focus manually while viewing a magnified image in the [Remote Live View window].
-
Set the lens's focus mode switch to AF.
-
Set the AF/MF switch in the capture window to [MF].
-
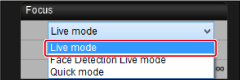
Select [Live mode], [1-point AF], [Live 1-point AF], or [Spot AF] from the list box.
- Clear the [Continuous AF] checkbox if is displayed.
-
Drag the magnifying frame ([□], 1) to the area to magnify.
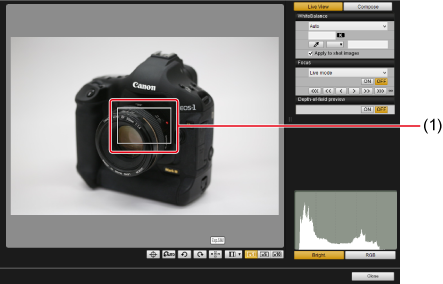
- The magnifying frame ([□]) can also be moved by clicking an area to move it to.
-
Click [
 ] or [
 ].
].
- Available magnification may vary depending on the camera connected.
-
The section you selected in step 4 is displayed enlarged in the Zoom View window.
- To move the display position in the Zoom View window, click [
 ], [
], [ ], [
], [ ], [
], [ ]. You can also move the display position by dragging in the window.
 - You can also display a magnified view in the Zoom View window by double-clicking the area to enlarge in step 4.
- To return to the [Remote Live View window], double-click the image in the Zoom View window.
-
Adjust the focus.
- Closer
- Further away
-
[
 ], [
], [ ]: Adjust by a large amount
 -
[
 ], [
], [ ]: Adjust by a medium amount
 -
[
 ], [
], [ ]: Adjust by a small amount
 -
The [Remote Live View window] is updated in real time in response to your adjustments.
Note
-
Keyboard-based focusing is also supported.
Amount of Adjustment Closer Further Away Windows macOS Windows macOS Large I  +I
+IO +OMedium K +KL +LSmall < +<> +> -
You can click [
 ] to switch between showing and hiding the magnifying frame.
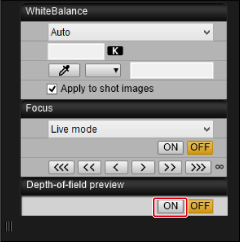
Checking Depth of Field and Exposure
You can check depth of field and exposure in the [Remote Live View window].
Setting the White Balance
You can configure white balance settings in the [Remote Live View window]. This white balance can also be registered on the camera.
- Configurable functions vary depending on the camera connected.
- For details on available functions, refer to the instruction manual of the connected camera.
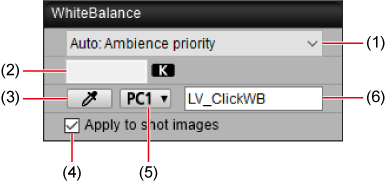
- Shows the white balance list.
- Color temperature can be entered when [Color Temperature] is selected in the list.
- Enables you to click an image area (white point) as the basis for white balance.
- When this option is selected, the current white balance is applied in shooting. If you have sampled a white point, your white balance is also registered on the camera as a personal white balance.
- Select a number to assign to your personal white balance.
- Enables you to name personal white balances you will register.
Electronic Level Display
You can display an electronic level in the [Remote Live View window] to ensure the camera is straight.
-
Click [
 ] in the [Remote Live View window].
-
Check whether the camera is tilted.
-
The vertical level may not be displayed, depending on the camera connected.
- Horizontal level
- Top of camera
- Vertical level
- Vertical reference
- Camera's vertical position
- Horizontal reference
- Camera's horizontal position
Horizontal markers are 10° apart, and vertical markers are 5° apart.
- To straighten the camera horizontally, align the camera's horizontal tilt indicator and the horizontal reference.
- To straighten the camera vertically, align the camera's vertical tilt indicator and the vertical reference.
- To hide the level, click [] again.
Note
- A margin of error of approx. ±1° may apply even when the level indicates that the camera is straight.
- Extreme tilting increases the level's margin of error.
-
Changing the Aspect Ratio
You can change the image aspect ratio in still photo shooting.
- Configurable functions vary depending on the camera connected.
- For details on precautions and available functions, refer to the instruction manual of the connected camera.
-
Click [
 ].
]. -
Configure the setting.
-
When the following screen is shown, set the aspect ratio from the list.
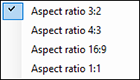
- JPEGs are cropped to your specified aspect ratio.
- RAW images are tagged with the aspect ratio but not cropped.
-
When the following screen is shown, configure either [Add aspect ratio information] or [Add cropping information]. Click [Close] after the setting is configured.
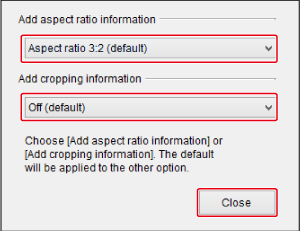
- JPEGs captured with [Add aspect ratio information] configured are cropped to your specified aspect ratio.
- JPEGs captured with [Add cropping information] configured are tagged with the aspect ratio but not cropped.
- RAW images captured with either setting configured are tagged with the aspect ratio but not cropped.
-
Caution
- For the EOS 5D Mark IV, set [Add cropping information] to [Off (default)] when configuring [Add aspect ratio information].
- Not available with an EF-S lens attached to the EOS R3, R5, R5 C, R6, R/Ra, or RP.
- Both JPEG and RAW images captured with the EOS-1D X Mark III, 1D X Mark II, 1D X, 1D C, or R3 are tagged with the aspect ratio but not cropped.
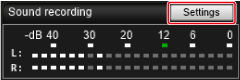
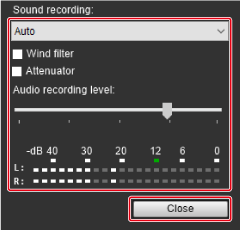
Audio Recording Setting
You can set the audio recording level for movie recording.
- Audio recording cannot be set on the EOS REBEL T7/2000D/1500D or REBEL T6/1300D.
- Configurable functions vary depending on the camera connected.
- For details on precautions and available functions, refer to the instruction manual of the connected camera.
-
Click [
 ] in the capture window.
 -
Click [Settings] in the [Sound recording] area of the Remote Live View window.
-
Configure settings as needed, then click [×].
Overlaid Display Function
An image saved on your computer can be overlaid on the current image in the [Remote Live View window]. Using this function, you can shoot at the same angle as in past images, which is useful in product photography or whenever you need multiple images captured at the same angle. Images loaded from your computer are only displayed, not included in new shots.
-
Select the [Compose] tab in the [Remote Live View window], then click [
 ] in [Overlay].
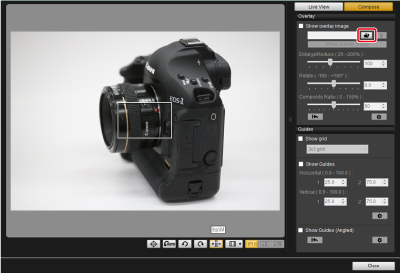
-
Select the image to overlay, then click [Open].
-
You can use files in these formats for overlay images: RAW images from Canon cameras with a .CR2 or .CR3 extension, or JPEG, HEIF, TIFF, BMP, or GIF images.
- For images edited in Digital Photo Professional 4, the original image is displayed as an overlay image.
- Overlay display may not be possible in some cases, even with images in supported file formats.
-
[Show overlay image] is now selected automatically, and the selected image is overlaid in the [Remote Live View window].
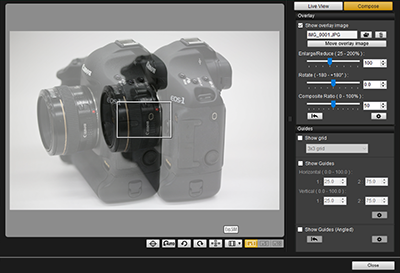
- You can resize, rotate, or adjust the transparency of overlay images ().
-
-
Move the camera or subject to compose the shot.
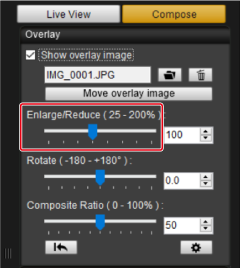
Enlarging/reducing overlay images
Overlay images can be displayed enlarged or reduced.
-
Drag the Enlarge/Reduce slider left or right.
- You can also enter values directly.
- The setting can also be configured by clicking the slider, then pressing the ← or → key or using the scroll-wheel to set a value.
- Click [
 ] to restore the default setting.
Rotating overlay images
You can rotate overlay images.
-
Drag the Rotate slider left or right.
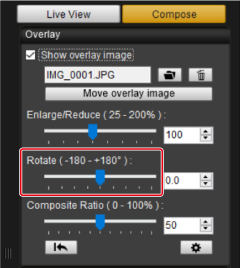
- You can also enter values directly.
- The setting can also be configured by clicking the slider, then pressing the ← or → key or using the scroll-wheel to set a value.
- Click [] to restore the default setting.
Setting the composite ratio of overlay images
You can set the composite ratio (transparency) of overlay images.
-
Drag the Composite Ratio slider left or right.

- You can also enter values directly.
- The setting can also be configured by clicking the slider, then pressing the ← or → key or using the scroll-wheel to set a value.
- Click [] to restore the default setting.
Moving overlay images
You can move overlay images in the [Remote Live View window]. Images can also be resized or rotated with cursor operations.
-
Click [Move overlay image].
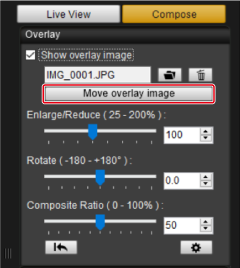
-
Drag the overlay image.
- The overlay image is moved and shown in the new position.
- Rotation is possible by dragging in the [Remote Live View window] outside the overlay image area.
- Resizing is possible by dragging overlay image corners.
- Click [] to restore the default setting.
Switching overlay images
You can change the image shown as the overlay image.
-
Click [
] below [Overlay].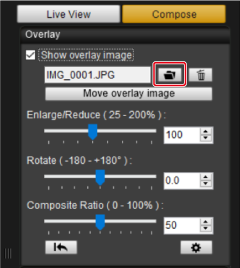
-
Select the image to switch to, then click [Open].
- The overlay image is replaced with the selected image.
Hiding overlay images
Overlay images can be hidden.
-
Clear the checkmark from [Show overlay image].

- To show the overlay image again, select [Show overlay image].
Configuring overlay image retention
You can set how long overlay images are retained. Set [Retain image overlays:] to [Always] if you wish to show the current overlay image again the next time EU starts up.
-
Click [
 ].
].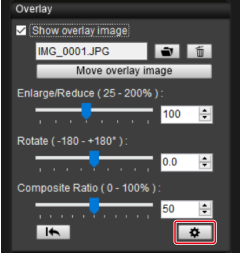
-
Select the retention period.
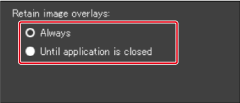
- [Retain image overlays:] is now set.
Grid Display
You can display a grid in the [Remote Live View window] to ensure the camera is straight.
-
On the [Compose] tab, select [Show grid] in [Guides].
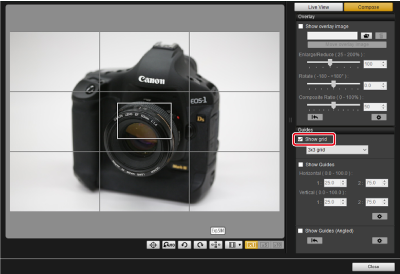
- A grid is displayed in the [Remote Live View window].
-
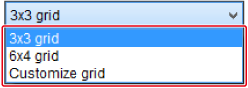
Select the type of grid in the [Grid] list box.
-
By selecting [Customize grid], you can set the following items.
- Number of squares vertically and horizontally (2–90)
- Grid line thickness (1–10)
- Grid color
- Show/hide diagonal lines
-
-
As you move the camera, confirm that it is straight.
-
To hide the grid, clear [Show grid].
-
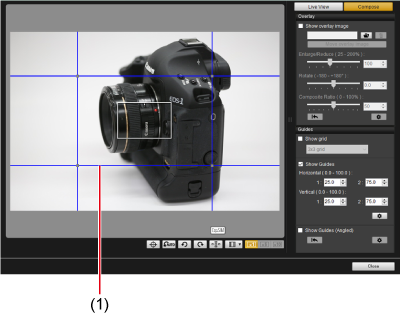
Guide Display
By displaying guides in the [Remote Live View window], you can move the lines as needed to help align subjects.
-
On the [Compose] tab, select [Show Guides] in [Guides].
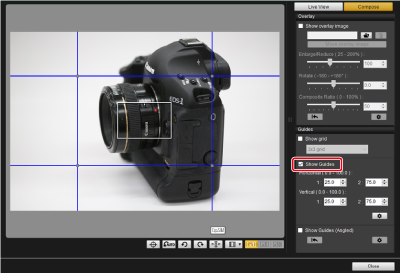
- Guides are displayed in the [Remote Live View window].
- Guides are not shown during magnified display.
-
By clicking [
], you can configure the following guide settings.- [Color]: Click [Choose] and select the guide color.
- [Width]: Select a value in the range of 1–10 as the guide width.
- [Display aspect ratio while moving guides]: Select to display the aspect ratio of the center box of the guide when you move the lines.
- [Target ratio]: When selected, any changes you make to the [Target ratio] aspect ratio are applied to the center box of the guide.
When finished, click [OK] to close the dialog box.
-
Drag lines (1) of the guide into position, as needed.
-
To resize the center box of the guide while maintaining the aspect ratio, drag the intersection of vertical and horizontal lines.
-
To move the center box of the guide while maintaining both the size and aspect ratio, right-click drag (Windows) or drag while holding the Shift key (Windows/macOS).
- You can also move the lines by entering values in the [1 :] and [2 :] boxes for [Horizontal ( 0.0 - 100.0 )] and [Vertical ( 0.0 - 100.0 )]. The supported input range is 0.0–100.0.
- The aspect ratio is displayed with the direction toward the target ratio when you move lines with [Display aspect ratio while moving guides] selected in the [Detailed settings] dialog box.
-
-
Move the camera to align subjects with the guides.
- To hide the guides, clear the checkmark from [Show Guides].
Guide Display (Angled)
By displaying guides in the [Remote Live View window], you can adjust the angle of the lines and move them as needed to help align subjects. The angle formed by lines appears as you move them.
-
On the [Compose] tab, select [Show Guides (Angled)] in [Guides].
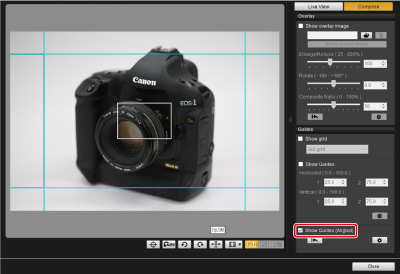
- Guides are displayed in the [Remote Live View window].
- Guides are not shown during magnified display.
-
Adjust lines of the guide as needed.
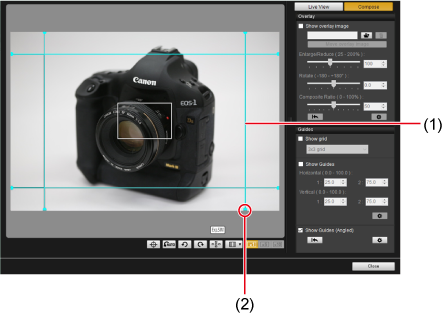
- Drag middle: Moves lines without changing the angle
- Drag end: Freely changes the angle of the line
- Drag the middle of a guide to move it without changing the angle.
- Drag the end of a guide to change it to any angle.
- Click [] to restore the default angles and positions of all guides displayed in step 1.
-
By clicking [
], you can configure the following guide settings.- [Color]: Click [Choose] and select the guide color.
- [Width]: Select a value in the range of 1–10 as the guide width.
- Each guide can be hidden by clearing the checkbox to the left of the name ([Horizontal1], [Horizontal2], [Vertical1], and [Vertical2]).
- Click [] to the right of the guide name ([Horizontal1], [Horizontal2], [Vertical1], and [Vertical2]) to restore the default angle and position.
-
Move the camera to align subjects with the guides.
- To hide the guides, clear the checkmark from [Show Guides (Angled)].
Powered Zooming
Powered zooming is supported for lenses on the EOS 90D, 80D, 77D, REBEL T8i/850D, REBEL T7i/800D, REBEL SL3/200D II, or REBEL SL2/200D with an attached Power Zoom Adapter PZ-E1.
Powered zooming is supported for lenses on the EOS R3 (with firmware ver. 1.7.0 or later), EOS R5 (with firmware ver. 2.0.0 or later), or EOS R6 Mark III with an attached Power Zoom Adapter PZ-E2/PZ-E2B.
Powered zooming is supported for EF Cinema (CN-E) lenses on the EOS R5 C, EOS C50, or EOS R5 (with firmware version 1.4.0 or later).
Powered zooming is supported for the EOS R6 V or EOS R50 V with powered zoom lenses, or with other lenses using an attached Power Zoom Adapter PZ-E2/PZ-E2B.
- Also refer to the instruction manual for Power Zoom Adapter PZ-E1, PZ-E2/PZ-E2B or EOS R50 V.
-
Click [
 ] in the [Remote Live View window].
 -
Use powered zooming.
[Variable speed] tab
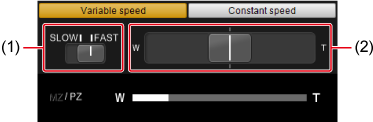
Zoom at your preferred speed.
- Use (1) to switch between speeds.
- Slide (2) to [W] to zoom to the wide-angle end. Slide to [T] to zoom to the telephoto end. Zooming speed varies depending on the amount you slide this control.
[Constant speed] tab

Zoom at constant speed.
- Use (1) to switch between speeds.
- Use (2) to set an exact speed.
- On (3), click the [W] side to zoom to the wide-angle end. Click the [T] side to zoom to the telephoto end.
- You can also press the W or T key for wide-angle or telephoto zooming.
Caution
- If zooming suddenly stops, check the message displayed.
- Recording a few test movies is recommended if you intend to perform powered zooming during movie recording. Powered zooming as you record may result in recording of exposure changes or lens sounds, loss of focus, or other issues.
Note
- You can zoom in [Constant speed] mode by pressing the W key on the keyboard for wide-angle zooming or the T key for telephoto zooming when the cursor is over the [Power Zoom Control] or [Remote Live View window].