Creating PQ-Compliant HDR Images
You can create PQ-compliant HDR images with less detail lost in highlights and shadows from three images that meet the following requirements.
- Compatible cameras: EOS R1, EOS R3, EOS R5 Mark II, EOS R6 Mark III, EOS R6 Mark II, EOS R6 V, EOS R7, EOS R8, EOS R10, EOS R50, EOS R50 V, PowerShot V1, or EOS C50
- Image format: HEIF images, RAW images captured with [HDR PQ] set to [Enable], or RAW images with [HDR PQ settings] set to [On] in DPP
Caution
- The best source images to use for an HDR image are images of the same scene that have low, normal, and high exposure.
- Not available for HDR PQ images without exposure-related information such as shutter speed, aperture value, or ISO speed.
-
Resulting HDR images have the following characteristics.
- No image information is added.
- Some recipe settings are not applied, such as ALO, brightness or gamma adjustment, or Picture Styles.
Note
- You can also save the resulting HDR image as a JPEG or TIFF.
-
Select an image.
-
Select [Start HDR PQ compositing tool] in the [Tools] menu.
-
Add images.
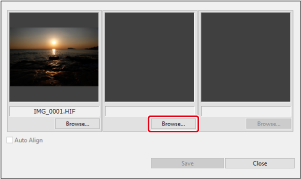
- Click [Browse] in the empty preview panels and add images to use. Three images are required in order to generate an HDR image.
- You can replace images as needed by clicking [Browse] and selecting a new image.
-
Configure the settings as needed.
- Selecting images of the same size enables you to select [Auto Align] for auto image alignment. Note that auto image alignment may not work correctly for patterned images (with a lattice or stripes, for example) or images that are generally flat and uniform. Image alignment also removes some peripheral image areas.
-
Save the file.
- After selecting the three images, click [Save].
- On the next screen, configure settings such as the image format and destination.
- When finished, click [Save].
- The HDR image is now generated.