Configuring Detailed Settings of Basic Settings
- Adjusting the Main Camera ([Main Camera] Tab)
- Adjusting the Registration Camera ([Registration Camera] Tab)
- Adjusting the External Sensor ([Sensor] Tab)
- Adjusting the MREAL Images ([Display] Tab)
- Setting a Registered Map ([Spatial Features] Tab)
- Adjusting the World Coordinate System ([Coordinate System] Tab)
If you select [Basic Settings] and click [Detailed Settings], the settings tabs are displayed. Switch the settings tabs to configure the MREAL Display, MREAL space, and other detailed settings
Note
- There are settings tabs that are not displayed depending on the settings of [Basic Settings].
Adjusting the Main Camera ([Main Camera] Tab)
When the MREAL images are too bright, adjust the white balance and exposure (brightness) of the main camera images.
White Balance

When a white object in the real image does not appear white due to the influence of the lighting or other conditions, use this function to adjust the white balance.
With the MREAL S1/X1, the white balance is adjusted automatically if you select [Auto Settings].
To adjust the white balance by color temperature, move the slider. You can check the results of adjustment in the Preview window.
For a model with [Use the White Balance Setting Tool] displayed, you can adjust the white balance using a white reference with the following procedure (MREAL Display MD-10/20).
-
Place white paper (white reference) within the MREAL space.
-
Click [Start Tool].
-
White Balance Tool launches and the following window appears.

-
-
Adjust the white reference so that it is within the red frame.
-
Click [Adjust within Frame].
-
Click [OK].
Exposure

- To adjust the brightness automatically, select [Auto Settings]. If you move the slider of [Auto Exposure Shift Quantity], exposure correction is performed in the auto setting status.
- To configure the settings manually, select [Manual Settings] and make adjustments with the sliders of [Shutter Speed] and [Gain].
- For a model with [Release the Upper Limit of Gain] displayed (MD-10 or MD-20), if you place a check mark in the checkbox, a gain correction value upper limit of up to 30.00 dB is enabled and the gain is set automatically within the range of 0 to 30.00 dB.
- You can check the results of adjustment in the Preview window.
Adjusting the Registration Camera ([Registration Camera] Tab)
Exposure

Adjust the brightness of the registration camera image of the MREAL Display.
- To adjust the brightness automatically, select [Auto Settings].
- For a model with [Release the Upper Limit of Gain] displayed, if you place a check mark in the checkbox, a gain correction value upper limit of up to 30.00 dB is enabled and the gain is adjusted automatically within the range of 0 to 30.00 dB.
- With the MD-20, if you move the slider of [Auto Exposure Shift Quantity], exposure correction is performed in the auto setting status.
- To configure the settings manually, select [Manual Settings] and make adjustments with the sliders of [Shutter Speed] and [Gain]. You can check the results of adjustment in the Preview window.
Improving the Camera Tracking Accuracy
With the MREAL X1, MREAL S1, MREAL Display MD-20, and RealSense, you may be able to improve the accuracy of camera tracking by adjusting the [Exposure] item.
-
Click [
 ] in the Preview Tool window to display the image of the registration camera.
- Slowly move the MREAL Display so that many feature points and other information are displayed in the MREAL image.
-
Select [Manual Settings].

-
Adjust the slider.
- Set [Shutter Speed] so that many feature points (green or blue points) are displayed in the Preview Tool window.
- Set [Gain] so that the brightness of the image is appropriate.
- When setting is finished, click [OK].

Adjusting the External Sensor ([Sensor] Tab)

Tracking Sensor Delay Settings
This is displayed when using an external sensor for the camera tracking method. Adjust the delay of the signal from the external sensor when, for example, the 3D CG is blurred or the target is not tracked. When the 3D CG is displayed late with respect to the movement in the image, move the slider in the + direction. When the 3D CG is displayed early, move the slider in the - direction.
Adjusting the MREAL Images ([Display] Tab)
- Display Position and Size
- Adjust Stereoscopy
- Display Panel Settings
- Luminance Settings
- Monitor Output Settings
- Other
Adjust how the MREAL image displayed in the MREAL Display appears.
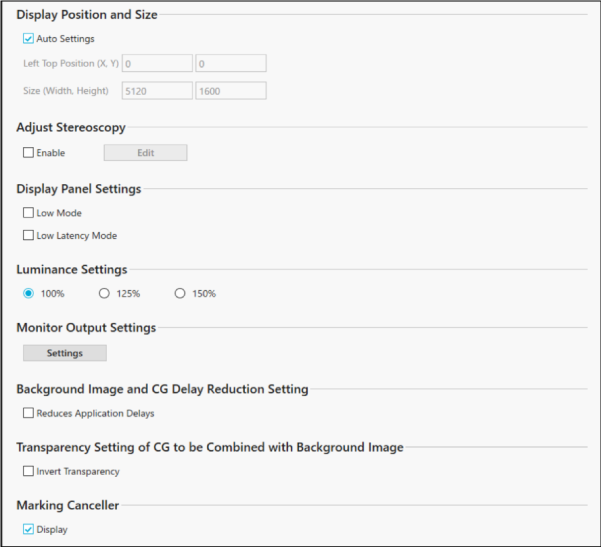
Display Position and Size
Adjust the size and position of the area in which the MREAL image is displayed. If you clear the check mark from [Auto Settings], you can make adjustments.
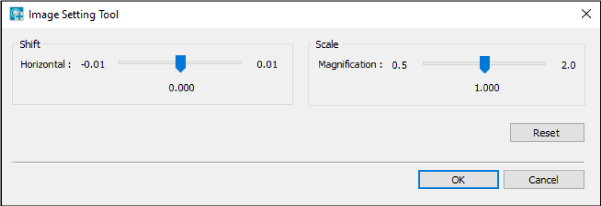
Adjust Stereoscopy
If you feel that the stereoscopic images appear larger or smaller than the actual size, adjust the size and position of the MREAL images.
-
Place a check mark in [Enable], and click [Edit].
-
Image Setting Tool launches and the following window appears.
-
-
Make adjustments by moving the sliders.
- [Display Position] allows you to adjust the spacing between images on the left eye side and right eye side.
- [Scale] allows you to adjust the size of the MREAL images.
- To return to the status before adjustment, click [Reset].
- When adjustment is finished, click [OK].
Display Panel Settings
Placing a check mark in [Low Latency mode] reduces the delay in image display.
Placing a check mark in [Low Afterimage mode] reduces the blurring caused by afterimages.
Placing a check mark in [Video Smoothing Mode] reduces the dropped frames in the MREAL images.
Caution
- When the dropped frames are noticeable, clear the check mark from [Video Smoothing Mode] and check the operating environment.
- [Video Smoothing Mode] does not affect external monitor output.
Luminance Settings
Adjust the luminance of the MREAL images according to the lighting, external light environment, and other conditions in the location of use.
Monitor Output Settings
Configure the settings for output to an external monitor (Full HD [1920×1080] or WQXGA [2560×1600]).
Other
Set the following as necessary when using an OpenXR compatible application.
Background Image and CG Delay Reduction Setting
When the delays in the movement of the 3D CG are noticeable relative to the background image, place a check mark in [Reduces Application Delays].
Transparency Setting of CG to be Combined with Background Image
If the relationship between the background image and CG transparency is unnatural, place a check mark in [Invert Transparency].
Marker Canceller
To use external monitors in the MREAL space, place a check mark in [Display]. This prevents markers displayed on external monitors from being detected erroneously by the MREAL Display.
Note
- The menus and items that are displayed differ depending on the model.
Setting a Registered Map ([Spatial Features] Tab)

This is displayed when using spatial features for the camera tracking method. With [Registered Map Information], you can create and register a registered map for camera tracking using spatial features. For details, see “Creating a Registered Map”.
Adjusting the World Coordinate System ([Coordinate System] Tab)
- Gravity Direction in the World Coordinate System
- Align the Origin of the World Coordinate System with the Origin of the Tracking Sensor
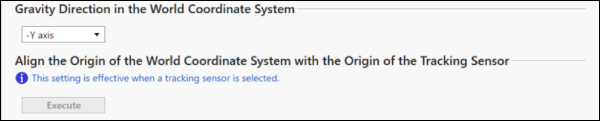
Configure the settings of the world coordinate system.
Gravity Direction in the World Coordinate System
Specify the gravity direction (downward).
Align the Origin of the World Coordinate System with the Origin of the Tracking Sensor
When using an external sensor for the camera tracking method, align the origin of the world coordinate system with the origin of the external sensor coordinate system.