Still Photo Shooting
- P: Program AE
- Tv: Shutter-Priority AE Shooting
- Av: Aperture-Priority AE Shooting
- M: Manual Exposure Shooting
- Long (Bulb) Exposures
P: Program AE
The camera automatically sets the shutter speed and aperture value to suit the subject's brightness.
P stands for Program.
AE stands for Auto Exposure.
-
Focus on the subject.
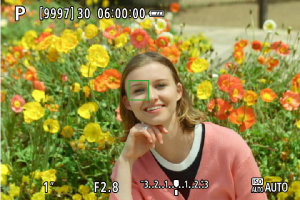
- Aim the AF point over the subject and press the shutter button halfway.
- Once the subject is in focus, the AF point turns green (with One-Shot AF).
- The shutter speed and aperture value are set automatically.
-
Check the display.
- As long as the exposure value is not blinking, standard exposure will be obtained.
-
Take the picture.
- Compose the shot and press the shutter button completely.
Caution
Note
-
Differences between P and
 modes
modes - mode limits available functions and sets the AF area, metering mode, and many other functions automatically to prevent bad shots. In contrast, P mode only sets the shutter speed and aperture value automatically, and you can freely set the AF area, metering mode, and other functions.
-
Program shift
- In P mode, you can freely change the combination (program) of shutter speed and aperture value set automatically by the camera while maintaining the same exposure. This is called Program shift.
- With Program shift, you can press the shutter button halfway, then turn the
 dial until the desired shutter speed or aperture value is displayed.
 - Program shift will be canceled automatically when the metering timer ends (exposure setting display turns off).
- Program shift cannot be used with flash.
Tv: Shutter-Priority AE Shooting
In this mode, you set the shutter speed and the camera automatically sets the aperture value to obtain the standard exposure matching the brightness of the subject. A faster shutter speed can freeze the action of a moving subject. A slower shutter speed can create a blurred effect, giving the impression of motion.
Tv stands for Time value.
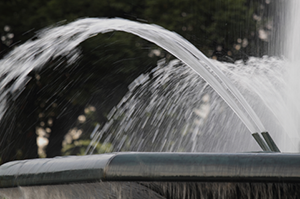
Blurred motion
(Slow speed image)
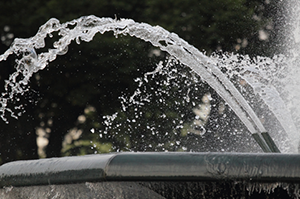
Frozen motion
(High speed image)
-
Set the desired shutter speed.
- Turn the dial to set it.
- Turn the
-
Focus on the subject.
- Press the shutter button halfway.
- The aperture value is set automatically.
-
Check the display and shoot.
- As long as the aperture value is not blinking, the standard exposure will be obtained.
Caution
-
If the lowest aperture value blinks, it indicates underexposure.
Turn the
dial to set a slower shutter speed until the aperture value stops blinking or set a higher ISO speed. -
If the highest aperture value blinks, it indicates overexposure.
Turn the
dial to set a faster shutter speed until the aperture value stops blinking, or set a lower ISO speed.
Note
-
Shutter speed display
- For example, 0"5 indicates 0.5 sec. and 15", 15 sec.
Av: Aperture-Priority AE Shooting
In this mode, you set the desired aperture value and the camera sets the shutter speed automatically to obtain the standard exposure matching the subject brightness. A higher f/number (smaller aperture hole) will make more of the foreground and background fall within acceptable focus. On the other hand, a lower f/number (larger aperture hole) will make less of the foreground and background fall within acceptable focus.
Av stands for Aperture value (aperture opening).

Blurred background
(Low aperture value image)
Sharp foreground and background
(High aperture value image)
-
Set the desired aperture value.
- Turn the dial to set it.
- Turn the
-
Focus on the subject.

- Press the shutter button halfway.
- The shutter speed is set automatically.
-
Check the display and shoot.
- As long as the shutter speed is not blinking, the standard exposure will be obtained.
Caution
-
If a slow shutter speed blinks, it indicates underexposure.
Turn the
dial to decrease the aperture value (open the aperture) until the shutter speed blinking stops or set a higher ISO speed. -
If a fast shutter speed blinks, it indicates overexposure.
Turn the
dial to increase aperture value (close the aperture) until the shutter speed blinking stops or set a lower ISO speed.
Note
-
Aperture value display
- The higher the value, the smaller the aperture opening will be. The aperture value displayed varies depending on the zoom position.
M: Manual Exposure Shooting
In this mode, you set both the shutter speed and aperture value as desired. To determine the exposure, refer to the exposure level indicator or use a commercially available exposure meter.
M stands for Manual.
-
Set the desired shutter speed.
- Turn the
 dial to set it.
- Turn the
-
Set the desired aperture value.
- Turn the dial to set it.
- Turn the
-
Focus on the subject.
- Press the shutter button halfway.
- Check the exposure level mark [
 ] to see how far the current exposure level is from the standard exposure level.
-
Take the picture.
Exposure Compensation with ISO Auto
If the ISO speed is set to [AUTO] for manual exposure shooting, you can set exposure compensation () as follows:
- Tap the exposure level indicator
- [
 : Expo.comp./AEB]
Caution
- Exposure may not be as expected when ISO Auto is set, because the ISO speed is adjusted to ensure standard exposure for your specified shutter speed and aperture value. In this case, set the exposure compensation.
- Exposure compensation is not applied in flash photography with ISO Auto, even if you have set an exposure compensation amount.
Note
- When ISO Auto is set, you can press the
 button to lock the ISO speed.
 - If you press the button and recompose the shot, you can see the exposure level difference on the exposure level indicator compared to when the button was pressed.
- Any existing exposure compensation amount is maintained if you switch to M mode with ISO Auto after using exposure compensation in P, Tv, or Av ().
Long (Bulb) Exposures
In this mode, the shutter stays open as long as you hold down the shutter button completely, and closes when you let go of the shutter button. Use bulb exposures for night scenes, fireworks, astrophotography, and other subjects requiring long exposures.
-
Set the shutter speed to [BULB].
- Turn the dial to the left to set [BULB].
- Turn the
-
Set the desired aperture value.
- Turn the dial to set it.
- Turn the
-
Take the picture.
- The exposure will continue for as long as you keep the shutter button pressed completely.
- Elapsed exposure time is shown on the screen.
Caution
- Do not point the camera toward an intense light source, such as the sun or an intense artificial light source. Doing so may damage the image sensor or the camera's internal components.
- Long bulb exposures produce more noise in the image than usual.
- ISO 400 is used when the camera is set to ISO Auto.