Charging the Battery
-
Connect and plug in the battery charger.

- Connect the power cord to the charger and plug the other end into a power outlet.
- All indicator lamps are off when no batteries are loaded.
-
Remove the protective cover.
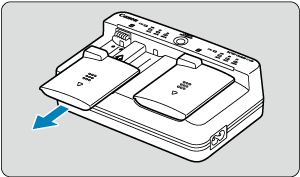
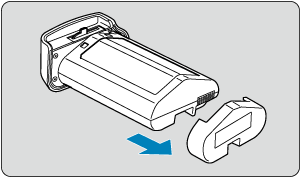
- Remove the included protective covers from the charger and battery.
-
Charge the battery.
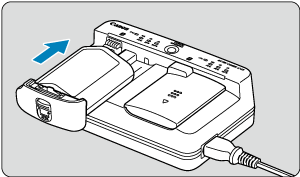
- Slide the battery in (in the opposite direction from protective cover removal) and make sure it is securely attached to the charger.
- You can load a battery into either slot
 or slot
  .
. - Charging begins automatically, and the charge lamp blinks or lights up in green.
- Charging is finished when all three charge lamps (50%/80%/100%) are lit in green.
-
Charging a depleted battery takes approx. 2 hr. and 50 min. at room temperature (23°C/73°F). The time required to charge the battery will vary greatly depending on the ambient temperature and the battery's remaining capacity.
- For safety, charging in low temperatures (5–10°C/41–50°F) takes longer (up to approx. 5 hr.).
Caution
- Use Battery Charger LC-E19 to charge Battery Pack LP-E19 (both included). This battery cannot be charged with Battery Charger LC-E4N/LC-E4.
- Depending on the condition of the battery, charging to 100% capacity may not be possible.
Note
- If you load two batteries, they are charged one after another in the order you load them.
-
Upon purchase, the battery is not fully charged.
Charge the battery before use.
-
Charge the battery on the day before or on the day it is to be used.
Charged batteries gradually lose their charge, even when they are not used.
-
After charging the battery, remove it and disconnect the charger from the power outlet.
When not using the battery or charger, reattach the included protective covers.
-
Use the battery in an ambient temperature range of 0–45°C/32–113°F.
For optimal battery performance, use batteries where the ambient temperature is 10–30°C/50–86°F. Lower temperatures may temporarily lower battery performance and reduce battery life.
-
When not using the camera, remove the battery.
If the battery is left in the camera for a prolonged period, a small amount of power current will keep being released, resulting in excess discharge and shorter battery life. Store the battery with the protective cover attached. Storing the battery when it is fully charged may lower the battery performance.
-
The battery charger can also be used in foreign countries.
The battery charger is compatible with a 100 V AC to 240 V AC 50/60 Hz power source. If necessary, attach a commercially available plug adapter for the respective country or region. To avoid damage, do not connect to portable voltage transformers.
-
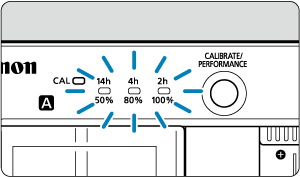
Check battery recharge performance, as needed.
Press the charger's
 button during charging to check battery recharge performance, as indicated by how many of the three lamps are lit in green.
 : Battery's recharge performance is good.
 : Battery's recharge performance is slightly degraded.
 : Purchasing a new battery is recommended.
-
If the battery becomes exhausted quickly even after having been fully charged, the battery has reached the end of its service life.
Check the battery's recharge performance () and purchase a new battery.
![]() The
The ![]() lamp blinks.
lamp blinks.
- This display advises you to calibrate (discharge) the battery, which will enable accurate charging capacity determination and battery level display on the camera.
- When the
 lamp blinks in green, calibration is recommended. To charge the battery at this time, wait approx. 10 sec., and charging will begin automatically.
 - To perform calibration, press the
 button while the lamp is blinking in green. The lamp now remains lit in green, and discharging begins.
 - Charging begins automatically after discharging, but note that the more fully charged the battery is, the longer discharging will take. Estimated time required for discharging is indicated by the 14h, 4h, and 2h lamp, with a blinking green 14h lamp indicating a discharge time of approx. 4–16 hours.
- Calibration drains the remaining battery level, and after this, charging the battery will take approx. 2 hr. 50 min. To cancel calibration in progress and start charging, remove and reload the battery in the charger.
Caution
- Multiple cycles of charging and use without calibration may result in inaccurate battery level display ().
- One battery can be charged while another is calibrated, but two batteries cannot be charged or calibrated at the same time.
- When performing calibration, consider using a battery that is nearly depleted. Calibrating and then charging Battery Pack LP-E19 when it is fully charged takes approx. 18 hr. 50 min.
![]() Only the 100% lamp is lit immediately after a battery is loaded.
Only the 100% lamp is lit immediately after a battery is loaded.
- Illumination of only the 100% lamp in green immediately after charging begins indicates that the internal battery temperature is out of range. Charging begins automatically when the internal temperature returns to 5–40°C/41–104°F.
- With two batteries loaded, illumination of only the 100% lamp in green on the side of the second battery indicates standby status.
![]() All three lamps are blinking.
All three lamps are blinking.
- Charging is not possible when batteries other than Battery Pack LP-E19 are loaded in the charger. In this case, the three charge lamps and lamp blink in green.
- If the three charge lamps blink in green consecutively during charging (with or without blinking of the lamp in green), remove the battery and contact your dealer or the nearest Canon Service Center.
- If the three charge lamps blink during calibration, remove the battery and contact your dealer or the nearest Canon Service Center.