Creative Filters
In ![]() (creative filters) mode, you can record movies with filter effects applied.
(creative filters) mode, you can record movies with filter effects applied.
-
Set the Mode dial to
 .
.
-
Press the
 button (
 ).
).- The Quick Control screen will appear.
-
Select [
 ].
].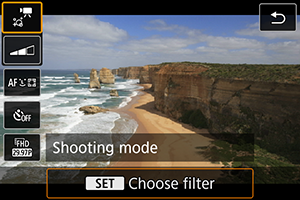
- Use the

 keys to select [] (Shooting mode) in the upper left, then press
  .
.
- Use the
-
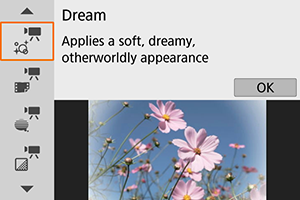
Select a filter effect.
-
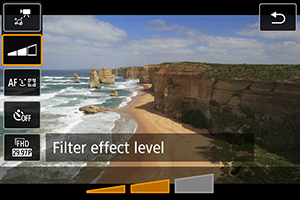
Adjust the filter effect level.
- Press the button and select the icon below [Movie self-timer].
- Use the

 keys to adjust the effect, then press .
 - When setting up [Miniature effect movie], select the playback speed.
- Press the
-
Record the movie.
Caution
- A magnified view is not available.
- No histogram is displayed.
- Not available for Movie digital zoom, video snapshots, time-lapse movies, or Movie digital IS.
Note
Creative Filter Characteristics
-
Dream
Applies a soft, dreamy, otherworldly appearance. Gives the movie a soft look overall, blurring the periphery of the screen. You can adjust the blurry areas along the screen edges by adjusting the filter effect.
-
 Old Movies
Creates an atmosphere like an old film by adding wavering, scratches, and flickering effects to the image. The top and bottom of the screen are masked in black. You can modify the wavering and scratch effects by adjusting the filter effect.
-
 Memory
Creates the atmosphere of a distant memory. Gives the movie a soft look overall, reducing brightness of the periphery of the screen. You can modify the overall saturation and the dark areas along the screen edges by adjusting the filter effect.
-
 Dramatic B&W
Creates an atmosphere of dramatic realism with high-contrast black and white. You can adjust the graininess and black-and-white effect by adjusting the filter effect.
-
 Miniature effect movie
You can record movies with a miniature (diorama) effect.
To make the scene frame movable, press the
 button in step 4 (or tap [
 ] in the lower right of the screen), so that it changes color. To center the frame again, press the
  button. To switch between vertical and horizontal scene frame orientation, tap [
 ] in the lower left of the screen. Switching scene frame orientation is also possible with the keys when in horizontal orientation and keys when in vertical orientation. To confirm the position of the scene frame, press . In step 5, set the playback speed to [5x], [10x], or [20x] before recording. [1-point AF] is used as the AF method, focusing on subjects centered in the white frame. The white frame is hidden during recording.
Speed and playback time (for a 1-minute movie)
| Speed | Playback Time |
|---|---|
| 5× | Approx. 12 sec. |
| 10× | Approx. 6 sec. |
| 20× | Approx. 3 sec. |