Fotoaufnahme
- Selbstporträtmodus
- Porträtmodus
- Glatte-Haut-Modus
- Panorama-Aufnahmemodus
- Speisenmodus
- Nachtaufnahmemodus ohne Stativ
- HDR-Gegenlicht-Modus
- Feuerwerk
Sie können den Aufnahmemodus an die jeweilige Szene anpassen.
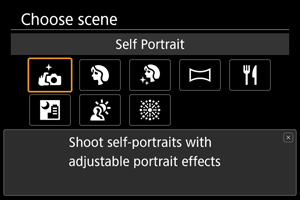
Selbstporträtmodus
Um Aufnahmen zu machen, auf denen auch Sie zu sehen sind, verwenden Sie den Modus [![]() ] (Selbstporträt). Drehen Sie den Monitor in Richtung des Objektivs. Die anpassbare Bildbearbeitung umfasst Hautglättung sowie Helligkeits- und Hintergrundanpassung, damit Sie sich selbst hervorheben können.
] (Selbstporträt). Drehen Sie den Monitor in Richtung des Objektivs. Die anpassbare Bildbearbeitung umfasst Hautglättung sowie Helligkeits- und Hintergrundanpassung, damit Sie sich selbst hervorheben können.
![]() Aufnahmetipps
Aufnahmetipps
-
Stellen Sie den Helligkeits- und Hautglättungseffekt ein.
Für [Helligkeit] und [Glatte Haut-Effekt] können Sie einen Bereich von fünf Stufen einstellen. Unter [Hintergrund] können Sie den Grad der Hintergrundunschärfe einstellen.
-
Tippen Sie auf den Monitor, um auszulösen.
Sie können die Aufnahme nicht nur durch vollständiges Drücken des Auslösers, sondern auch durch Tippen auf den Monitor machen. Dazu muss der Touch-Auslöser aktiviert sein [
 ]. Dies geschieht durch Änderung zu [
 ] ().
] ().
Vorsicht
- Ändern Sie nach der Scharfstellung den Abstand zwischen Ihnen und der Videokamera nicht, bis das Bild aufgenommen wird.
- Achten Sie darauf, dass Sie die Videokamera nicht fallen lassen.
Hinweis
- Die Selbstauslöser-Lampe () blinkt nicht, wenn der Monitor im Modus [Selbstporträt] in Richtung der Vorderseite der Videokamera weist.
- Sie können auch Aufnahmen von sich selbst in anderen Aufnahmemodi als [Selbstporträt] machen, indem Sie den Monitor nach vorne rotieren und unten links auf [
 ] tippen.
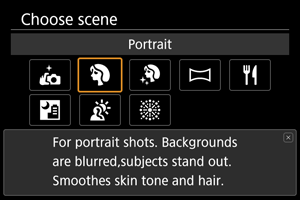
Porträtmodus
Verwenden Sie den Modus [![]() ] (Porträt), um den Hintergrund zu verwischen und die Person, die Sie aufnehmen, hervorzuheben. Außerdem erscheinen Hauttöne und Haar weicher.
] (Porträt), um den Hintergrund zu verwischen und die Person, die Sie aufnehmen, hervorzuheben. Außerdem erscheinen Hauttöne und Haar weicher.
![]() Aufnahmetipps
Aufnahmetipps
-
Wählen Sie den Ort aus, an dem die Entfernung zwischen Motiv und Hintergrund am größten ist.
Je weiter der Hintergrund vom Motiv entfernt ist, desto unschärfer wird er. Außerdem hebt sich das Motiv besser vor einem einfachen, dunklen Hintergrund ab.
-
Wählen Sie das Teleobjektiv aus.
Drücken Sie den Zoom-Hebel in Richtung
 , und nähern Sie sich dem Motiv, sodass der Oberkörper des Motivs den Rahmen ausfüllt.
 -
Fokussieren Sie das Gesicht.
Stellen Sie beim Fokussieren vor der Aufnahme sicher, dass das AF-Messfeld auf dem Gesicht der Person grün ist. Bei Nahaufnahmen von Gesichtern können Sie [
 : Augenerkennung] auf [Aktivieren] einstellen, damit auf die Augen der Person fokussiert wird.
 -
Machen Sie Reihenaufnahmen.
Die Standardeinstellung ist [
 ] (Reihenaufnahme langsam). Wenn Sie den Auslöser gedrückt halten, können Sie Reihenaufnahmen erstellen, um Änderungen der Gesichtsausdrücke und Haltung des Motivs zu erfassen.
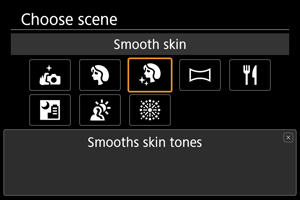
Glatte-Haut-Modus
Verwenden Sie den Modus [![]() ] (Glatte Haut), um die Haut attraktiver aussehen zu lassen. Die Bildverarbeitung macht die Haut glatter.
] (Glatte Haut), um die Haut attraktiver aussehen zu lassen. Die Bildverarbeitung macht die Haut glatter.
![]() Aufnahmetipps
Aufnahmetipps
-
Aktivieren Sie die Videokamera, um Gesichter zu erkennen.
Wenn die Videokamera das Hauptmotiv erkennt, auf das der Glatte-Haut-Effekt angewendet wird, wird der Rahmen um das Gesicht des Motivs angezeigt. Für eine effektivere Hautglättung können Sie näher an das Motiv heranrücken oder sich von ihm entfernen, sodass der Rahmen um das Gesicht des Motivs angezeigt wird.
-
Fokussieren Sie das Gesicht.
Stellen Sie beim Fokussieren vor der Aufnahme sicher, dass das AF-Messfeld auf dem Gesicht der Person grün ist. Bei Nahaufnahmen von Gesichtern können Sie [
: Augenerkennung] auf [Aktivieren] einstellen, damit auf die Augen der Person fokussiert wird.
Vorsicht
- Andere Zonen als die Haut von Personen können je nach den Aufnahmebedingungen verändert werden.
- Wenn der Glatte-Haut-Effekt zu stark ist, sehen die Bilder möglicherweise nicht wie erwartet aus. Machen Sie im Voraus einige Testaufnahmen und überprüfen die Ergebnisse.
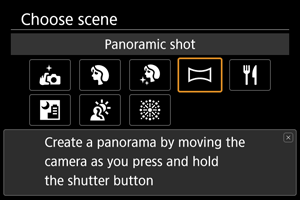
Panorama-Aufnahmemodus
Verwenden Sie den Modus [![]() ] (Panorama-Aufnahme), um Panorama-Aufnahmen zu machen. Das Panorama entsteht durch die Kombination von Aufnahmen, die bei Reihenaufnahmen gemacht wurden, wenn Sie die Videokamera in eine Richtung bewegen und dabei den Auslöser ganz gedrückt halten.
] (Panorama-Aufnahme), um Panorama-Aufnahmen zu machen. Das Panorama entsteht durch die Kombination von Aufnahmen, die bei Reihenaufnahmen gemacht wurden, wenn Sie die Videokamera in eine Richtung bewegen und dabei den Auslöser ganz gedrückt halten.
-
Wählen Sie eine Aufnahmerichtung aus.
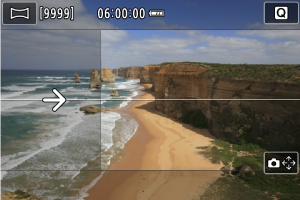
- Tippen Sie unten rechts auf [
 ], um die Aufnahmerichtung auszuwählen.
 - Es wird ein Pfeil angezeigt, der die Richtung angibt, in die die Videokamera bewegt werden soll.
- Tippen Sie unten rechts auf [
-
Drücken Sie den Auslöser halb durch.
- Halten Sie den Auslöser halb gedrückt, und stellen Sie das Motiv scharf.
-
Lösen Sie aus.
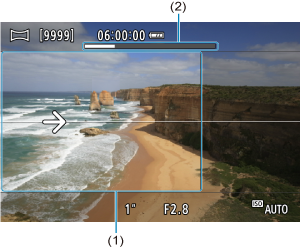
- Bewegen Sie die Videokamera bei vollständig gedrücktem Auslöser mit konstanter Geschwindigkeit geradeaus in Pfeilrichtung.
- Der deutlich angezeigte Bereich (1) wird erfasst.
- Eine Aufnahmefortschrittsanzeige (2) wird angezeigt.
- Die Aufnahme wird beendet, wenn Sie den Auslöser loslassen oder wenn die Fortschrittsanzeige ganz weiß ist.
Vorsicht
- In einigen Szenen werden die Bilder, die Sie aufnehmen wollten, möglicherweise nicht wie erwartet gespeichert, und das Panorama sieht möglicherweise nicht wie erwartet aus.
- Die Aufnahme kann mittendrin abgebrochen werden, wenn Sie die Videokamera zu langsam oder zu schnell bewegen. Das bis zu diesem Zeitpunkt erstellte Panorama wird jedoch weiterhin gespeichert.
-
Verwenden Sie einen Computer oder ein anderes Gerät, um die Größe von Panoramabildern zu verändern, wenn Sie sie von einer in einen Canon-Drucker eingelegten Speicherkarte ausdrucken möchten, da die Bilder im Modus
 sehr groß sind.
Wenn Panoramen von der Software oder den Webservices nicht korrekt verwaltet werden können, versuchen Sie, die Größe auf einem Computer zu ändern.
-
Aufnahmen der folgenden Motive und Szenen werden möglicherweise nicht richtig kombiniert.
- Bewegte Motive
- Motive im Nahbereich
- Szenen, in denen der Kontrast stark variiert
- Szenen mit langen Abschnitten derselben Farbe oder desselben Musters, z. B. das Meer oder der Himmel
- Die Aufnahmen werden durch Korrekturen in keiner Weise beeinträchtigt, die angewendet werden, um Unschärfe durch das Schwenken der Videokamera auszugleichen.
- Bewegen Sie die Videokamera langsam, wenn Teleobjektiv für den Zoom eingestellt ist, oder wenn Sie Nachtaufnahmen oder Aufnahmen bei schwachem Licht machen.
Speisenmodus
Verwenden Sie den Modus [![]() ] (Speisen) für Aufnahmen von Speisen. Das Foto wirkt hell und kräftig. Je nach Lichtquelle wird im aufgenommenen Bild zudem die rötliche Tönung von Bildern unterdrückt, die durch Kunstlicht usw. verursacht wird.
] (Speisen) für Aufnahmen von Speisen. Das Foto wirkt hell und kräftig. Je nach Lichtquelle wird im aufgenommenen Bild zudem die rötliche Tönung von Bildern unterdrückt, die durch Kunstlicht usw. verursacht wird.

![]() Aufnahmetipps
Aufnahmetipps
-
Ändern Sie den Farbton.
[Farbton] kann angepasst werden. Zur Erhöhung der rötlichen Tönung der Speisen stellen Sie die Option in Richtung [Warm] (rot) ein, oder aber in Richtung [Kalt] (blau) ein, falls das Foto zu rot erscheint.
Vorsicht
- Der warme Farbstich der Motive kann verblassen.
- Umfasst die Szene mehrere Lichtquellen, wird der warme Farbstich möglicherweise nicht reduziert.
- Bei Blitzaufnahmen wechselt [Farbton] in die Standardeinstellung.
- Befinden sich Personen im Bild, wird möglicherweise der Hautton nicht korrekt reproduziert.
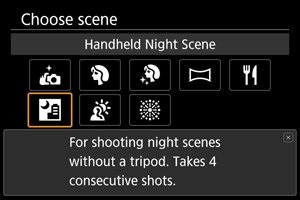
Nachtaufnahmemodus ohne Stativ
Der Modus [![]() ] (Nachtaufnahmen o. Stativ) ermöglicht es, Nachtaufnahmen aus freier Hand zu machen. In diesem Aufnahmemodus werden für jedes Bild nacheinander vier Aufnahmen erstellt, die dann zu einem Bild zusammengefügt werden. So entsteht ein Bild mit reduzierter Verwacklung.
] (Nachtaufnahmen o. Stativ) ermöglicht es, Nachtaufnahmen aus freier Hand zu machen. In diesem Aufnahmemodus werden für jedes Bild nacheinander vier Aufnahmen erstellt, die dann zu einem Bild zusammengefügt werden. So entsteht ein Bild mit reduzierter Verwacklung.
![]() Aufnahmetipps
Aufnahmetipps
-
Halten Sie die Videokamera ruhig.
Halten Sie Ihre Ellbogen eng am Körper, um die Videokamera ruhig zu halten (). In diesem Modus werden vier Aufnahmen ausgerichtet und zu einem Einzelbild zusammengefügt. Wenn jedoch aufgrund von Videokameraverwacklungen bei einer der vier Aufnahmen eine erhebliche Fehlausrichtung auftritt, werden sie möglicherweise im endgültigen Bild nicht richtig aufeinander ausgerichtet.
Vorsicht
- Der Bildbereich ist kleiner als in anderen Aufnahmemodi.
- Die Auswahl der RAW-Bildqualität ist nicht möglich.
- Die Autofokussierung während der Nacht oder bei dunklen Szenen kann schwierig sein, wenn Lichtpunkte innerhalb des AF-Messfelds liegen. Stellen Sie in diesem Fall den Fokussiermodus auf MF (), und nehmen Sie eine manuelle Fokussierung vor.
- Bei Aufnahmen von bewegten Motiven kann es zu Nachbildern durch die Bewegung oder zu Dunkelheit um das Motiv herum kommen.
- Die Bildausrichtung funktioniert bei sich wiederholenden Mustern (Gitter, Streifen usw.), bei einfarbigen Bildern ohne Struktur oder bei Aufnahmen mit stark abweichender Ausrichtung wegen Verwacklungsunschärfe möglicherweise nicht.
- Es dauert eine Weile, die Bilder auf der Karte zu speichern, da sie nach der Aufnahme zusammengeführt werden. [BUSY] wird auf dem Monitor angezeigt, wenn Bilder verarbeitet werden. Eine Aufnahme ist dann erst wieder nach abgeschlossener Verarbeitung möglich.
- Die Aufnahmen unterscheiden sich geringfügig vom Vorschaubild auf dem Monitor.
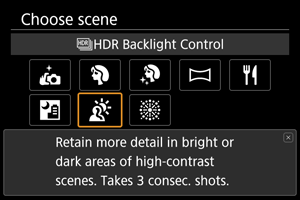
HDR-Gegenlicht-Modus
Verwenden Sie den Modus [![]() ] (
] (![]() HDR-Gegenlicht) für Gegenlichtaufnahmen in sowohl hellen als auch dunklen Bereichen. Bei der einmaligen Aufnahme in diesem Modus werden drei aufeinanderfolgende Bilder mit unterschiedlicher Belichtung aufgenommen, die zu einem einzigen HDR-Bild kombiniert werden, bei dem Details in den Schatten erhalten bleiben, die ansonsten durch Gegenlicht verloren gehen könnten.
HDR-Gegenlicht) für Gegenlichtaufnahmen in sowohl hellen als auch dunklen Bereichen. Bei der einmaligen Aufnahme in diesem Modus werden drei aufeinanderfolgende Bilder mit unterschiedlicher Belichtung aufgenommen, die zu einem einzigen HDR-Bild kombiniert werden, bei dem Details in den Schatten erhalten bleiben, die ansonsten durch Gegenlicht verloren gehen könnten.
HDR steht für „High Dynamic Range“ (hoher Dynamikumfang).
![]() Aufnahmetipps
Aufnahmetipps
-
Halten Sie die Videokamera ruhig.
Halten Sie Ihre Ellbogen eng am Körper, um die Videokamera ruhig zu halten (). In diesem Modus werden drei Aufnahmen ausgerichtet und zu einem Einzelbild zusammengefügt. Wenn jedoch eine der drei Aufnahmen wegen Verwacklungsunschärfe uneinheitlich ausgerichtet ist, können die Bilder im endgültigen Bild möglicherweise nicht exakt ausgerichtet werden.
Vorsicht
- Der Bildbereich ist kleiner als in anderen Aufnahmemodi.
- Die Auswahl der RAW-Bildqualität ist nicht möglich.
- Blitzaufnahmen sind nicht verfügbar.
- Beachten Sie, dass das Bild möglicherweise nicht mit einer glatten Abstufung gerendert wird und ungleichmäßig oder verrauscht aussieht.
- Die Funktion „HDR-Gegenlicht“ kann bei Aufnahmen mit extremem Gegenlicht oder Kontrast wirkungslos sein.
- Wenn Sie von ausreichend hellen Motiven wie normal beleuchtete Szenen Aufnahmen machen, sieht das Bild aufgrund des HDR-Effekts möglicherweise unnatürlich aus.
- Bei Aufnahmen von bewegten Motiven kann es zu Nachbildern durch die Bewegung oder zu Dunkelheit um das Motiv herum kommen.
- Die Bildausrichtung funktioniert bei sich wiederholenden Mustern (Gitter, Streifen usw.), bei einfarbigen Bildern ohne Struktur oder bei Aufnahmen mit stark abweichender Ausrichtung wegen Verwacklungsunschärfe möglicherweise nicht.
- Es dauert eine Weile, die Bilder auf der Karte zu speichern, da sie nach der Aufnahme zusammengeführt werden. [BUSY] wird auf dem Monitor angezeigt, wenn Bilder verarbeitet werden. Eine Aufnahme ist dann erst wieder nach abgeschlossener Verarbeitung möglich.
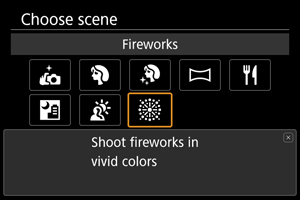
Feuerwerk
Verwenden Sie den Modus [![]() ] (Feuerwerk), um ein Feuerwerk in leuchtenden Farben aufzunehmen.
] (Feuerwerk), um ein Feuerwerk in leuchtenden Farben aufzunehmen.
![]() Aufnahmetipps
Aufnahmetipps
-
Halten Sie die Videokamera ruhig.
Montieren Sie die Videokamera auf einem Stativ, oder treffen Sie andere Maßnahmen, um sie ruhig zu halten und Verwacklungen zu vermeiden. Darüber hinaus wird empfohlen, [
 : IS (Bildstabilisator) Modus] auf [Aus] einzustellen, um Aufnahmen zu machen, wenn die Videokamera mit einem Stativ usw. gesichert wird.
Obwohl keine Rahmen angezeigt werden, wenn Sie den Auslöser halb herunterdrücken, wird dennoch der optimale Fokus ermittelt.