Advanced Shooting with Fully Automatic Wireless Flash
This wireless system eliminates the need to set up the following features on receivers, which are automatically configured based on transmitter (sender) settings.
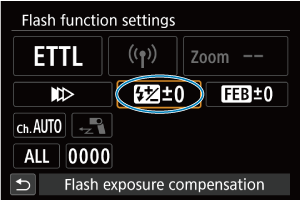
Flash Exposure Compensation
Just as exposure compensation is adjustable, you can also adjust flash output.
-
Press the
 button.
-
Select [Flash exposure compensation].
-
Set the flash exposure compensation amount.

- After setting the compensation amount, select [OK].
- “0.3” indicates 1/3 stops and “0.7” indicates 2/3 stops.
- To cancel flash exposure compensation, return the compensation amount to “±0.”
Note
- Generally, set an increased exposure compensation for bright subjects and set a decreased exposure compensation for dark subjects.
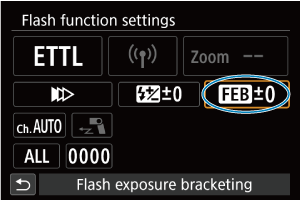
FEB
You can take three shots while automatically changing the flash output. This is called FEB (Flash Exposure Bracketing).
-
Press the
button.
-
Select [Flash exposure bracketing].
-
Set the FEB level.
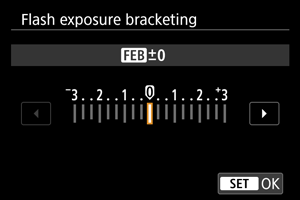
- After setting the FEB level, select [OK].
- “0.3” indicates 1/3 stops and “0.7” indicates 2/3 stops.
- When used with flash exposure compensation, FEB shooting is centered on your specified flash exposure compensation amount.
Note
- After the three shots are taken, FEB is canceled automatically.
- Before shooting with FEB, consider setting the camera drive mode to single shooting, and make sure the flash units are charged. When the drive mode is set to continuous shooting, shooting automatically stops after three consecutive shots are taken.
- You can use FEB together with flash exposure compensation or FE lock.
- You can set FEB to remain enabled after shooting the three shots (C.Fn-03).
- You can change the FEB shooting sequence (C.Fn-04).
High-Speed Synchronization
High-speed sync enables flash photography at all shutter speeds. This is effective when you want to shoot in the aperture-priority AE ![]() mode (open aperture) with background blur in locations such as outdoors in daylight.
mode (open aperture) with background blur in locations such as outdoors in daylight.
-
Press the
button.
-
Select [Shutter synchronization].
-
Select [High-speed synchronization].
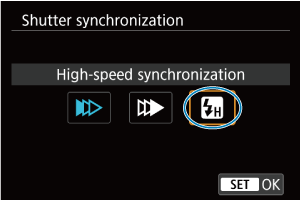
- Select [High-speed synchronization] and then [OK].
- Before shooting, confirm that
 appears on the camera screen.
Caution
- With high-speed sync, the faster the shutter speed, the shorter the effective flash range will be.
Note
- is not displayed on the camera screen when the shutter speed is less than the maximum flash sync shutter speed.
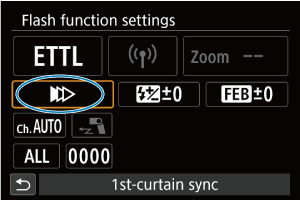
- To return to normal flash firing, select [First-curtain synchronization] in step 3.
Second-Curtain Synchronization
Using second-curtain sync at low shutter speeds enables natural shots of subject motion trails, such as car lights. The flash fires immediately before the camera finishes shooting (before the shutter closes).
-
Press the
button.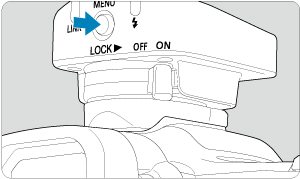
-
Select [Shutter synchronization].

-
Select [Second-curtain synchronization].

- Select [Second-curtain synchronization] and then [OK].
Note
- Second-curtain sync works well in
 (bulb) shooting mode.
 - Flash units fire twice in [E-TTL II flash metering] flash mode. The first firing, which does not indicate malfunctioning, is preflash to determine flash output.
- To return to normal flash firing, select [1st-curtain sync] in step 3.
FE Lock
Shooting with FE (flash exposure) Lock provides suitable flash exposure over your specified area of the subject.
Use the camera to configure FE lock. For instructions, refer to the instruction manual of the camera and flash unit.
Note
 blinks on the camera screen if suitable exposure cannot be obtained with FE lock. Move the receiver closer to the subject or open the aperture, and then lock the flash exposure again. You can also try setting a higher ISO speed before performing FE lock again.
- FE lock may not be effective if the subject is too small in the viewfinder.