Linked Shooting with Radio Transmission
When using an EOS DIGITAL camera released in or after 2012 (except EOS REBEL T100/4000D/3000D, EOS REBEL T7/1500D/2000D, EOS REBEL T6/1300D and EOS REBEL T5/1200D), you can perform linked shooting, which automatically releases the shutter of a receiver camera unit by linking it to the sender camera unit. You can perform linked shooting with up to 16 units, including both sender units and receiver units. This is useful when you want to shoot a subject from multiple angles at the same time.
To perform linked shooting, attach a Speedlite or a Speedlite Transmitter that supports radio transmission wireless shooting to the camera. When used with a camera released up to 2011 or with EOS REBEL T100/4000D/3000D, EOS REBEL T7/1500D/2000D, EOS REBEL T6/1300D or EOS REBEL T5/1200D, the unit can be used only as "sender camera unit". The unit cannot be used as a "receiver camera unit".
Some cameras are not supported.
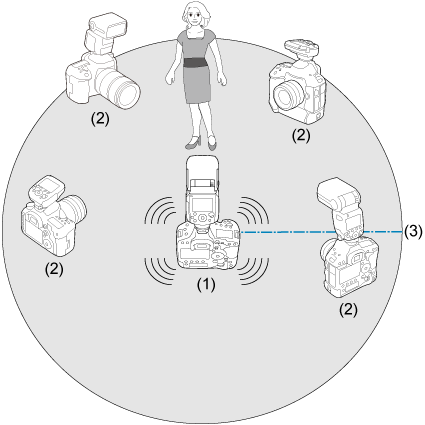
(1) Sender camera unit
(2) Receiver camera unit
(3) Transmission distance: Approx. 30 m / 98.4 ft.
Note
- When an EL-1 set for linked shooting and a camera are combined, they are referred to respectively as a "sender camera unit" and a "receiver camera unit".
Before performing the operations below, attach a Speedlite or transmitter to all the cameras to be used for linked shooting. For details on setting other devices, refer to the Instruction Manual of the devices.
-
Select
 with the joystick.
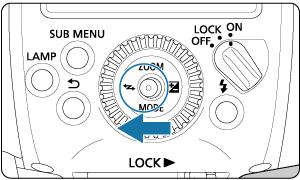
-
Set to normal shooting mode.
- Press the joystick up, down, left, or right, or turn
 and select
  , then press the joystick vertically.
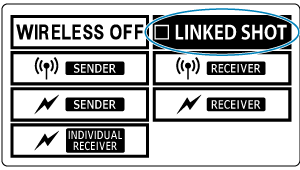
- Display changes to
 .
.
- Press the joystick up, down, left, or right, or turn
-
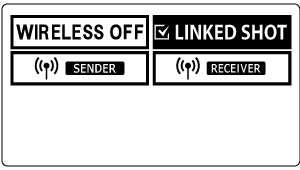
Set as sender unit / receiver unit.

- Press the joystick up / down / left / right or turn to select

 or
or  , then push the joystick vertically.
- Press the joystick up / down / left / right or turn
-
Set the transmission channel and wireless radio ID.
- Refer to "Setting the Transmission Channel / Wireless Radio ID" for details on how to set.
-
Set the camera's shooting functions.
-
Set all the Speedlites.
- Set all the Speedlites to perform linked shooting to "sender unit" or "receiver unit" in linked shooting.
- Set the transmitters in the same way if any are to be used in linked shooting.
- If you change the setting from "receiver unit" to "sender unit" in Step 2, the other Speedlites (or transmitters) set as "sender units" will automatically become "receiver units".
-
Install the receiver camera unit.
- Set up all the receiver camera units within approx. 30 m / 98.4 ft. of the sender camera unit.
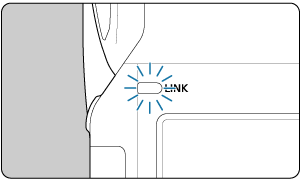
- Check that the
 lamps of the receiver units are lit in green.
-
Take the picture.
- Check that the lamp of the sender unit is lit in green and take the picture.
- The receiver camera units are released with the release of the sender camera unit.
- Receiver units for which linked shooting has been performed are indicated by a
 on the LCD panel.
- Check that the
Note
- When you want to clear linked shooting, operate the Speedlites one by one to change the setting to
 in step 1.
 - You can use this function as a remote control for linked shooting without attaching a Speedlite to a camera. After pushing the joystick of the sender unit vertically, push the joystick up / down / left / right or turn to select
 and release all the receiver camera units.
 - During linked shooting, the time until auto power off takes effect is approx. 5 min. for both the sender and the receiver units. When the interval of linked shooting is 5 min. or longer, set the "Auto power off" to "OFF" on both the sender and the receiver units (C.Fn-01-1).
- When P.Fn-06-0 is set (), the beep will sound on each fully charged flash unit (sender / receiver).
Caution
- Setting the focus mode switches of the lenses attached to the receiver camera unit to
 and taking the picture with manual focusing is recommended. If focus cannot be achieved with autofocus, linked shooting is not possible with the corresponding receiver camera unit.
 - There is a short time lag between the release of the receiver camera unit and the release timing of the sender camera unit. Perfectly simultaneous shooting is not possible.
- When set to P.Fn-03-1 (), the flash can be fired during linked shooting, but if multiple flashes are fired simultaneously during linked shooting, the proper exposure may not be obtained or inconsistent exposure may occur.
- When [Flash firing] in [External Speedlite control] or [Flash control] is set to [Disable] () on the sender camera, linked shooting cannot be performed.
- When set to P.Fn-03-0 (), if linked shooting is not possible while viewing the live view image, set [Soft LV shooting] or [Silent LV shoot.] in the menu of the sender camera unit to [Disable]. If [Mode 1] or [Mode 2] is set, the receiver camera units may not be released depending on the camera model used.
- The transmission distance may be shorter depending on the conditions such as the positioning of the flashes, the surrounding environment, and weather conditions.
- The linked shooting function is similar to linked shooting on the WFT series of wireless file transmitters. However, linked shooting cannot be performed in combination with the WFT series file transmitters. Moreover, the release time lag differs from linked shooting performed using the WFT series.
Caution
Linked Shooting Using Live View Function
- When set to P.Fn-03-0 (), if the following cameras are combined and set as sender cameras, linked shooting in the Live View mode is not possible.
- Perform linked shooting after switching Live View shooting to viewfinder shooting or set the Speedlite to P.Fn-03-1.
EOS REBEL T6S/760D, EOS REBEL T6i/750D, EOS REBEL T5i/700D, EOS REBEL T4i/650D, EOS REBEL T3i/600D, EOS REBEL T2i/550D, EOS REBEL T1i/500D, EOS REBEL XSi/450D, EOS REBEL XS/1000D