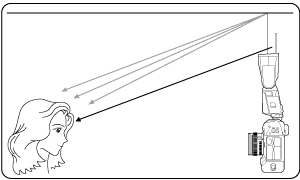
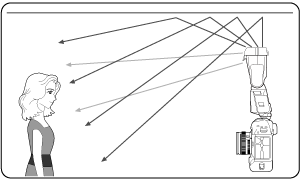
Yansıma
Yansıyan ışığı kullanmak için flaş kafasını tavana veya duvara doğrultmanız, konunun gölgelerini yumuşatarak daha doğal görünümlü çekimler elde edilmesini sağlayabilir. Bu çekim yöntemine yansıma flaşlı fotoğrafçılık denir.
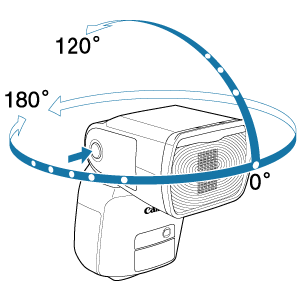
Flaş kafasının yönünü ayarlama
- Yansıma kilit açma tuşuna gösterildiği gibi basarken flaş kafasını döndürebilirsiniz. Flaş kafasını çevirmeniz veya eğmeniz göstergeyi
 olarak değiştirir.
 - Speedlite
 (Otomatik) flaş kapsamı ayarındayken flaş kafasını çevirirseniz flaş kapsamı 50 mm olur ve --- görüntülenir.
 - Flaş kapsamını manuel olarak da ayarlayabilirsiniz ().
Not
- Işığı çok uzaktaki tavanlardan veya duvarlardan yansıtmak yeterli pozlama sağlamayabilir, çünkü konuya yeterli ışık ulaşmayacaktır.
- Çekimleriniz çok karanlıksa, diyaframı açmak için diyafram değerini (f/numarası) düşürün ve tekrar deneyin. Dijital fotoğraf makinesi kullanıldığında ISO hızı da artırılabilir.
- Işığı yansıtmak için düz beyaz veya beyazımsı bir tavan veya duvar seçin, çünkü bunlar daha yansıtıcıdır. Beyaz olmayan yüzeylerden gelen yansımalar yeterli pozlama sağlamayabilir; konuya yeterli ışık ulaşmayabilir ve çekimleriniz kullanılan yüzeyin renginden etkilenebilir.
- Yansıma flaşlı fotoğrafçılığında Hızlı flaş kullanmanız, flaş çıkışının azalmasından dolayı düşük pozlamaya neden olabilir.
 Yakın Mesafe Flaşlı Fotoğrafçılık
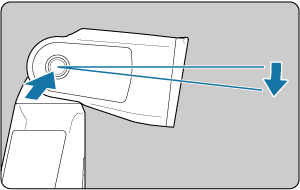
Yansıma kilit açma tuşuna basarken flaş kafasını aşağı doğru 7° konumlandırdığınızda, yaklaşık 0,5 - 2 m / 1,6 - 6,6 fit aralığında kısa mesafeden konu çekimi yapabilirsiniz.
Flaş kafasının 7° aşağı doğru eğilmesi ekranı ![]() olarak değiştirir.
olarak değiştirir.
Işık Yansıtma Çekimi
Portre çekiminde ışık yansıtma panelini kullandığınızda, kişi gözünde yansıtılan ışığı yakalayabilir ve daha canlı bir ifade elde edebilirsiniz.
-
Flaş kafasını yukarı doğru 90° eğin.
-
Geniş paneli çıkarın.
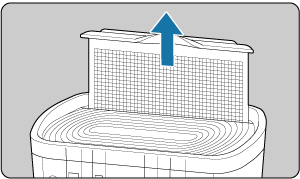
- Geniş panelin ortasındaki tırnağı kaldırın.
- Işık yansıtma paneli onunla birlikte açılır.
-
Geniş paneli geri itin.
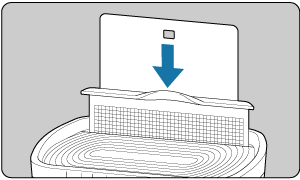
- Geniş paneli geri itin ve sadece ışık yansıtma panelini yukarıda bırakın.
- Çekim normal yansıma flaşlı fotoğrafçılık ile aynıdır.
Önlem
- Flaş kafasını öne ve 90° yukarı doğru konumlandırın. Flaş kafası sola veya sağa doğru çevrildiğinde, yansıma ışığı etkili olmaz.
- Kişi gözündeki ışık yansımasını etkili bir şekilde yakalamak için konuyu yaklaşık 1,5 m / 4,9 fit (ISO 100'de f/2,8 ile) mesafeden çekin.
- Geniş panele fazla güç uygulayarak çekmeyin. Aksi takdirde geniş panel Speedlite'tan çıkabilir.
 Yansıma Adaptörü ile Çekim
Size verilen yansıma adaptörünü Speedlite'a takar ve flaş ışığını tavana veya duvara, vb. yansıtırsanız, flaş ışığını daha geniş bir alana yayabilir ve konu gölgelerini bastırabilirsiniz.
Aynı zamanda, flaş ışığını tavanda, vb. yansıtmak için flaş kafasını yukarı doğru 90° döndürürseniz, yansıma adaptörünün yanlarında yayılan flaş ışığı konunun ön kısmına düşer (çekim mesafesi kılavuzu: yaklaşık 1,5 m / 4,9 fit’te, f/2,8 ile ISO 100'de) ve konu gölgesini daha da bastırır. Portre çekimlerinde ışık yansıtma efekti de elde edilebilir.
-
Yansıma adaptörünü takın.
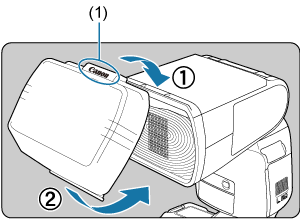
(1) "Canon" logosu
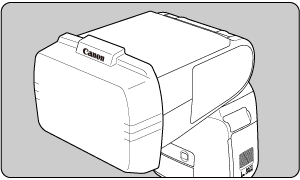
- Adaptörü, şekilde gösterildiği gibi tık sesiyle yerine oturana kadar sağlam bir şekilde flaş kafasına takın.
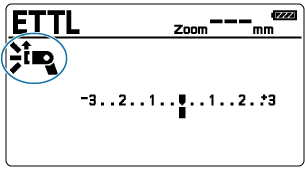
- Göstergenin
 olarak değiştiğinden emin olun.
 - Adaptörü çıkarmak için, prosedürü tersi yönde uygulayın. Adaptörün alt yanındaki çıkarma çıkıntısını kaldırın, sonra adaptörü flaş kafasından çıkarın.
-
Fotoğrafı çekin.
- Flaş ışığı tavandan, duvardan veya benzeri bir yüzeyden yansırken resim çekin.
Önlem
- Yansıma adaptörü takıldığında veya yansıma adaptörü ile geniş panel birlikte kullanıldığında kılavuz numarası azalacağı için düşük pozlama olabilir. Fotoğraf makinesinde ISO hızını artırmak veya flaş poz telafisi uygulamak için gerekli önlemleri alın ().
- Yansıma adaptörü takılı iken hızlı flaş () patlatıldığında, flaş hazır lambası kırmızı renkte yandıktan sonra çekim yapmanızı öneririz. Aksi takdirde flaş çıkışı yeterli olmayabilir.
- Yansıma adaptörü takıldığı zaman flaş kapsamı otomatik olarak ayarlanır. Manuel olarak değiştirilemez.
- 2004 yılı öncesinde piyasaya sürülen bir EOS DIGITAL fotoğraf makinesini kullanırken yansıma adaptörünü takarsanız beyaz ayarını
 konumuna ayarlayın.
  ayarı ile çekim yaparken, uygun beyaz ayarını elde edemeyebilirsiniz.