Automatic Flash Photography with 1 Flash Receiver
- About the LCD Panel Illumination
- Multiple Flash Photography with Wireless Functions
- About Sender Unit(s)
This section describes basic fully automatic wireless shooting when using a EL-1 attached to the camera (sender) and a EL-1 set as a receiver unit.
-
Set the sender unit.
-
Set the receiver unit.
-
Check the channel and ID.
-
Position the camera and flash.
- Position them within the range shown at "Positioning and Operation Range".
-
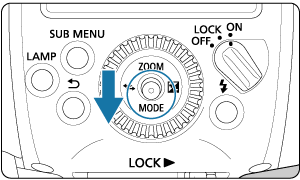
Use the joystick on the sender to select
 .
.
-
Set the flash mode to
 .
.
- Press the joystick up, down, left, or right, or turn
 and select
  , then press the joystick vertically.
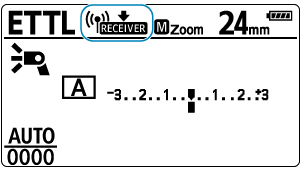
 - The receiver unit is set automatically to during shooting, controlled by the sender unit.
- Check that the firing group control is set to
 .
.
- Press the joystick up, down, left, or right, or turn
-
Check transmission status and charging.
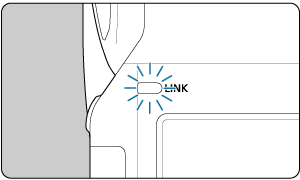
- Check that the
 lamp is lit in green.
 - When the receiver flash is ready, the AF-assist beam emitter blinks at approx. 1-second intervals.
- When the sender unit is set to P.Fn-06-0 (), the sender unit's beep will sound when recharging of all flash units is completed.
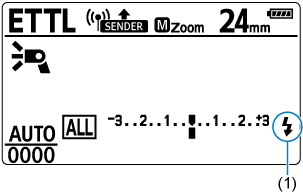
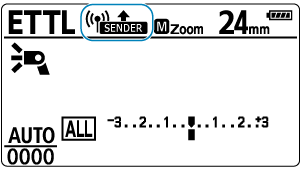
- Check that the
 icon (1) is lit on the sender / receiver unit's LCD panel (
 is not displayed).
 - For details of the LCD panel illumination of the sender, refer to About the LCD Panel Illumination.
- Check that the sender unit's flash-ready lamp is lit.
- Check that the
-
Check the operation.
-
Take the picture.
- Set the camera and take the picture in the same way as with normal flash shooting.
Caution
- When the lamp is off, radio transmission is not possible. Check the transmission channels and wireless radio IDs of the sender unit and receiver unit again. If you cannot connect with the same settings, turn the sender unit and receiver unit off and on again.
Note
- The flash coverage of the sender unit and receiver unit is set to 24 mm. You can also set the flash coverage manually.
- It can also fire a flash on the sender ().
- You can press the depth-of-field preview button on the camera to fire the modeling flash ().
- When set as the sender unit, the time until auto power off takes effect is approx. 5 min.
- If the receiver unit's auto power off takes effect, press the sender unit's test flash button to turn on the receiver unit.
- You cannot use the test flash when operating the flash timer, etc. on the camera end.
- You can change the time until the receiver unit's auto power off takes effect (C.Fn-10).
- You can enable a beep to sound when recharging of all the flash units (sender / receiver units) is complete (P.Fn-06).
- You can disable the blinking of the AF-assistant beam emitter when the receiver unit is fully charged (C.Fn-23).
About the LCD Panel Illumination
During radio transmission wireless shooting, the light on the sender's display panel will either be on or off according to the charge status of the sender and receiver (flash group).
The sender unit's LCD panel illumination is lit when the sender unit and receiver units are not fully charged. When the sender unit and receiver units are fully charged, the LCD panel illumination will turn off after approx. 12 sec.
When the charging of the sender unit and receiver unit starts as you take pictures, the sender unit's LCD panel will be illuminated again.
Caution
- If the sender unit or any of the receiver units (firing group) are not fully charged, will be displayed on the sender unit's LCD panel. Check that is not displayed on the LCD panel, and take a picture.
Multiple Flash Photography with Wireless Functions
Since the following functions set on the sender unit will be set automatically to the receiver units on this wireless system, you do not need to operate the receiver unit(s). For this reason, you can perform wireless flash photography in the same way as normal flash photography.
- Flash Exposure Compensation

- FEB

- FE Lock
- High-Speed Sync

- Second-Curtain Sync

- Manual Flash
- Stroboscopic Flash
Note
- You can also directly operate the receiver unit to individually set the flash exposure compensation and flash coverage on each receiver unit.
- If the sender is set to EL-1, it is possible to take radio transmission wireless slow sync photos with a 600EXII-RT, 600EX-RT, or 430EXIII-RT set as receivers.
About Sender Unit(s)
You can designate two or more sender units. When using multiple cameras with senders attached, you can switch cameras in wireless strobe shooting using the same lighting (receivers).
When two or more sender units are used, ![]() is displayed on the LCD panel.
is displayed on the LCD panel.
Caution
- When the lamp turns off or
 is displayed on the LCD panel, it means that the unit is not connected yet. After checking the transmission channel and wireless radio ID, turn each receiver unit off and on again.
 - Limit the total number of senders and receivers during radio transmission wireless shooting to 16 units.
Note
- You can shoot even when the sender unit is in the sub-sender state.