Shooting and Recording
- Keeping the Camera Steady
- Focusing
- Remote Shooting from a Computer
- Remote Shooting from a Smartphone
Shooting still photos while recording a movie will set the recording quality to UHD.
Keeping the Camera Steady
For best results, use a tripod or take other measures to stabilize the camera. Before recording from a tripod or similar equipment, be aware of the following.
- Keeping the camera level is advisable.
- Ensure that tripod heads and legs are not in the picture.
- To avoid camera shake issues caused by operating the camera directly, consider shooting remotely from a computer or smartphone.
- If you will shoot or record by operating the camera directly, hold the camera steady when pressing the shutter button or other buttons.
- To reduce camera shake, consider using an optional remote controller. For instructions on using the camera and shooting with a remote controller, refer to the camera and remote controller instruction manuals.
Before handheld recording, be aware of the following.
- If you will use EOS VR Utility to convert your movies, you can use image stabilization in the application to reduce camera shake. Note that image stabilization in EOS VR Utility is not available for RF7-14mm F2.8-3.5 L FISHEYE STM. For details, refer to the EOS VR Utility instruction manual.
- For still photos, consider using a shutter speed less susceptible to camera shake.
Caution
- Peripheral image areas may be missing if clip image stabilization is used in EOS VR Utility or EOS VR Plugin for Adobe Premiere Pro when converting a movie that was recorded with the camera tilted. For details, refer to the instruction manual for EOS VR Utility or EOS VR Plugin for Adobe Premiere Pro.
Focusing
For focusing instructions, refer to the lens and camera instruction manuals.
- RF-S3.9mm F3.5 STM DUAL FISHEYE and RF-S7.8mm F4 STM DUAL are autofocus lenses (using the left lens).
- For best results, focus before you start recording with RF5.2mm F2.8 L DUAL FISHEYE or RF-S3.9mm F3.5 STM DUAL FISHEYE, and avoid focusing during recording.
Note
- Subject detection AF is available with RF-S7.8mm F4 STM DUAL attached. Note that the Flexible Zone AF 1 cannot be moved.
Display (except for RF7-14mm F2.8-3.5 L FISHEYE STM)
Display is as follows in the viewfinder or on the screen after you turn the camera on. If the viewfinder or screen is blank, press the ![]() button repeatedly.
button repeatedly.
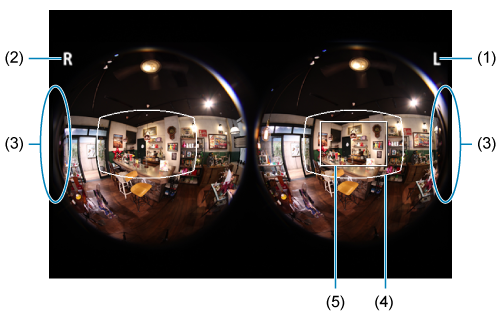
- (1) Image through the left lens
- (2) Image through the right lens
- (3) Reflection from the lens on the other side (only when using RF5.2mm F2.8 L DUAL FISHEYE)
- (4) Magic window, or estimated initial display area as viewed in 2D in an environment such as a web browser
- (5) Area shown in a magnified view
- (6) AF frame
Note
- Display varies depending on the equipment used.
Focusing functions
Magnified view
- For a magnified view (5), tap [
 ] on the screen. Display can be further magnified by tapping [] again. To return to viewing the entire image, tap [] again.
 - Magnified view is also available by pressing the <> button. Assign magnify/reduce to one of the buttons in [
 : Customize buttons] on the EOS R7 or EOS R50, or in [
 : Customize buttons for shooting] on the EOS R50 V.
 - On the EOS R5 C (in movie mode), you can adjust magnification with the
 button.
Moving the magnified area
- To move the magnified area that includes the left/right shooting area, or to move the magnified display position, tap the screen or use
 (or the joystick, on the EOS R5 C in movie mode).
Display switching during magnified view
- To switch between left/right lens display, tap [
 ] or press the
  button during magnified view.
 - On the EOS R5 C (in movie mode), use the Select dial.
Peaking
- You can simplify focusing by using peaking display, which shows edges of subjects in focus in a color of your choice.
- For peaking instructions, refer to the instruction manual of the camera used.
Focus guide
- Focusing is also easier if you use a focus guide, displayed as a guide frame that shows where and how much to adjust focus.
- The focus guide can be displayed in the center of the left or right image.
- For focus guide instructions, refer to the instruction manual of the camera used.
- A focus guide is not available on the EOS R6 Mark II.
- With RF-S3.9mm F3.5 STM DUAL FISHEYE or RF-S7.8mm F4 STM DUAL, a focus guide frame can be displayed on the image from the left lens.
Remote Shooting from a Computer
To shoot remotely from a computer, use EOS Utility (EU) ver. 3.18.5 or later, as installed on the computer. Refer to the EU instruction manual for more detailed EU instructions.
Caution
- Remote shooting is not available on some cameras with versions of EU earlier than ver. 3.18.5. Make sure EU ver. 3.18.5 or later is installed.
-
EOS R5 C precautions
- Remote shooting in EU is not available in movie modes. Consider using Browser Remote to shoot remotely.
-
EOS C400 and EOS C80 precautions
- Remote shooting in EU is not available. Consider using Browser Remote to shoot remotely.
-
EOS C50 precautions
- Remote shooting in EU is not available in movie modes. Consider using a controller or application compatible with the XC protocol to shoot remotely.
-
Connect the camera and computer wirelessly or with an interface cable.
- For instructions on connecting the camera to a computer, refer to the camera instruction manual.
-
Start EU.
-
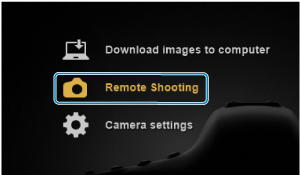
Select [Remote Shooting] in the main window.
-
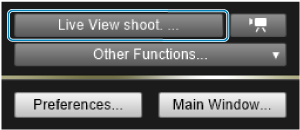
In the capture window, select [Live View shoot. ...].
-
The Remote Live View window is displayed.
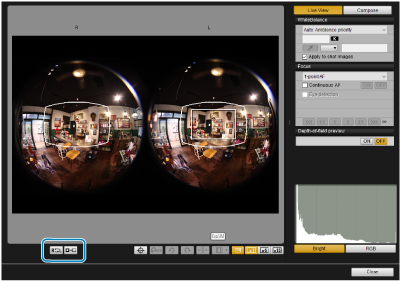
Clicking [
 ] switches between left/right images.
Clicking [
 ] converts to a VR/3D image.
-
Note
- Display varies depending on the equipment used.
- To choose EOS VR Utility as the linked application that starts up automatically after remote shooting, click [Preferences] in the main window, then configure the setting on the [Linked Software] tab. For details, refer to the EU instruction manual.
Focusing
RF5.2mm F2.8 L DUAL FISHEYE: Use the lens to focus manually.
RF-S3.9mm F3.5 STM DUAL FISHEYE or RF-S7.8mm F4 STM DUAL: You can focus from the remote Live View screen.
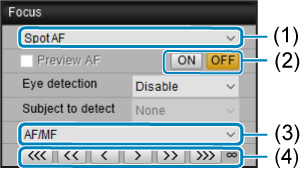
- (1) Select the AF area. You can move the AF area by clicking near the center of the left lens image.
- (2) To use autofocus, click [ON].
- (3) Camera operations can be switched between focusing and correcting differences in left/right focus.
- (4) You can focus manually.
Movie recording (EOS R5 Mark II,EOS R5, EOS R6 Mark III, EOS R6 Mark II, EOS R7, EOS R50 V, EOS R50)
-
Make sure the camera is in movie recording mode.
-
If the camera is in still photo shooting mode, click [
 ] in the capture window.
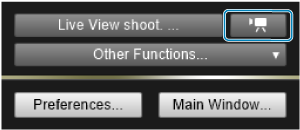
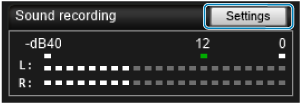
-
To adjust sound recording settings, click [Settings] for [Sound recording] in the Remote Live View window.
-
-
Click [
 ] in the lower left of the Remote Live View window.
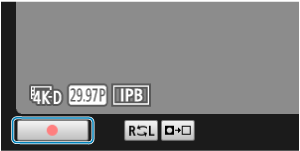
- Movie recording begins. Click [] again to stop recording.
- Movie recording begins. Click [
Still photo shooting
-
To switch from movie recording to still photo shooting, click [
 ] in the capture window.
 -
Click the shutter button in the capture window.
Remote Shooting from a Smartphone
To shoot remotely from a smartphone, use Camera Connect, as installed on the smartphone.
- Connect the camera and smartphone wirelessly and start Camera Connect. For instructions on wirelessly connecting the camera to a smartphone, refer to the camera instruction manual.
- To record movies, tap the movie shooting button. To stop recording, tap the movie shooting button again.
- To shoot still photos, tap the still photo shooting button.
Caution
- Remote shooting is not available in versions of Camera Connect earlier than ver. 2.9.0. Make sure Camera Connect ver. 2.9.0 or later is installed.
-
EOS C50 and EOS R5 C precautions
- Remote shooting in Camera Connect is not available in movie modes.
-
EOS C400 and EOS C80 precautions
- Remote shooting in Camera Connect is not available.