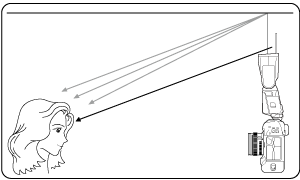
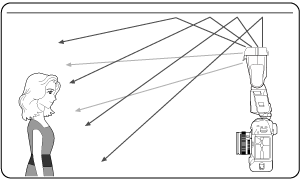
Bounce
By pointing the flash head toward a ceiling or wall, the flash light will bounce off the surface before illuminating the subject, making it possible to soften the shadows of the subject for a more natural-looking shot. This shooting method is called "Bounce flash photography".
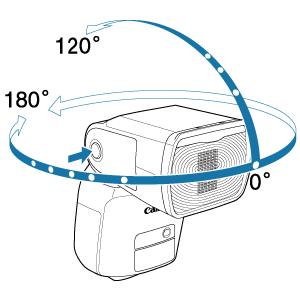
Setting the orientation of the flash head
- You can turn the flash head while pressing the bounce lock-release button as shown. When you turn the flash head, the display changes to
 .
. - When the flash head is turned with the flash coverage set to
 (automatic setting), the flash coverage is set at 50 mm and --- is displayed.
 - You can also set the flash coverage manually ().
Note
- If the ceiling or wall to bounce the flash light on is too far away, shooting with the appropriate exposure may not be possible since the bounced flash may be too weak.
- If the picture appears dark, use a larger aperture opening (smaller f/number) and try again. You can also increase the ISO speed when using a digital camera.
- The ceiling or wall to bounce the flash light on should be plain white for high reflectance. If the bounce surface is not white, shooting with the appropriate exposure may not be possible, since a color cast may result in the picture or the bounced flash may be too weak.
- When Quick flash is fired with bounce flash, underexposure may occur since the flash output decreases.
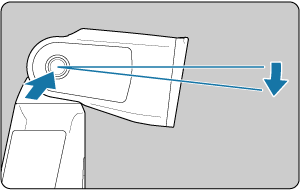
 Short Distance Flash Shooting
When you position the flash head down by 7° while pressing the bounce lock-release button, you can shoot subjects at a short distance in a range of approx. 0.5 to 2 m / 1.6 to 6.6 ft.
When the flash head is positioned down by 7°, the display changes to ![]() .
.
Catchlight Shooting
Using the catchlight panel when shooting a portrait enables you to capture reflected light in a person's eyes and create a more vivid expression.
-
Turn the flash head up 90°.
-
Pull up the wide panel.
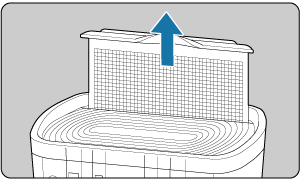
- Pull up the protruding area located in the center of the wide panel.
- The white catchlight panel is pulled out at the same time.
-
Push back the wide panel.
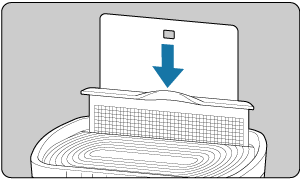
- Push back the wide panel only, keeping just the catchlight panel up.
- Shoot using the same method as bounce flash.
Caution
- Position the flash head toward the front and 90° up. When the flash head is rotated to the left or right, the catchlight is not very effective.
- To effectively obtain the catchlight in a person's eyes, shoot within approx. 1.5 m / 4.9 ft. from the subject (at ISO 100 with f/2.8).
- Do not pull up the wide panel with excessive force. Doing so may detach the wide panel from the Speedlite.
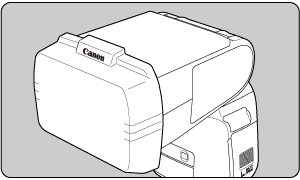
 Bounce Photography with the Bounce Adapter
If you attach the provided bounce adapter to the Speedlite and bounce the flash light on the ceiling or wall, etc., you can spread the flash light across a larger area and suppress the shadows of the subject.
Also, if the flash head is turned 90° upward to bounce the flash light on the ceiling, etc., the diffused flash light emitted from the sides of the bounce adapter falls on the front of the subject (shooting distance guidance: within approx. 1.5 m / 4.9 ft., at ISO 100 with f/2.8), further suppressing the shadow of the subject. When shooting portraits, the catchlight effect can also be obtained.
-
Attach the bounce adapter.
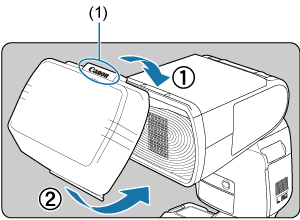
(1) "Canon" logo
- Attach the adapter securely to the flash head until it clicks in place, as shown.
- Check that the display changes to
 .
. - When removing the adapter, follow the procedure in reverse order. Raise the removal tab on the lower side of the adapter, then remove the adapter from the flash head.
-
Take the picture.
- Take the picture with the flash light bouncing off the ceiling, walls, or the like.
Caution
- When the bounce adapter is attached, or when the bounce adapter and the wide panel are used together, underexposure may result since the guide no. decreases. Take necessary countermeasures such as increasing the ISO speed on the camera or applying flash exposure compensation ().
- When Quick flash () is fired with the bounce adapter attached, taking the picture after the flash-ready lamp is lit in red is recommended since the flash output may not be sufficient.
- The flash coverage is set automatically when the bounce adapter is attached. It cannot be changed arbitrarily.
- If you attach the bounce adapter to the flash when using an EOS DIGITAL camera released up to 2004, set the white balance to
 . If you shoot with
  setting, an appropriate white balance may not be obtained.