Menu Operations and Settings

- (1)
 button
 - (2)
 button
 - (3) Screen
- (4)
 button
 - (5)
 Dial
Dial
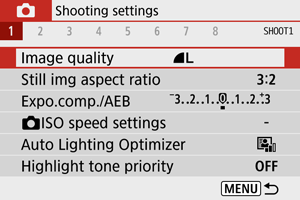
Menu Screen
The menu tabs and items displayed vary depending on the shooting mode.
Basic Zone
Movie recording
Creative Zone
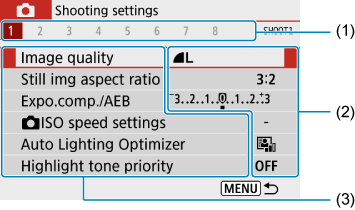
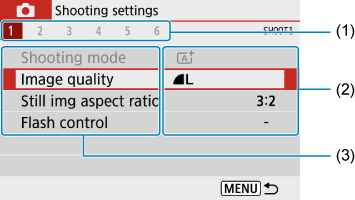
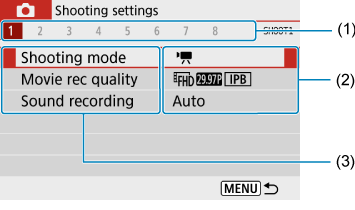
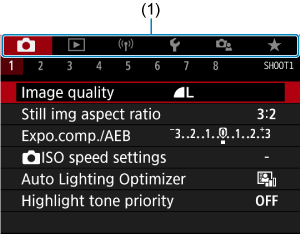
- (1) Secondary tabs
- (2) Menu settings
- (3) Menu items
Menu Setting Procedure
When set to [![]() : Menu display: Guided]
: Menu display: Guided]
-
Display the main tabs.
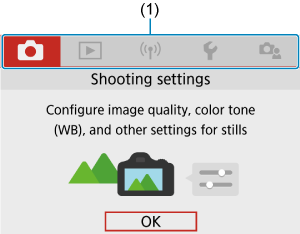
- When you press the button, the main tabs (1) and a description of the selected tab will appear.
- When you press the
-
Select a main tab.
- Turn the dial to switch between main tabs.
- You can also switch main tabs by pressing the button.
- Turn the
-
Display the menu screen.
- Press the button to display the menu screen.
- To return to the main tab screen, press the button.
- Press the
-
Select a secondary tab.
- Use the

 keys or turn the dial to select a secondary tab.
- Use the
-
Select an item.

- Use the

 keys to select an item, then press the button.
- Use the
-
Select an option.
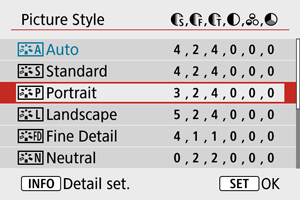
- Use the or keys to select an option. (Some options are selected with the keys and others with the keys.)
- The current setting is indicated in blue.
- Use the
-
Set an option.
- Press the button to set it.
- If you change the setting from the default, it will be indicated in blue (available only for the menu items under the [
 ] tab).
- Press the
-
Exit the setting.
- Press the button twice to exit the menu and return to shooting standby.
- Press the
Note
- The description of menu functions hereafter assumes that the menu screen is displayed.
- To cancel the operation, press the button.
When set to [![]() : Menu display: Standard]
: Menu display: Standard]
-
Display the menu screen.
- Press the button to display the menu screen.
- Press the
-
Select a tab.
- Press the button to switch between main tabs (1).
- Use the keys or turn the dial to select a secondary tab.
- After this, operations are the same as when set to [
 : Menu display: Guided]. See When set to [
 : Menu display: Guided], starting with step 5.
 - To exit the setting, press the button once.
- Press the
Dimmed Menu Items
Example: When set to [Highlight tone priority]

Dimmed menu items cannot be set. The menu item is dimmed if another function setting is overriding it.
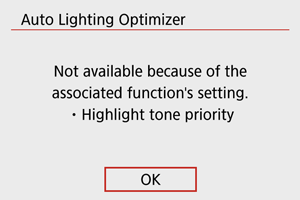
You can see the overriding function by selecting the dimmed menu item and pressing the ![]() button.
button.
If you cancel the overriding function's setting, the dimmed menu item will become settable.
Caution
- You may not be able to see the overriding function for certain dimmed menu items.