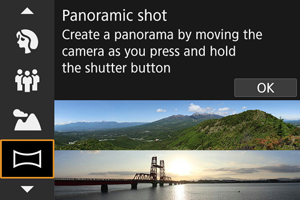
Panoramic Shot Mode
Use [![]() ] (Panoramic Shot) mode to shoot panoramas. The panorama is created by combining shots captured in continuous shooting as you move the camera in one direction while pressing the shutter button completely.
] (Panoramic Shot) mode to shoot panoramas. The panorama is created by combining shots captured in continuous shooting as you move the camera in one direction while pressing the shutter button completely.
-
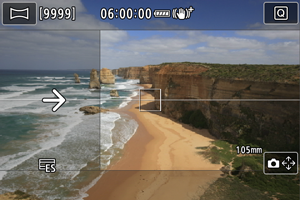
Choose a shooting direction.
- Press the
 button or tap [
 ] in the lower right to choose the direction you will shoot.
 - An arrow is displayed showing the direction to move the camera.
- Press the
-
Press the shutter button halfway.
- Keeping the shutter button pressed halfway, focus on the subject.
-
Shoot.
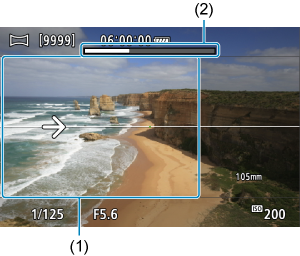
- Press the shutter button completely and move the camera at a constant speed in the direction of the arrow.
- The area displayed clearly (1) is captured.
- A shooting progress indicator (2) is displayed.
- Shooting stops when you release the shutter button, or when all of the progress indicator is white.
Caution
- In some scenes, images you intended to capture may not be saved as expected, and the panorama may not look as expected.
- Shooting may stop midway if you move the camera too slowly or quickly. However, the panorama created up to that point will still be saved.
-
In consideration of the large sizes of
 mode images, use a computer or other device to resize panorama images if you will print them from a memory card inserted in a Canon printer.
If panoramas cannot be managed correctly by software or Web services, try resizing them on a computer.
-
Shots of the following subjects and scenes may not be combined correctly.
- Subjects in motion
- Subjects at close range
- Scenes where the contrast varies greatly
- Scenes with long stretches of the same color or pattern, such as the sea or sky
- Shooting is not affected by any correction applied to counteract blur from swinging the camera.
- Move the camera slowly when using a lens with a long focal length, or when shooting night scenes or under low light.
- Lens image stabilization is not applied.