Manual Focus
If focusing is not possible with autofocus, you can magnify the image and focus manually.
-
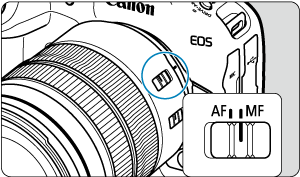
Set the lens's focus mode switch to
 .
.
- Turn the lens focusing ring to set the approximate focus.
- For lenses without a focus mode switch, set [
 : Focus mode] to [].
-
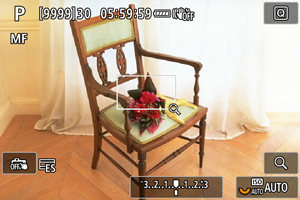
Magnify the image.
- Each press of the
 button changes the magnification ratio, as follows.

- Each press of the
-
Move the magnified area.
- Use
 to move the magnified area into position for focusing.
 - To center the magnified area, press straight in.
- Use
-
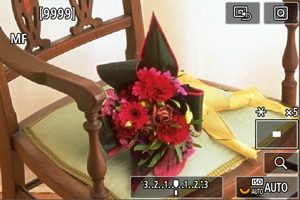
Focus manually.
- While looking at the magnified image, turn the lens focusing ring to focus.
- After achieving focus, press the button to return to the normal view.
Note
- In magnified view, the exposure is locked.
- Even when focusing manually, you can use Touch Shutter to shoot.
Setting MF peaking (Outline Emphasis)
Edges of subjects in focus can be displayed in color to make focusing easier. You can set the outline color and adjust the sensitivity (level) of edge detection.
-
Select [
: MF peaking settings].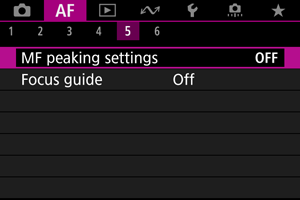
-
Select [Peaking].
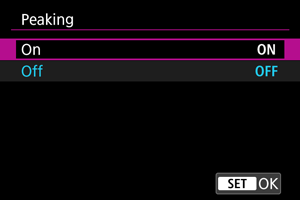
- Select [On].
-
Set [Level] and [Color].
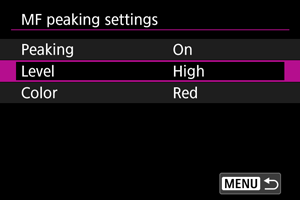
- Set as necessary.
Caution
- In magnified view, peaking display is not shown.
- During HDMI output, peaking display is not shown on equipment connected via HDMI. Note that peaking display is shown on the camera screen when [
 : HDMI display] is set to [
 +
+ ].
]. - MF peaking may be hard to discern at high ISO speeds, especially when ISO expansion is set. If necessary, lower the ISO speed or set [Peaking] to [Off].
Note
- Peaking display shown on the screen is not recorded in images.
- MF peaking may be hard to discern when Canon Log is set. If necessary, set [View Assist.] to [On].
Focus Guide
Setting [![]() : Focus guide] to [On] provides a guide frame that shows which direction to adjust focus and the extent of adjustment needed. You can also use eye control to display the focus guide at your preferred position. For details, see Using Eye Control for AF.
: Focus guide] to [On] provides a guide frame that shows which direction to adjust focus and the extent of adjustment needed. You can also use eye control to display the focus guide at your preferred position. For details, see Using Eye Control for AF.
-
Select [
: Focus guide].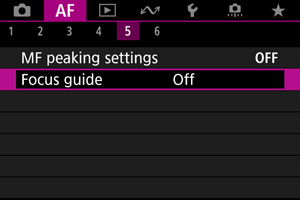
-
Select [On].
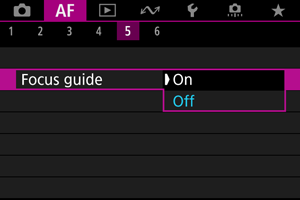
- The guide frame is displayed on the face of any person detected as the main subject.
- To display the guide frame near the eyes of any person detected as the main subject, set [: Subject tracking] to [On] and [: Eye detection] to [Enable].
- After pressing the
 button, you can use to move the guide frame in the direction you press.
 - To center the guide frame while using , press straight in.
- To set the guide frame after moving it with , press
 .
. - You can also move and set the guide frame by tapping the screen.
- To center the guide frame, tap [
 ] or press straight in.
The guide frame indicates the current position in focus and adjustment amount as follows.

Toward infinity
Much adjustment needed

Toward infinity
Slight adjustment needed

In focus

Toward close range
Slight adjustment needed

Toward close range
Much adjustment needed

Adjustment information
not detected
Caution
- Under difficult shooting conditions for AF (), the guide frame may not be displayed correctly.
- Higher aperture values are more likely to prevent correct guide frame display.
- No AF points are displayed while the guide frame is displayed.
- The guide frame is not displayed in these situations.
- When the lens's focus mode switch is set to

- When display is magnified
- When the lens's focus mode switch is set to
- The guide frame is not displayed correctly during shifting or tilting of TS-E lenses.
Note
- The camera's auto power off counter does not count time spent adjusting the focus with a lens's electronic focusing ring.