Lens Aberration Correction
- Peripheral Illumination Correction
- Distortion Correction
- Digital Lens Optimizer
- Chromatic Aberration Correction
- Diffraction Correction
Vignetting, image distortion, and other issues may be caused by lens optical characteristics. The camera can compensate for these phenomena by using [Lens aberration correction].
-
Select [
 : Lens aberration correction].
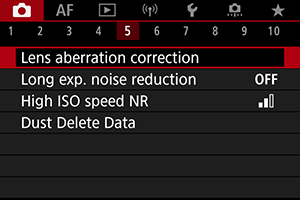
-
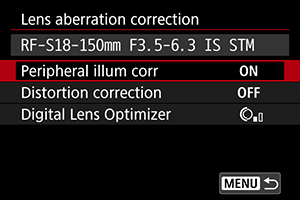
Select an option.
-
Select a setting.
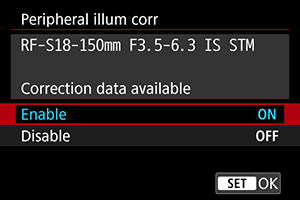
- Confirm that the name of the attached lens and [Correction data available] are displayed.
- If [Correction data not available] or [
 ] is displayed, see Digital Lens Optimizer.
Peripheral Illumination Correction
Vignetting (dark image corners) can be corrected.
Caution
- Depending on shooting conditions, noise may appear on the image periphery.
- The higher the ISO speed, the lower the amount of correction will be.
Note
- The amount of correction applied will be lower than the maximum correction amount applied with Digital Photo Professional (EOS software).
Distortion Correction
Distortion (image warping) can be corrected.
Caution
- Specifying distortion correction may subtly change the angle of view, resulting in images that are cropped a little and seem slightly less sharp.
- The amount of image cropped may vary between still photos and movies.
Note
- With RF lenses, distortion correction during movie recording is supported.
Digital Lens Optimizer
Various aberrations from lens optical characteristics can be corrected, along with diffraction and low-pass filter-induced loss of resolution.
If [Correction data not available] or [![]() ] is displayed by [Digital Lens Optimizer], you can use EOS Utility to add the lens correction data to the camera. For details, refer to the EOS Utility Instruction Manual.
] is displayed by [Digital Lens Optimizer], you can use EOS Utility to add the lens correction data to the camera. For details, refer to the EOS Utility Instruction Manual.
Caution
- Image processing after you shoot takes longer when set to [High] (which causes the access lamp to be illuminated longer).
- Maximum burst is lower with [High]. Image recording to the card also takes longer.
- Depending on shooting conditions, noise may be intensified together with the effects of correction. Image edges may also be emphasized. Adjust Picture Style sharpness or set [Digital Lens Optimizer] to [Disable] as needed before shooting.
- The higher the ISO speed, the lower the amount of correction will be.
- For movie recording, [Digital Lens Optimizer] will not appear. (Correction is not possible.)
- The effect of Digital Lens Optimizer cannot be checked on the screen at the time of shooting.
Note
- With [Digital Lens Optimizer] set to [Standard] or [High], [Chromatic aberr corr] and [Diffraction correction] are not displayed, but they are both set to [Enable] for shooting.
Chromatic Aberration Correction
Chromatic aberration (color fringing around subjects) can be corrected.
Note
- [Chromatic aberr corr] is not displayed when [Digital Lens Optimizer] is set to [Standard] or [High].
Diffraction Correction
Diffraction (loss of sharpness caused by the aperture) can be corrected.
Caution
- Depending on shooting conditions, noise may be intensified together with the effects of correction.
- The higher the ISO speed, the lower the amount of correction will be.
- For movie recording, [Diffraction correction] will not appear. (Correction is not possible.)
- The effect of diffraction correction cannot be checked on the screen at the time of shooting.
Note
- “Diffraction correction” corrects degraded resolution not only from diffraction but also from the low-pass filter and other factors. Thus, correction is also effective for exposures with the aperture wide open.
- [Diffraction correction] is not displayed when [Digital Lens Optimizer] is set to [Standard] or [High].
Caution
-
General precautions for lens aberration correction
- Lens aberration correction cannot be applied to existing JPEG/HEIF images.
- When using a non-Canon lens, setting the corrections to [Disable] is recommended even if [Correction data available] is displayed.
- Magnifying the periphery of the image may display parts of the image that will not be recorded.
- The amount of correction (except diffraction correction) is less for lenses that do not provide distance information.
Note
-
General notes for lens aberration correction
- Effects of lens aberration correction vary by lens and shooting conditions. Also, the effect may be difficult to discern depending on the lens used, shooting conditions, etc.
- If the correction is difficult to discern, magnifying and checking the image after shooting is recommended.
- Corrections are applied even when an extender or life-size converter is attached.
- If the correction data for the attached lens is not registered to the camera, the result will be the same as when the correction is set to [Disable] (except for diffraction correction).
- If necessary, refer to the EOS Utility Instruction Manual as well.