Radio Transmission Wireless Settings
- Sender Settings
- Receiver Settings
- Setting the Transmission Channel / Wireless Radio ID
 Lamp and Connection Indication
- Sender Unit(s) Flash Firing ON / OFF
- Memory Function
E-TTL II / E-TTL During radio transmission wireless shooting with autoflash photography, use the following steps to set the sender and receiver.
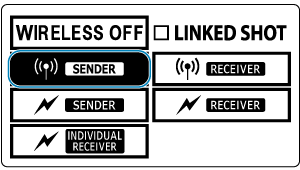
Sender Settings
-
Select
 with the joystick.
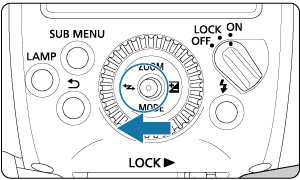
-
Set to

 .
.
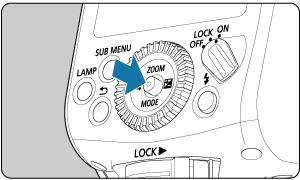
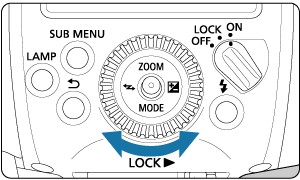
- Press the joystick up, down, left, or right, or turn
 and select , then press the joystick vertically.
- Press the joystick up, down, left, or right, or turn
-
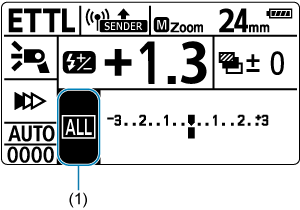
Select the firing method.
- Push the joystick vertically.
- Push the joystick up / down / left / right or turn to select item (1), then push the joystick vertically.
- Push the joystick to the left or right, turn to select from


 , then push the joystick vertically.
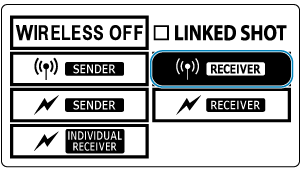
Receiver Settings
-
Set to
 .
.
- Operate and set the flash you want to set as the receiver unit.
- Select in the same way as for the sender unit setting.
Caution
- To perform normal flash shooting, select
 to clear the wireless (sender / receiver) settings.
Setting the Transmission Channel / Wireless Radio ID
Use the following procedure to set the transmission channel and wireless radio ID of the sender unit. Set the same channel and ID for both the sender unit and receiver unit. For details on the receiver operation procedure, refer to the Instruction Manual of the Speedlite equipped with the radio transmission wireless receiver function.
Caution
- When establishing multiple radio transmission wireless flash systems in a place, interference between flash systems may occur even if the flashes are set to different transmission channels. Set different wireless radio IDs for each channel.
-
Push the joystick vertically.
-
Select Item (1).
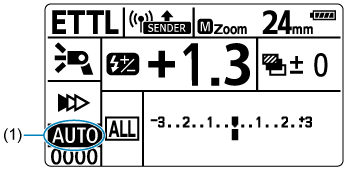
- Push the joystick up / down / left / right, or turn to select a channel item, then push the joystick vertically.
- Push the joystick up / down / left / right, or turn
-
Set a transmission channel.
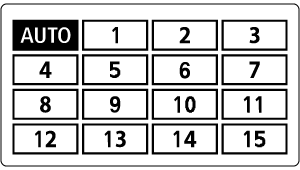
- Press the joystick up / down / left / right or turn to select from
 or Ch.1 to 15, then push the joystick vertically.
- Press the joystick up / down / left / right or turn
-
Select Item (2).
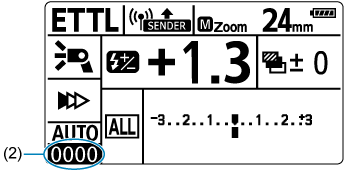
- Select the ID item using the same operation as the transmission channel setting, then push the joystick vertically.
-
Set the wireless radio ID.
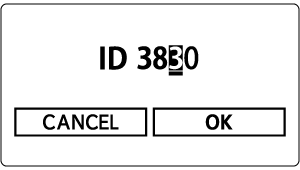
- Push the joystick to the left or right or turn to select the position (digit) to set, then push the joystick vertically.
- Push the joystick up or down or turn to select a number from 0 to 9, then push the joystick vertically.
- Set a 4-digit number with the same procedure and select
 .
.
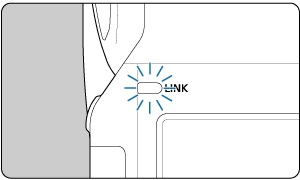
- When transmission between the sender unit and receiver unit is established, the
 lamp is lit in green.
- Push the joystick to the left or right or turn
Scanning and Setting the Sender Unit Transmission Channels
You can scan the radio reception status and set the sender unit's transmission channel automatically or manually. When the channel is set to "AUTO", the channel with the best reception signal is reset automatically. When setting the channel manually, you can reset the transmission channel while referring to the scan results.
-
Scanning when "AUTO" is set
-
Press the
 button.
-
Run the scan.
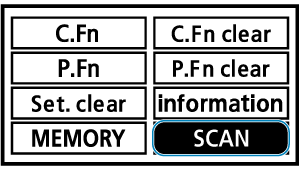
- Press the joystick up, down, left, or right, or turn and select
 , then press the joystick vertically.
 - Choose .
- The scan is performed, and the channel with the best reception signal is reset.
- Press the joystick up, down, left, or right, or turn
-
-
Scanning when a channel between Ch. 1 and 15 is set
-
Press the
button.
-
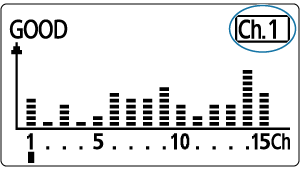
Run the scan.
- Press the joystick up, down, left, or right, or turn and select , then press the joystick vertically.
- Choose .
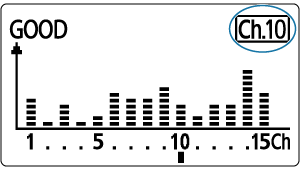
- The scan is performed and the reception status is displayed in a graph.
-
The higher the peak of the channel in the graph, the better the radio reception signal.
- Press the joystick up, down, left, or right, or turn
-
Set the channel.
- Push the joystick up / down / left / right or turn to select from Ch.1 to 15.
-
Push the joystick vertically to set the channel.
- Push the joystick up / down / left / right or turn
-
Lamp and Connection Indication
You can check the transmission status by the lighting status of the ![]() lamp or the icon on the LCD panel.
lamp or the icon on the LCD panel.
| Status | Description | Action |
|---|---|---|
| Lit | Transmission OK | – |
| Off | Not connected | Checking the channel and ID |
| Off | Too many units | Set the total number of sender and receiver units to 16 or less. |
| Blinking | Error | Turn the sender unit and receiver unit off and on again. |
| Lit | Transmission OK*1 | – |
| Lit | Transmission OK*2 | – |
1: When sender side is connected to the sub-sender
2: When the sender side is connected for continuous shooting
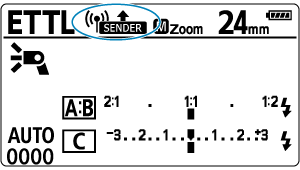
| Display | Description | Action |
|---|---|---|
| Transmission OK | – | |
| Not connected | Checking the channel and ID | |
| Too many units | Set the total number of sender and receiver units to 16 or less. | |
| Error | Turn the sender unit and receiver unit off and on again. | |
| Transmission OK*1 | – |
1: When sender side is connected to the sub-sender
Caution
- If the transmission channels of the sender unit and receiver unit are different, the receiver unit will not fire. Set both to the same number or set both to "AUTO".
- If the wireless radio IDs of the sender unit and receiver unit are different, the receiver unit does not fire. Set to the same number.
Sender Unit(s) Flash Firing ON / OFF
You can set whether or not to fire the sender unit as a wireless flash that controls the receiver unit. When sender flash firing is turned ON, the flash fires as firing group A.
-
Push the joystick vertically.

-
Select an item in (1).
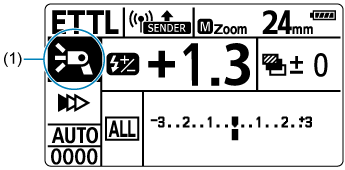
- Push the joystick up / down / left / right or turn to select an item, and push the joystick vertically.
- Push the joystick up / down / left / right or turn
-
Set sender flash firing.

- Turn to select sender flash firing ON / OFF, then push the joystick vertically.
 : Sender flash firing ON
 : Sender flash firing OFF
- Turn
Memory Function
You can save the wireless settings to the sender unit and receiver unit and recall the settings later. Operate each sender or receiver unit individually to save or recall its settings.
-
Press the
button.
-
Select
 .
.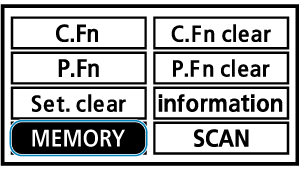
- Press the joystick up, down, left, or right, or turn and select , then press the joystick vertically.
- Press the joystick up, down, left, or right, or turn
-
Save or load the settings.
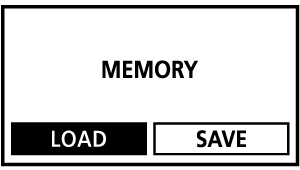
Save
- Press the joystick to the left or right, turn to select
 to select, then push the joystick vertically.
 - Press the joystick to the left or right, turn to select to select, then push the joystick vertically.
- The settings are saved (stored in the memory).
Load
- Press the joystick to the left or right, turn to select
 to select, then push the joystick vertically.
 - Press the joystick to the left or right, turn to select to select, then push the joystick vertically.
- The settings that were saved are set.
- Press the joystick to the left or right, turn