
What This System Can Do
- System Configuration
- Compatible Cameras
- System Requirements
- Screen Configuration of the EMR Application
- Shooting with one camera (sender camera)
- Remote shooting linking up to 10 cameras (receiver cameras)
- Various operations with a terminal
- Remote shooting using up to 10 cameras (receiver cameras)
- Review and downloading of captured images
- Camera setting changes
- FTP transfer configuration and the transfer of captured images to an FTP server
- Configuration of IPTC information
If you are using EMR Ver.1.1.0 or later, you can perform remote shooting together with the Robotic Camera System CR-S700R. For details, see “Connecting the Remote Head.”
System Configuration
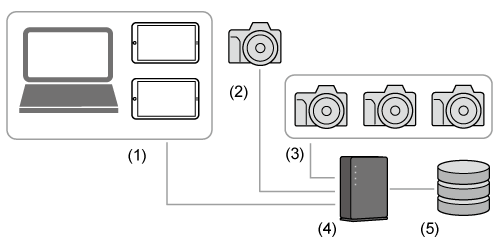
- (1) Terminals
- (2) Sender camera
- (3) Receiver camera
- (4) Access point
- (5) FTP server
The role of each device is as follows.
Terminals
- Remote shooting with a receiver camera, setting changes, and review of captured images, etc.
- Multiple terminals can be connected. The receiver camera can be controlled from any terminal.
- For terminals that can be used, see “System Requirements.”
- The sender camera cannot be operated from a terminal.
-
When operating EMR Ver.1.1.0 or later on a PC, you can also use the PC keyboard or game controller.
Canon has confirmed the operation of the following devices (However, Canon does not guarantee the operation of such devices. Confirmation results as of July 2025).
- SONY DualSense CFI-ZCT1J (supports Windows/macOS/iOS, wireless and wired connections)
- APEM VM Desktop (Windows/macOS)
Sender camera
- The sender camera controls the receiver camera during linked shooting.
- For sender cameras that can be used, see “Compatible Cameras.”
Receiver camera
- The receiver camera is controlled by the sender camera during linked shooting.
- It can be operated with a terminal that has the EMR application installed.
- For receiver cameras that can be used, see “Compatible Cameras.”
Access point
- The access point connects the sender camera, receiver camera, and terminals to a network with a wired or wireless connection.
- A hub can be used with a wired connection.
FTP server
- Connect to a network and transfer images.
- The FTP transfer settings can be configured from a terminal.
- The customer is responsible for preparing the FTP server.
Compatible Cameras
To use this system, the following camera firmware must be updated to the latest version.
Sender cameras
- EOS R1
- EOS R5 Mark II
Receiver cameras
- EOS R1
- EOS R5 Mark II
- EOS R3
Caution
- When using the EOS R5 Mark II with a wired connection, the Battery Grip BG-R20EP or Cooling Fan CF-R20EP is required.
System Requirements
OS
- iOS/iPad OS: Ver.18 and Ver.26
-
Windows: Windows 11
-
macOS: macOS 14, macOS 15 and macOS 26
*Supports Macs with Apple Silicon.
Devices
-
Terminals that run the above OS
When using multiple receiver cameras, it is recommended that you use a high-performance terminal for comfortable Live View shooting, etc.
Caution
- Be careful not to set the terminal character size too large. If the size is set extremely large, the characters may stick out and inhibit proper operation.
- To prevent the EMR application from becoming locked during shooting, set the terminal [Auto-Lock] to [Never]. On an iPhone/iPad, open [Settings] and select [Never] under [Display & Brightness]-[Auto-Lock].
- When the EMR application is placed in the background, the connection with camera may be severed. Keep the application in an active state during use.
Screen Configuration of the EMR Application
This application is operated by switching screens according to the situation.
Main screen
The main screen is displayed when starting this application. Register cameras and configure various settings.
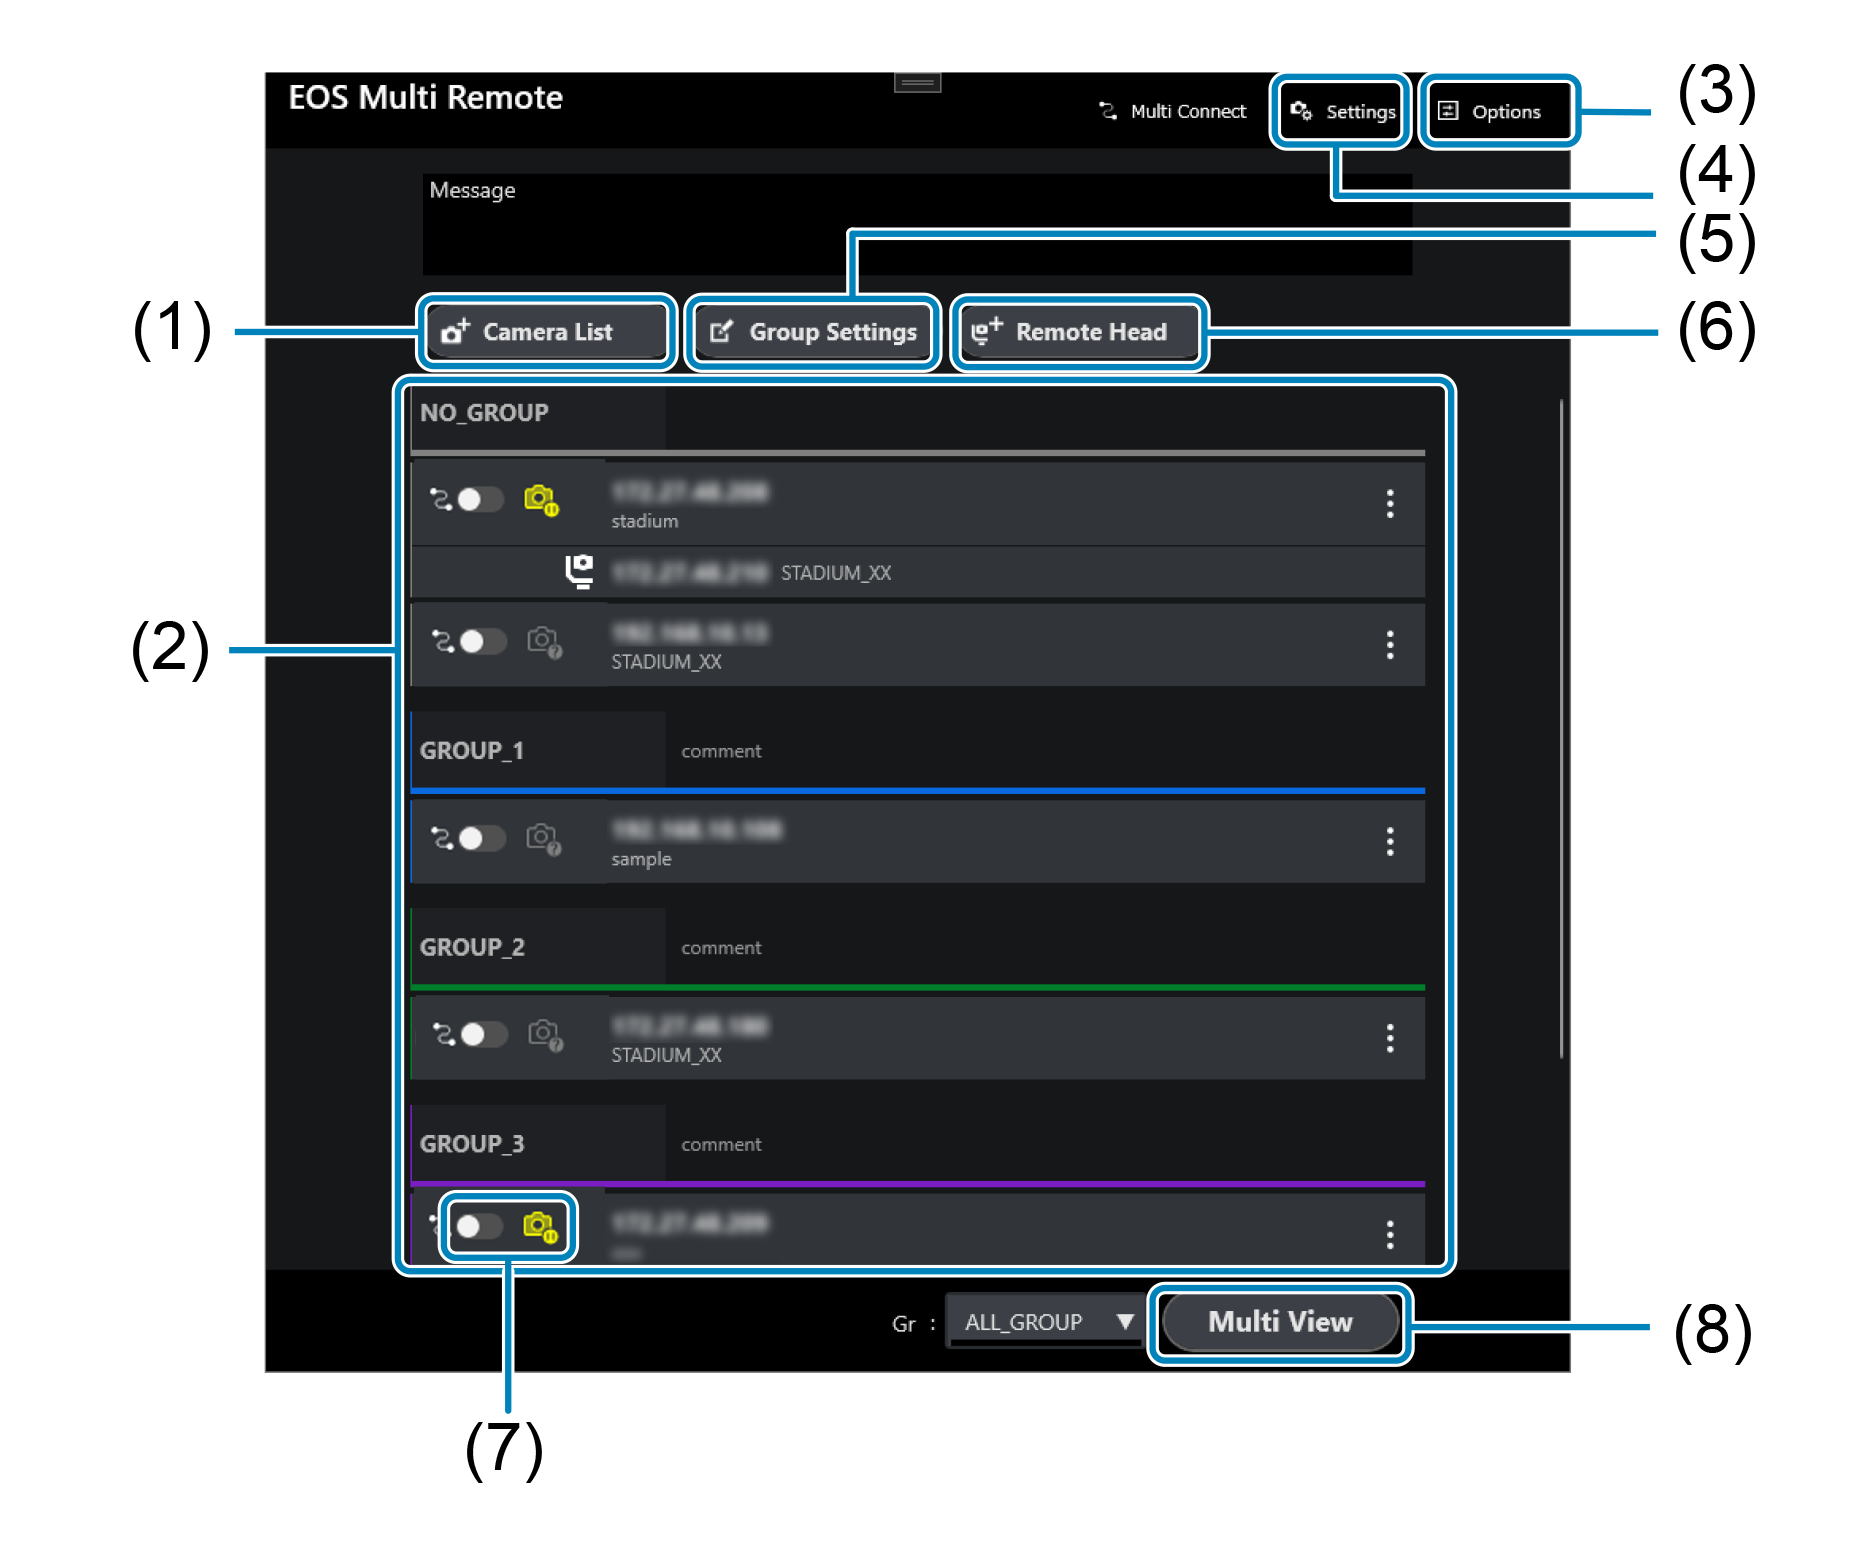
- (1) Connect/disconnect cameras shown on the Multi View screen.
- (2) Configure the camera date and time settings and the FTP settings.
- (3) Display the option settings screen.
- (4) Show/hide cameras in specific groups, or select groups to use before switching to the Multi View screen.
- (5) Lists receiver camera setting details ().
- (6) Lists registered receiver cameras.
- (7) Display the Camera List/Edit List screen.
- (8) Display the Group Settings screen.
- (9) Display the Add Remote Head/Edit List screen.
- (10) Shows whether selected groups are connected or disconnected.
- (11) Display the Multi View screen.
Camera information area
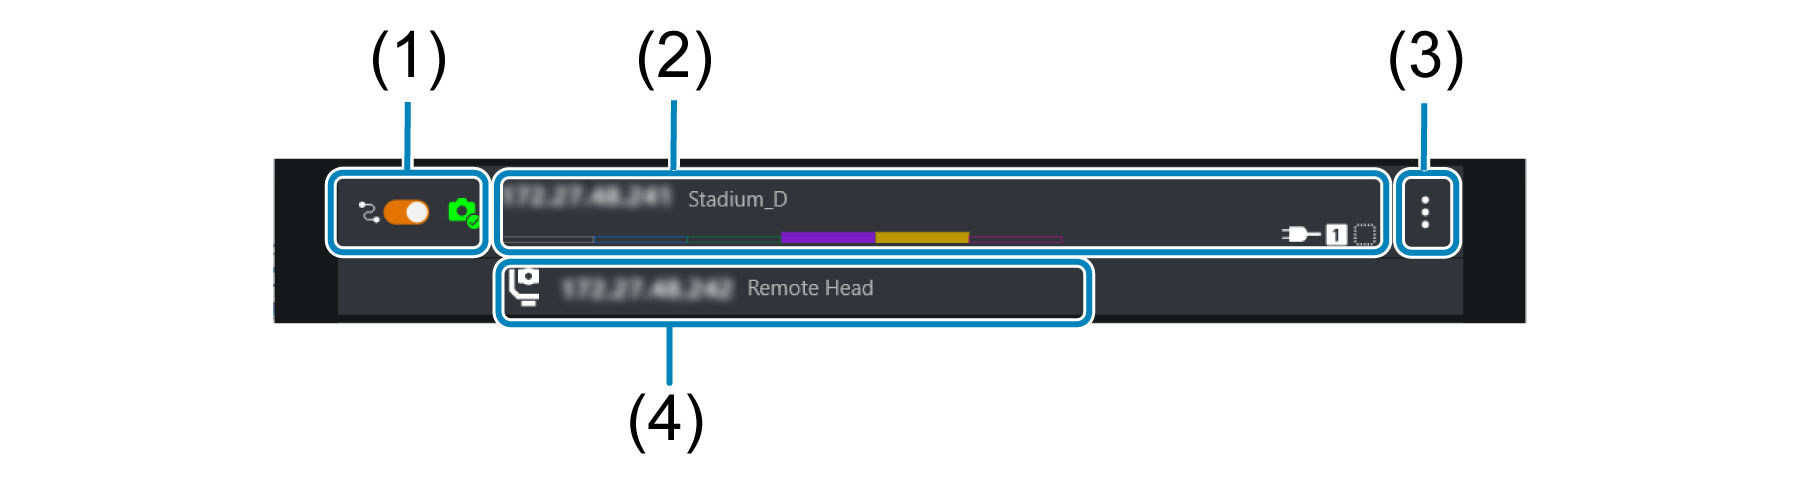
- (1) Turn on to connect cameras listed on the Multi View screen. Cameras set to on are automatically connected after detection the next time the application starts up.
- (2) Shows information about cameras registered in the application. Tap to display the camera's remote control screen.
- (3) Display the camera settings menu screen.
- (4) Shows remote head settings.
Multi View screen 1
To display this screen, tap [Multi View] on the main screen.
Information about registered receiver cameras is displayed side by side. Remote shooting and setting changes can be carried out by camera and group.
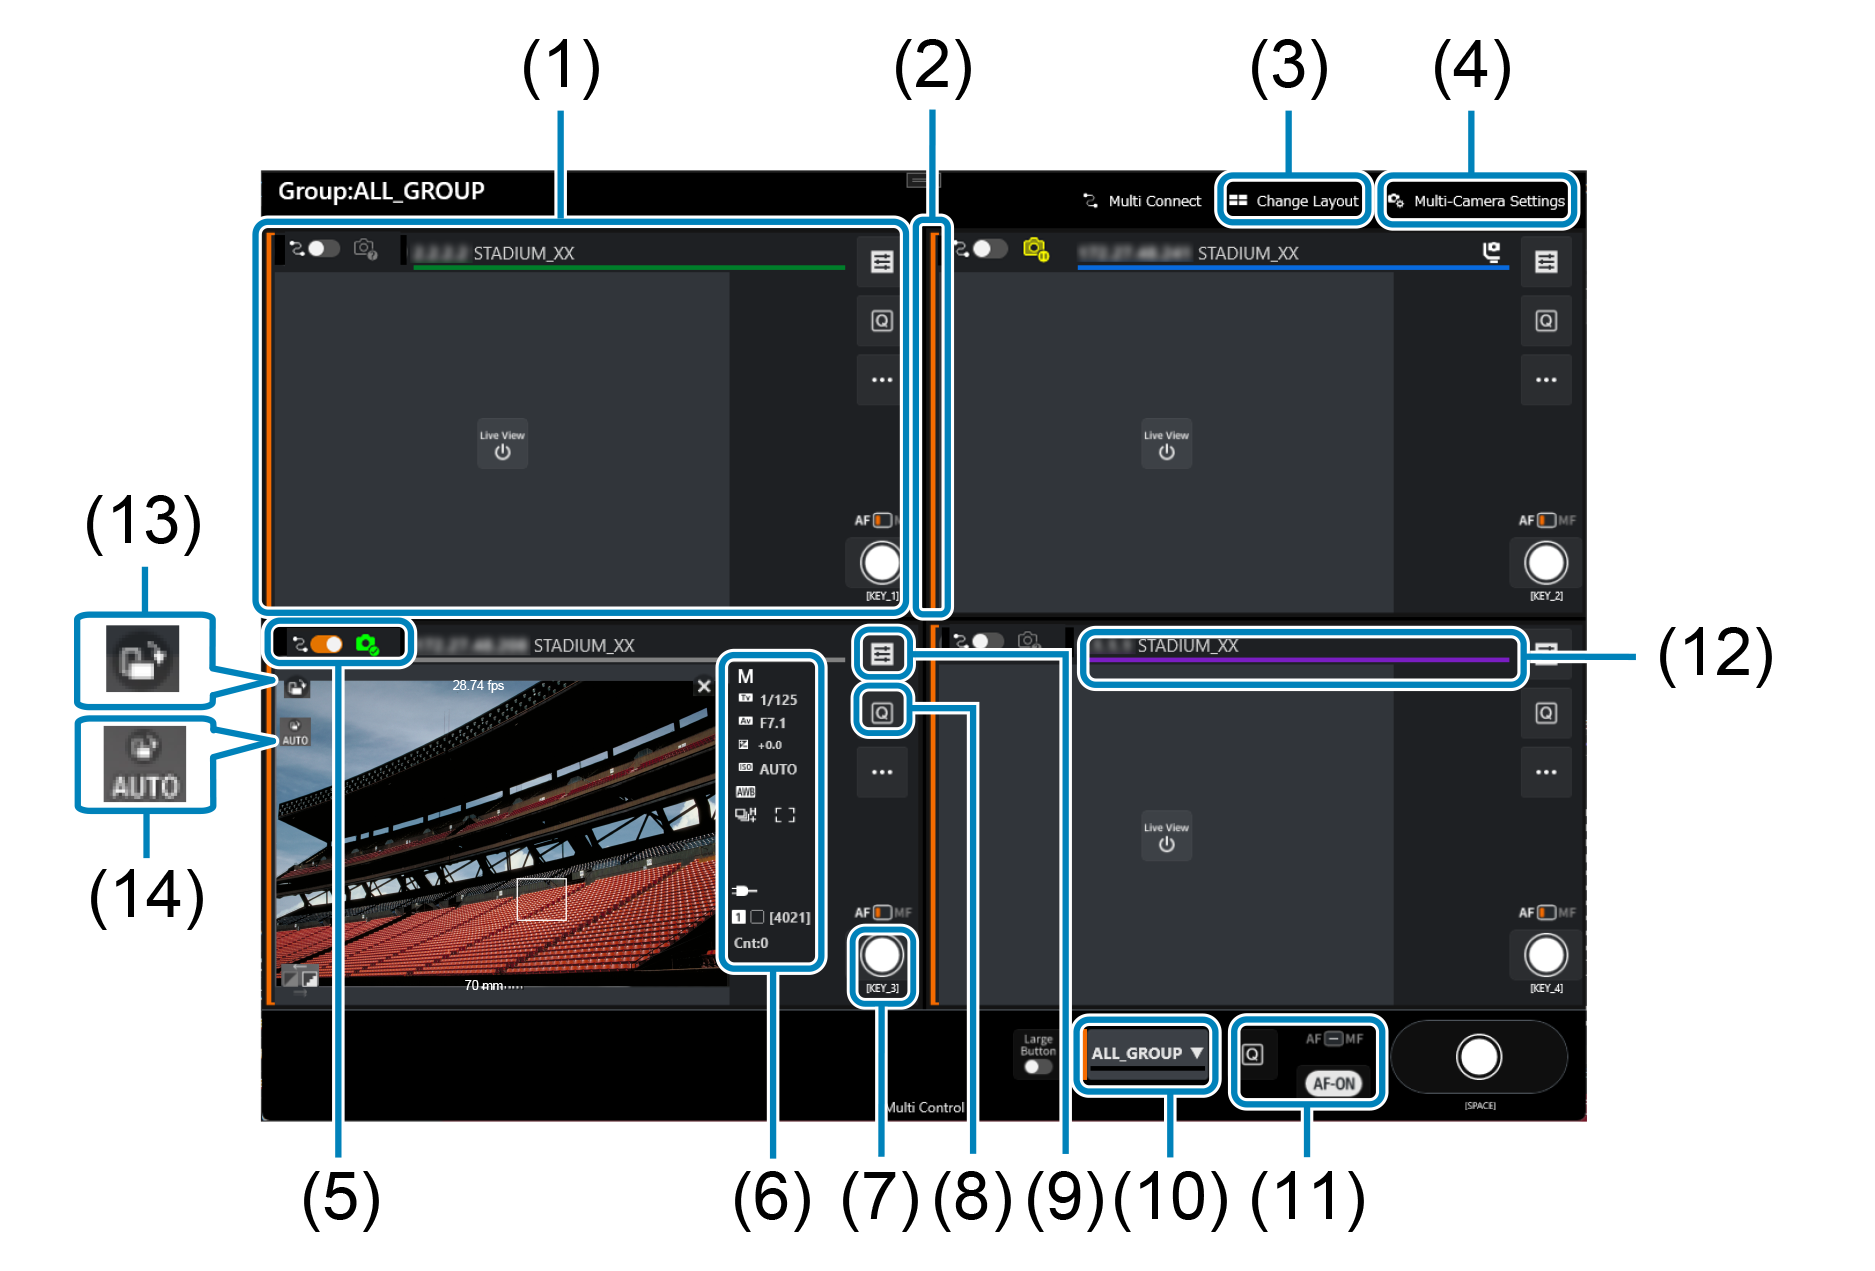
- (1) Connect/disconnect the cameras shown on the screen.
- (2) Display the [Change Layout] screen ().
- (3) Display the screen for batch configuration of multiple cameras.
- (4) Shows camera information ().
- (5) Identifies selected groups by color.
- (6) Select receiver camera groups.
- (7) Control all cameras in selected groups at once.
- (8) Shoot remotely with all cameras.
Camera information area
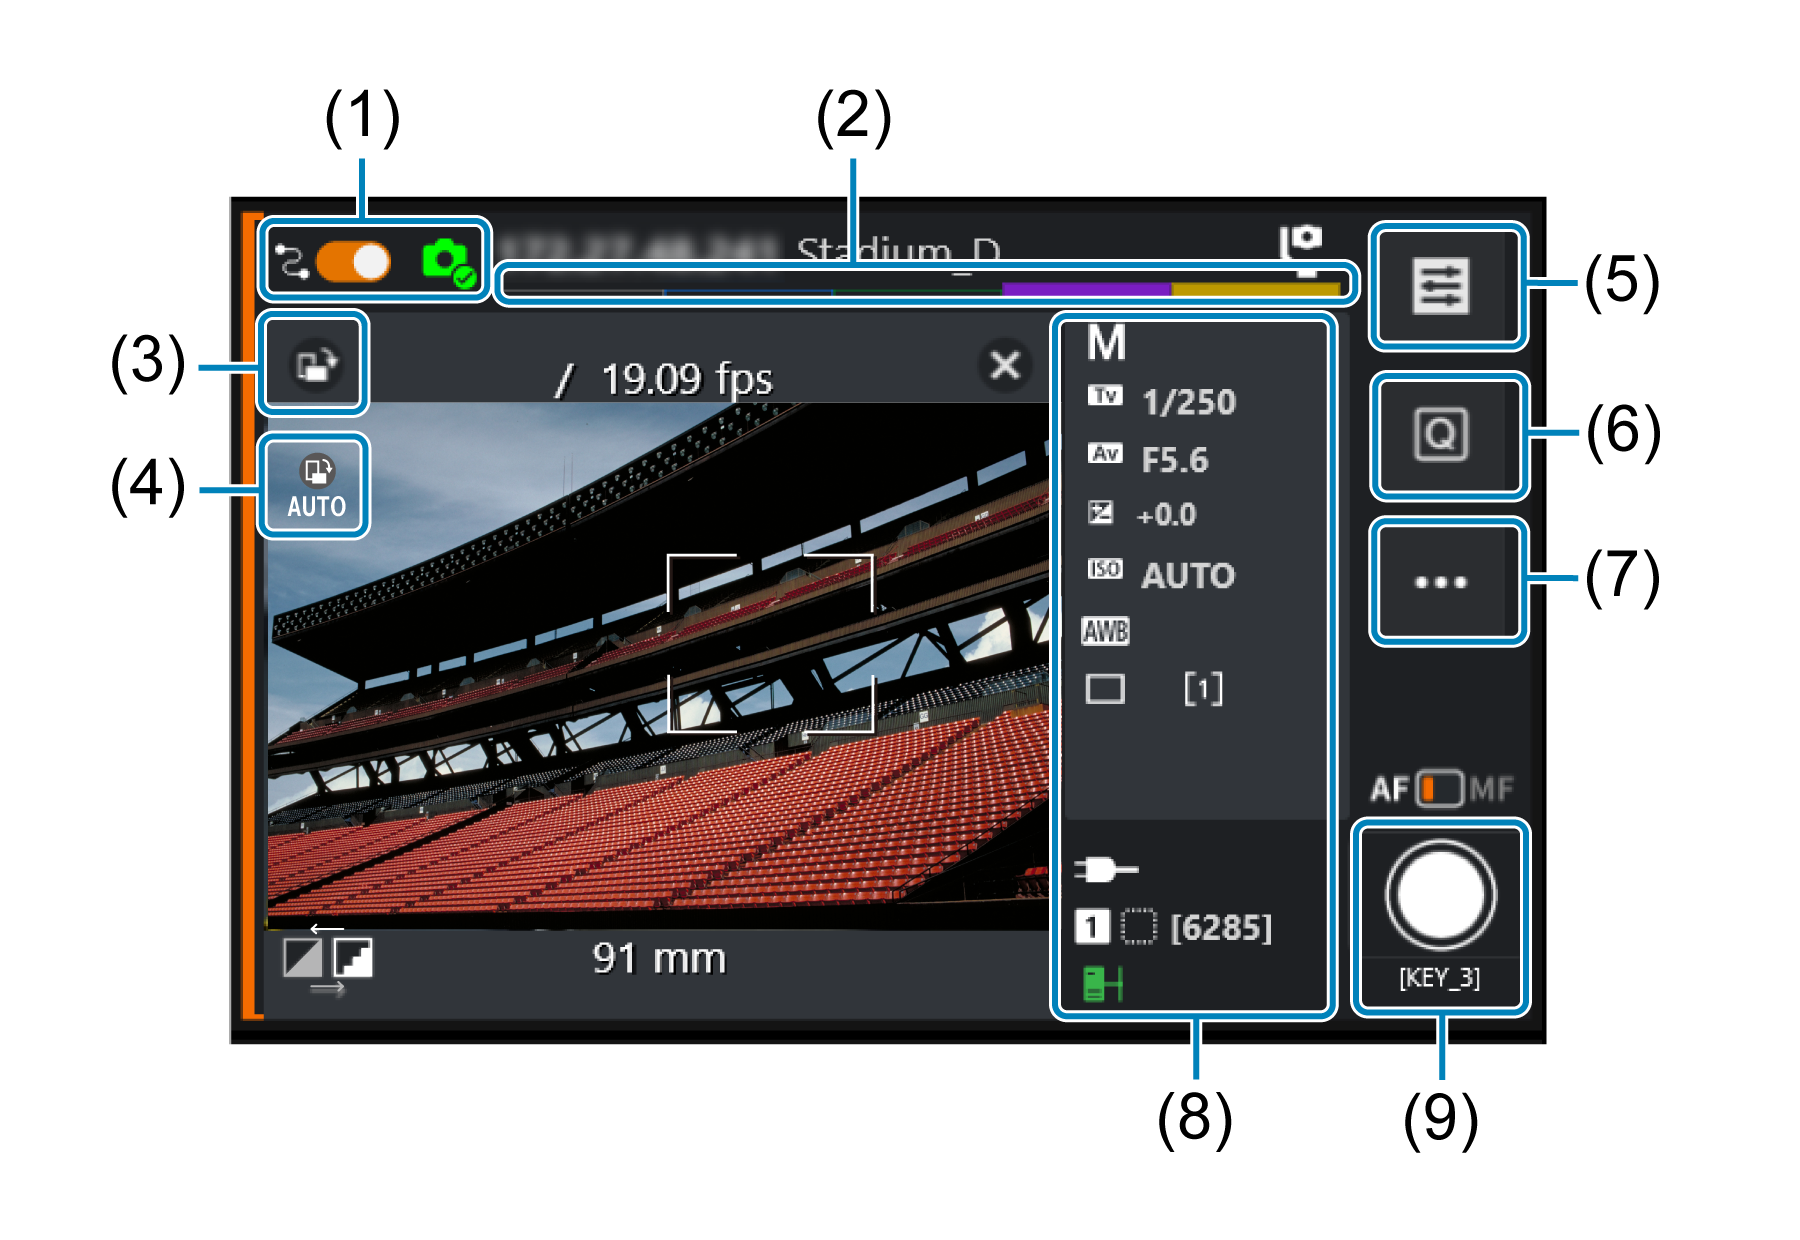
- (1) Turn on to connect cameras listed on the Multi View screen. Cameras set to on are automatically connected after detection the next time the application starts up.
- (2) Identifies selected groups by color.
- (3) Tap to rotate the Live View display 90° clockwise.
- (4) Toggle auto rotation. When set to auto rotation, Live View display is automatically rotated to match the camera orientation.
- (5) Switch to the Single View screen ().
- (6) Tap to display the shooting settings menu. Tap an item to make it editable.
- (7) Display the settings screen for camera features.
- (8) Lists camera setting details. Tap to display the shooting settings menu.
- (9) Shoot remotely.
*(3) and (4) are also displayed on Multi View screen 2 and the shooting screen for the Single View screen.
Multi View screen 2
Tap [ ] on Multi View screen 1 and choose [Main/Sub] on the displayed screen to display Multi View screen 2 ().
Similar to Multi View screen 1, remote shooting and setting changes can be carried out by camera and group.
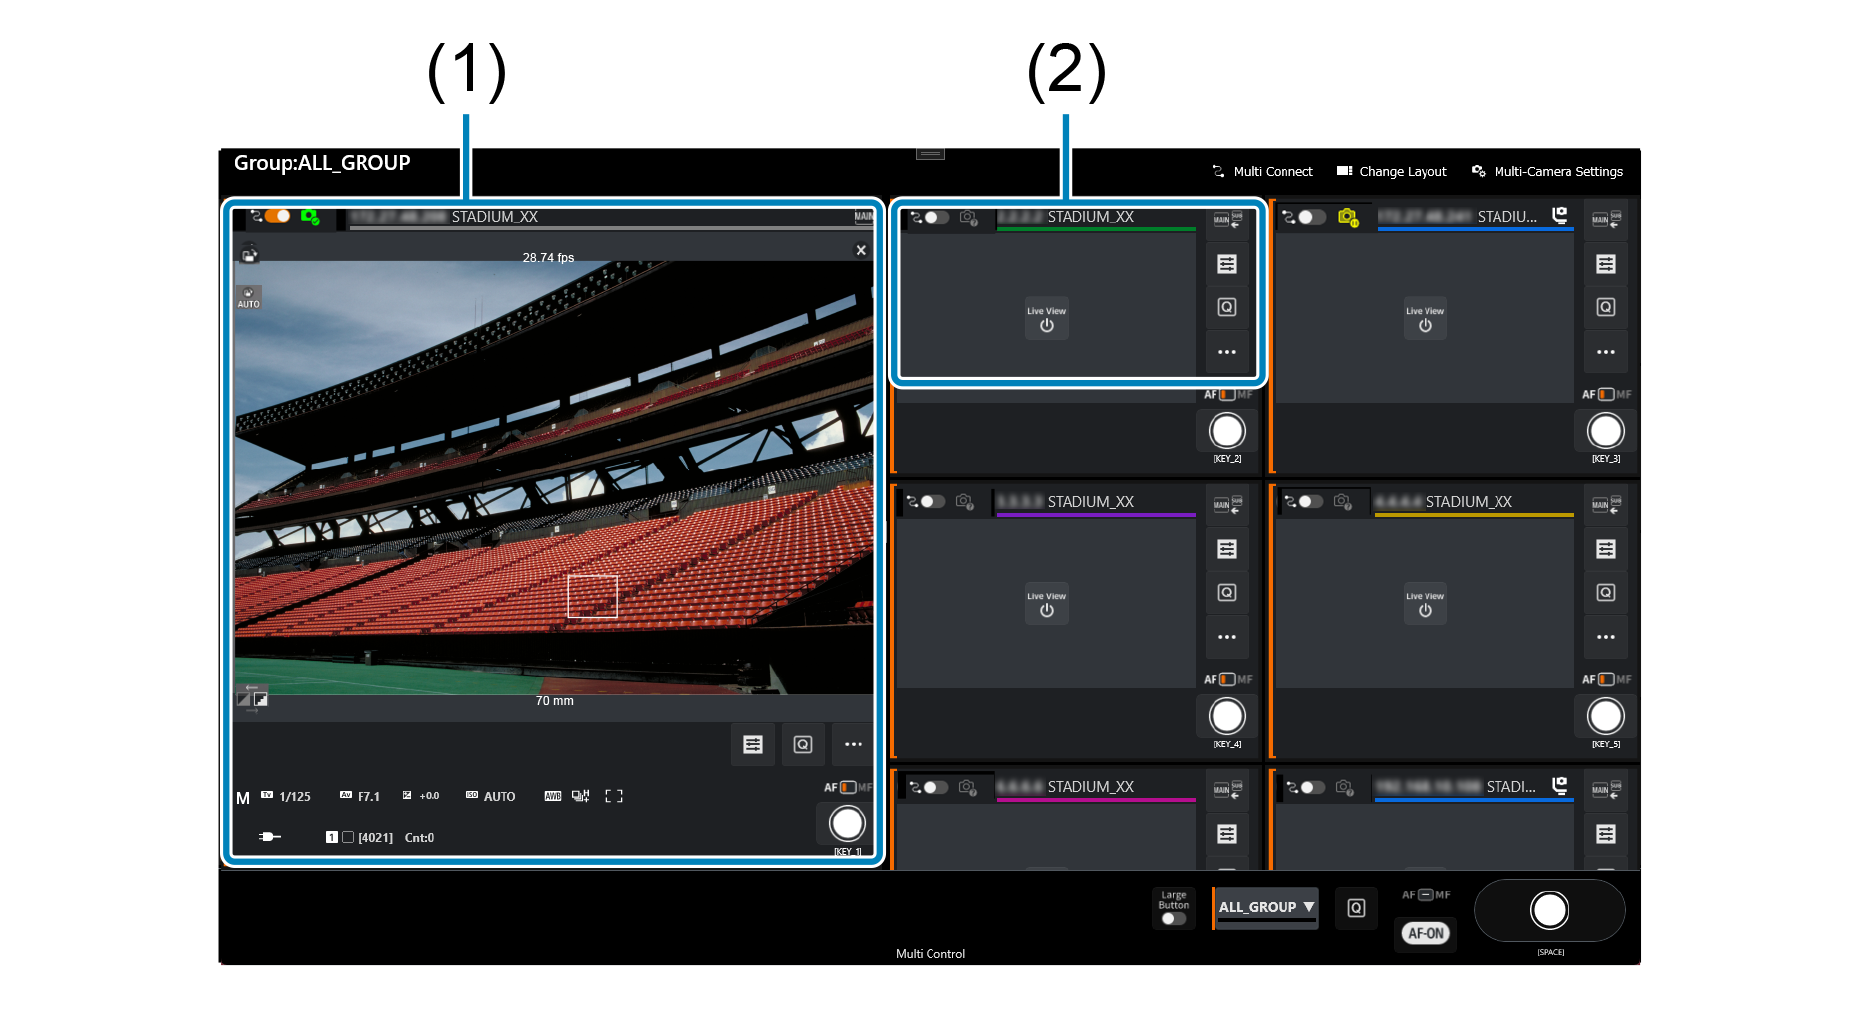
- (1) Display the information for the selected receiver camera.
- (2) Display the information for other receiver cameras.
Change Layout
Tap [] on Multi View screen 1 or [ ] on Multi View screen 2 to display Change Layout.
You can change the layout on the Multi View screen.
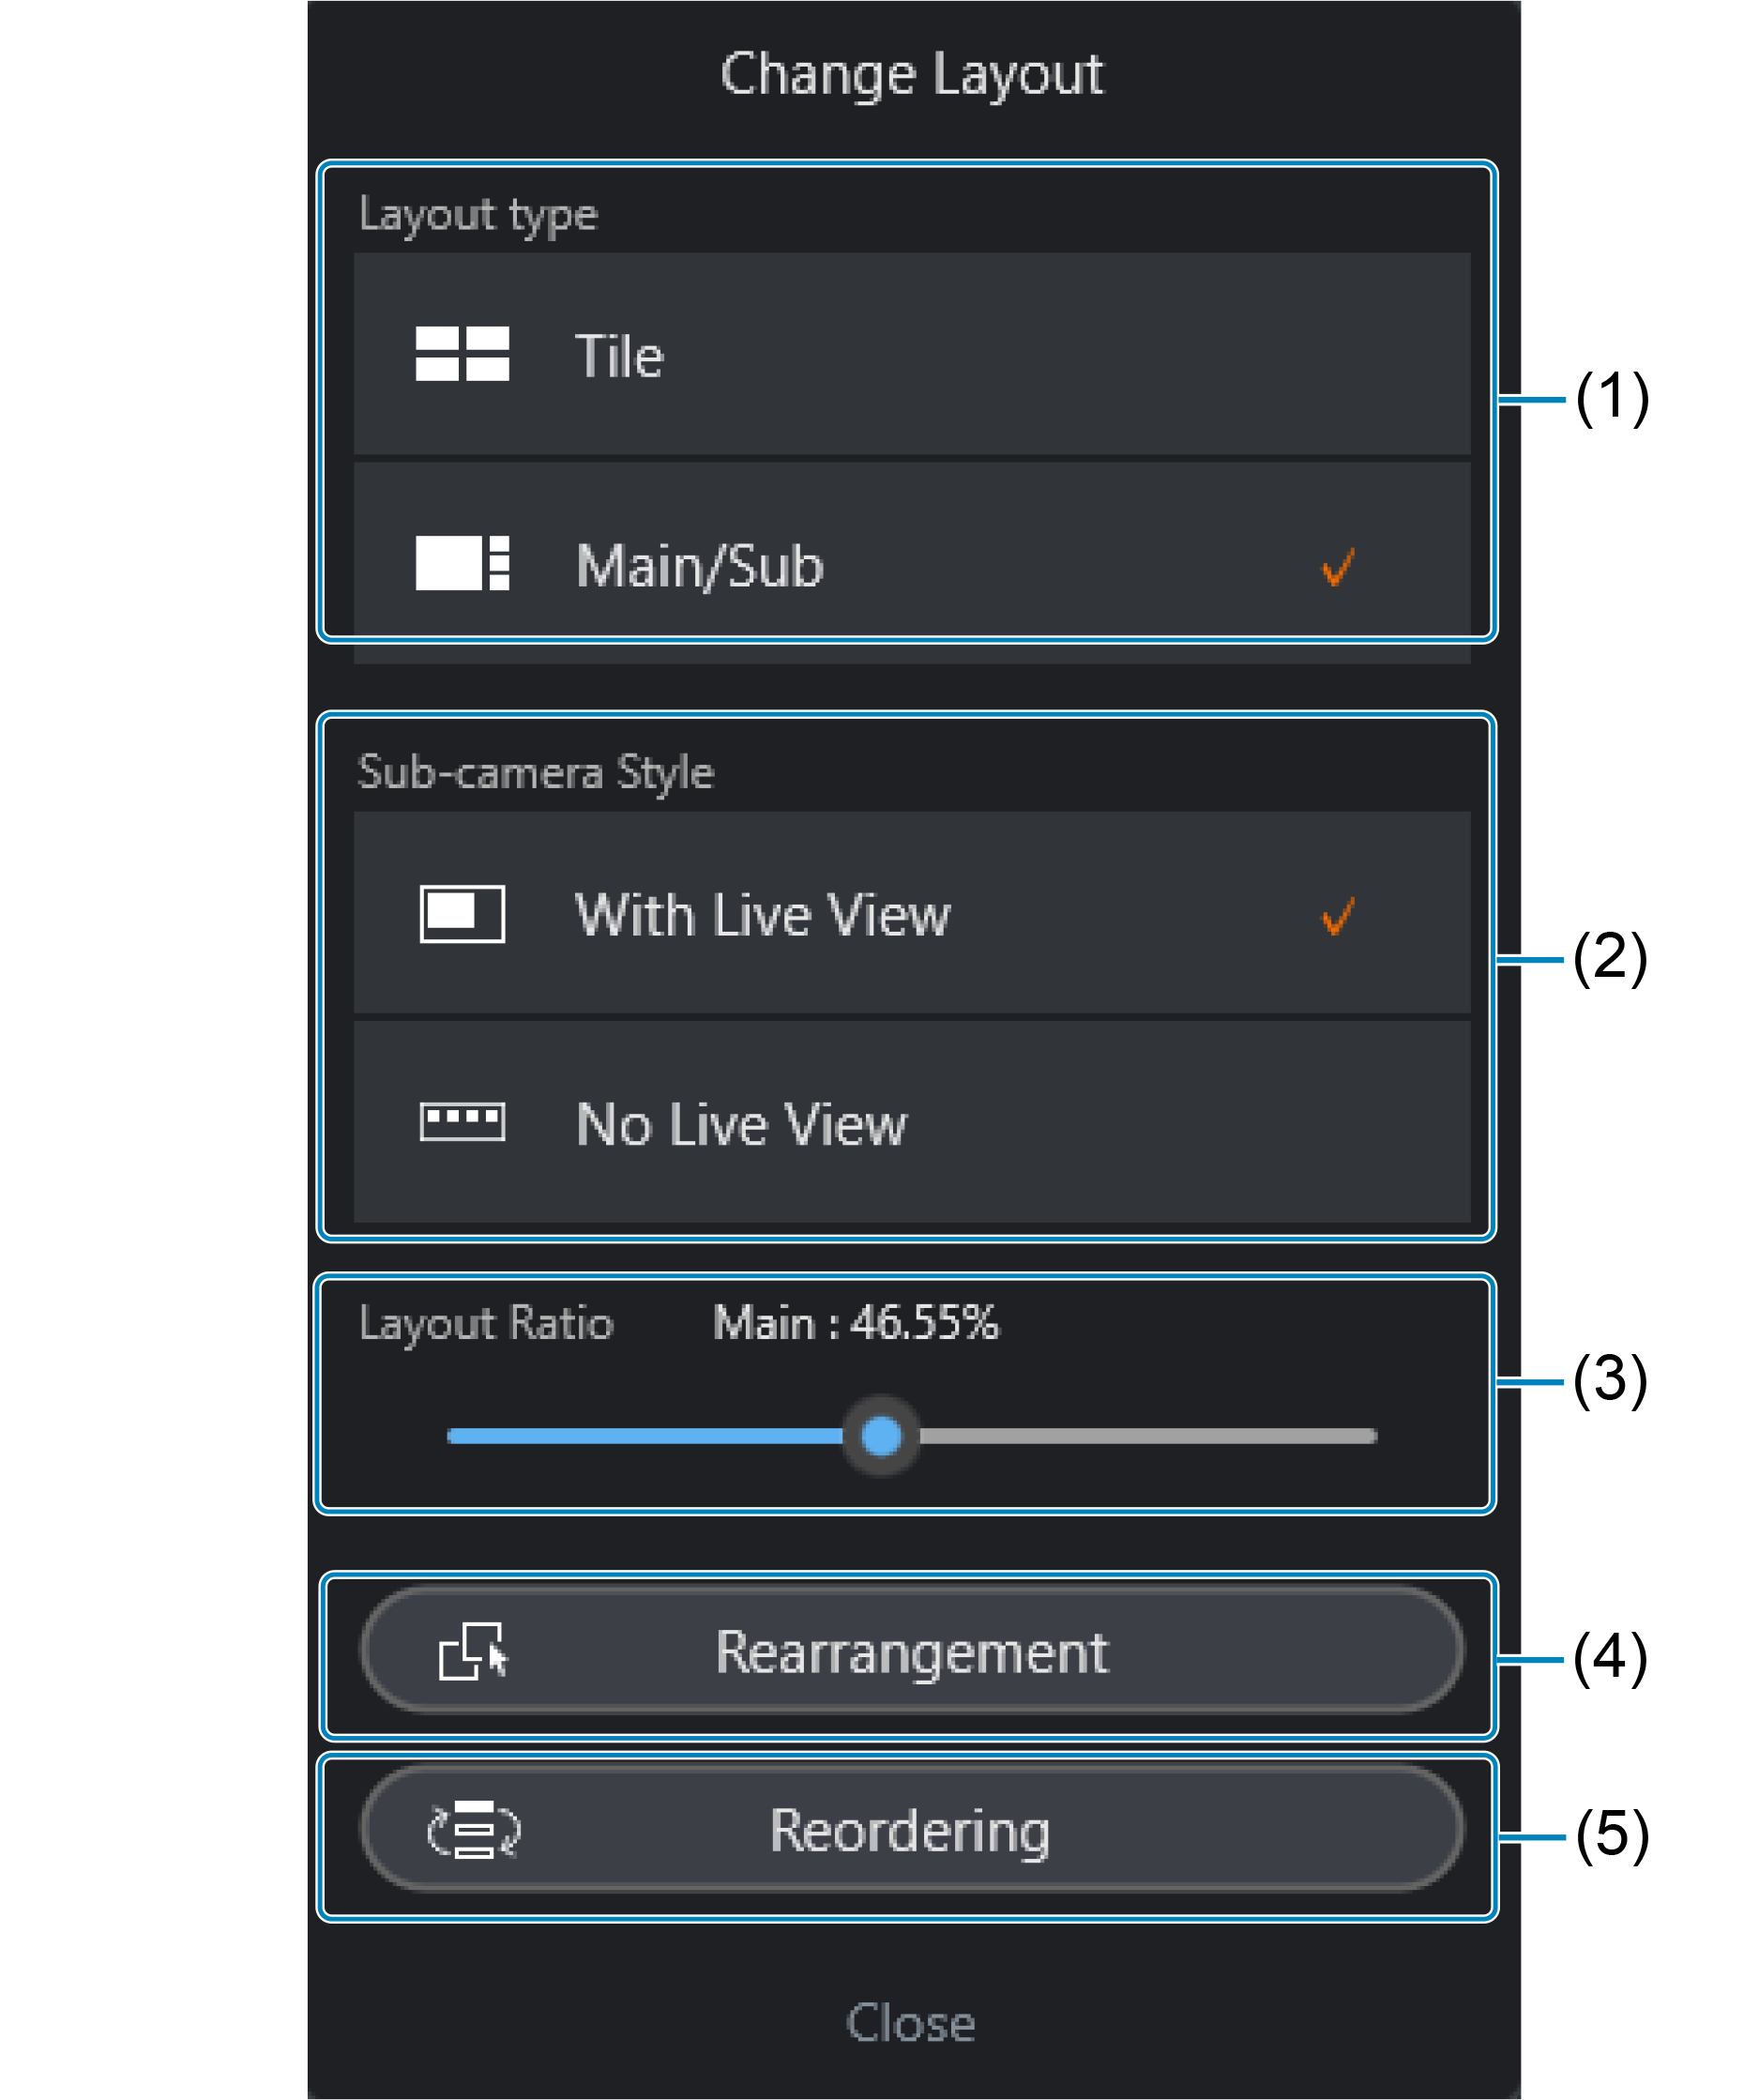
- (1) Select the layout type for the Multi View screen.
- (2) Select whether to include a Live View. You can select this option when [Main/Sub] is selected in [Layout type].
- (3) You can change the display range ratio of the selected receiver camera on Multi View screen 2.
- (4) You can edit the Multi View screen camera placement or Group shooting button* placement. Editing is performed using a drag operation.
*Only available when the Group shooting button is enabled.
- (5) Display the [Sort Cameras] screen.
Single View screen
Tap [ ] on the Multi View screen to display the Single View screen (can also be displayed from the main screen).
Browse and save images or perform remote shooting with the selected camera.
Top screen
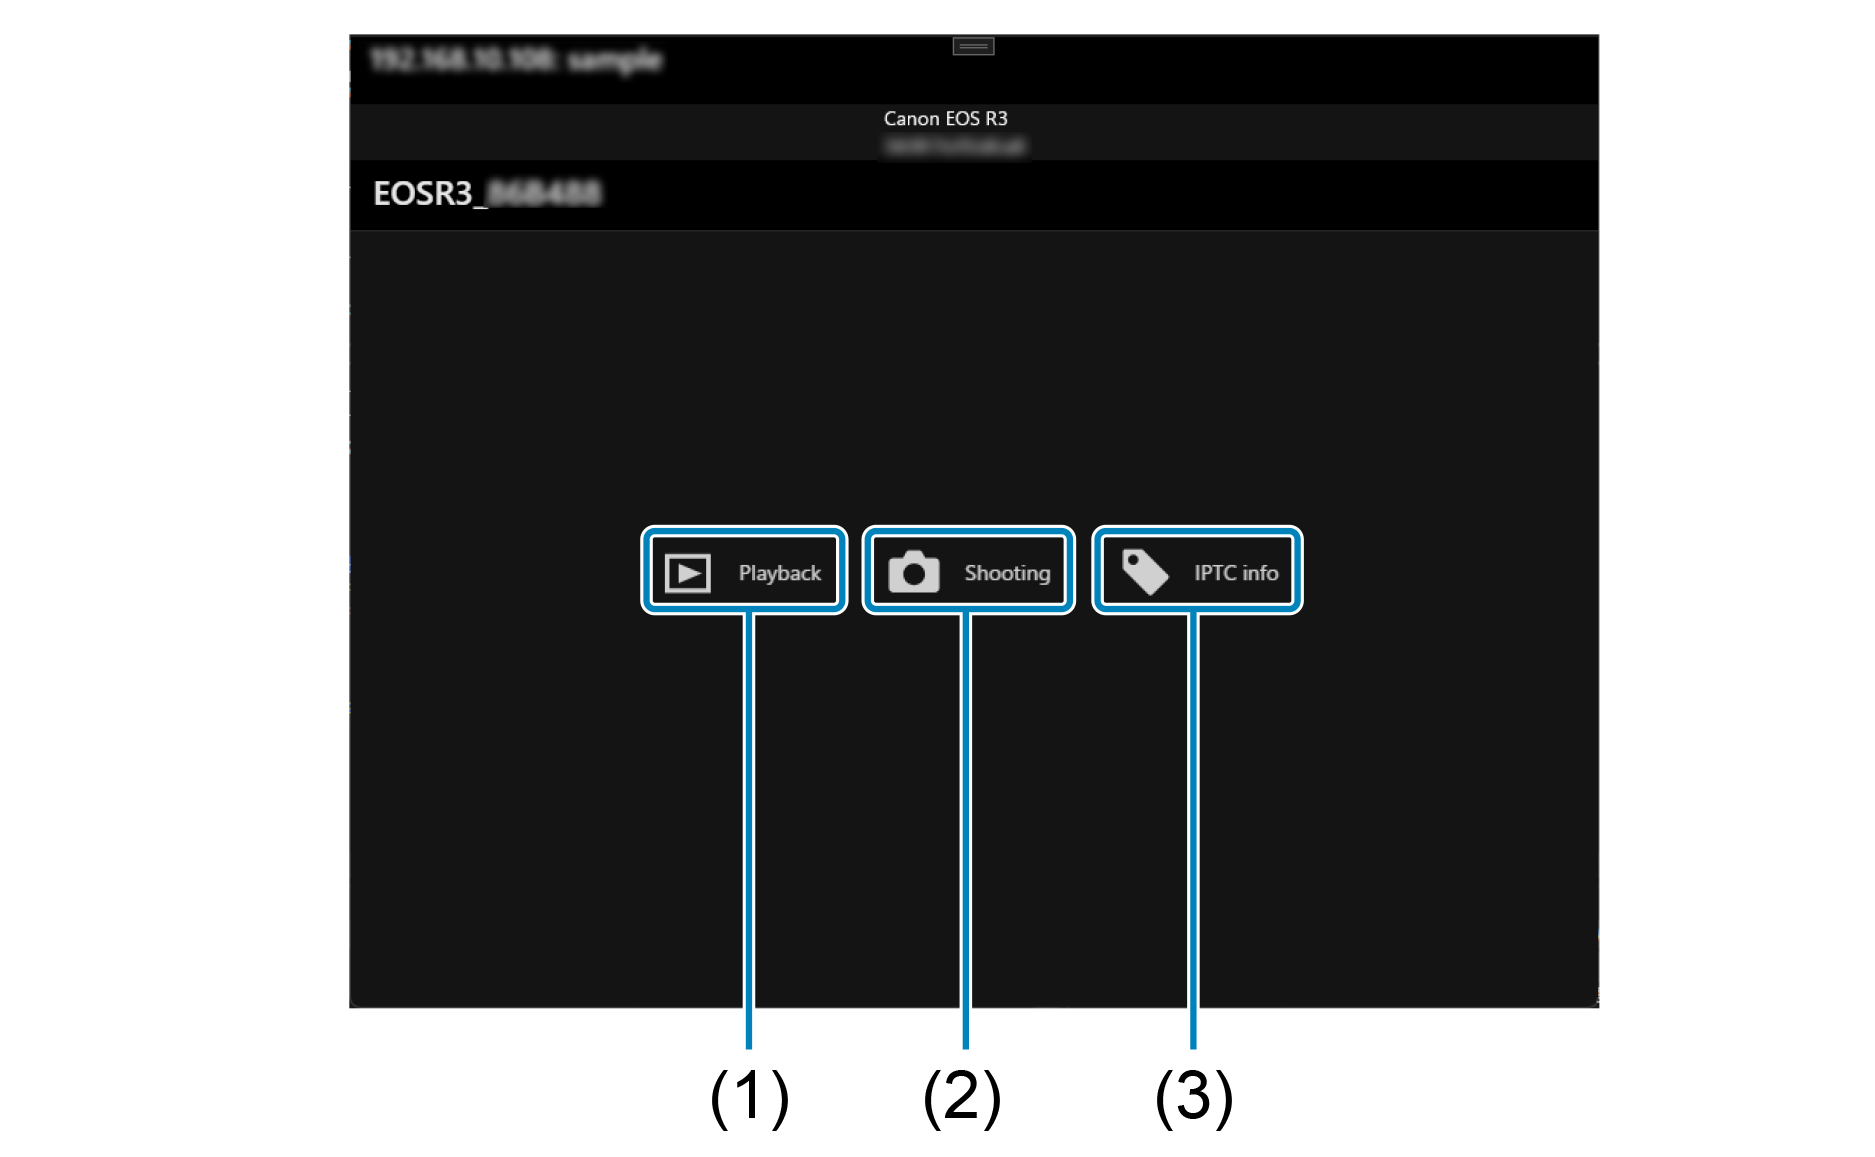
- (1) Display the playback screen.
- (2) Display the shooting screen.
- (3) Display the IPTC information screen.
Caution
- The following operations cannot be performed when the camera is in movie recording mode.
- Browsing images
- Registering IPTC information
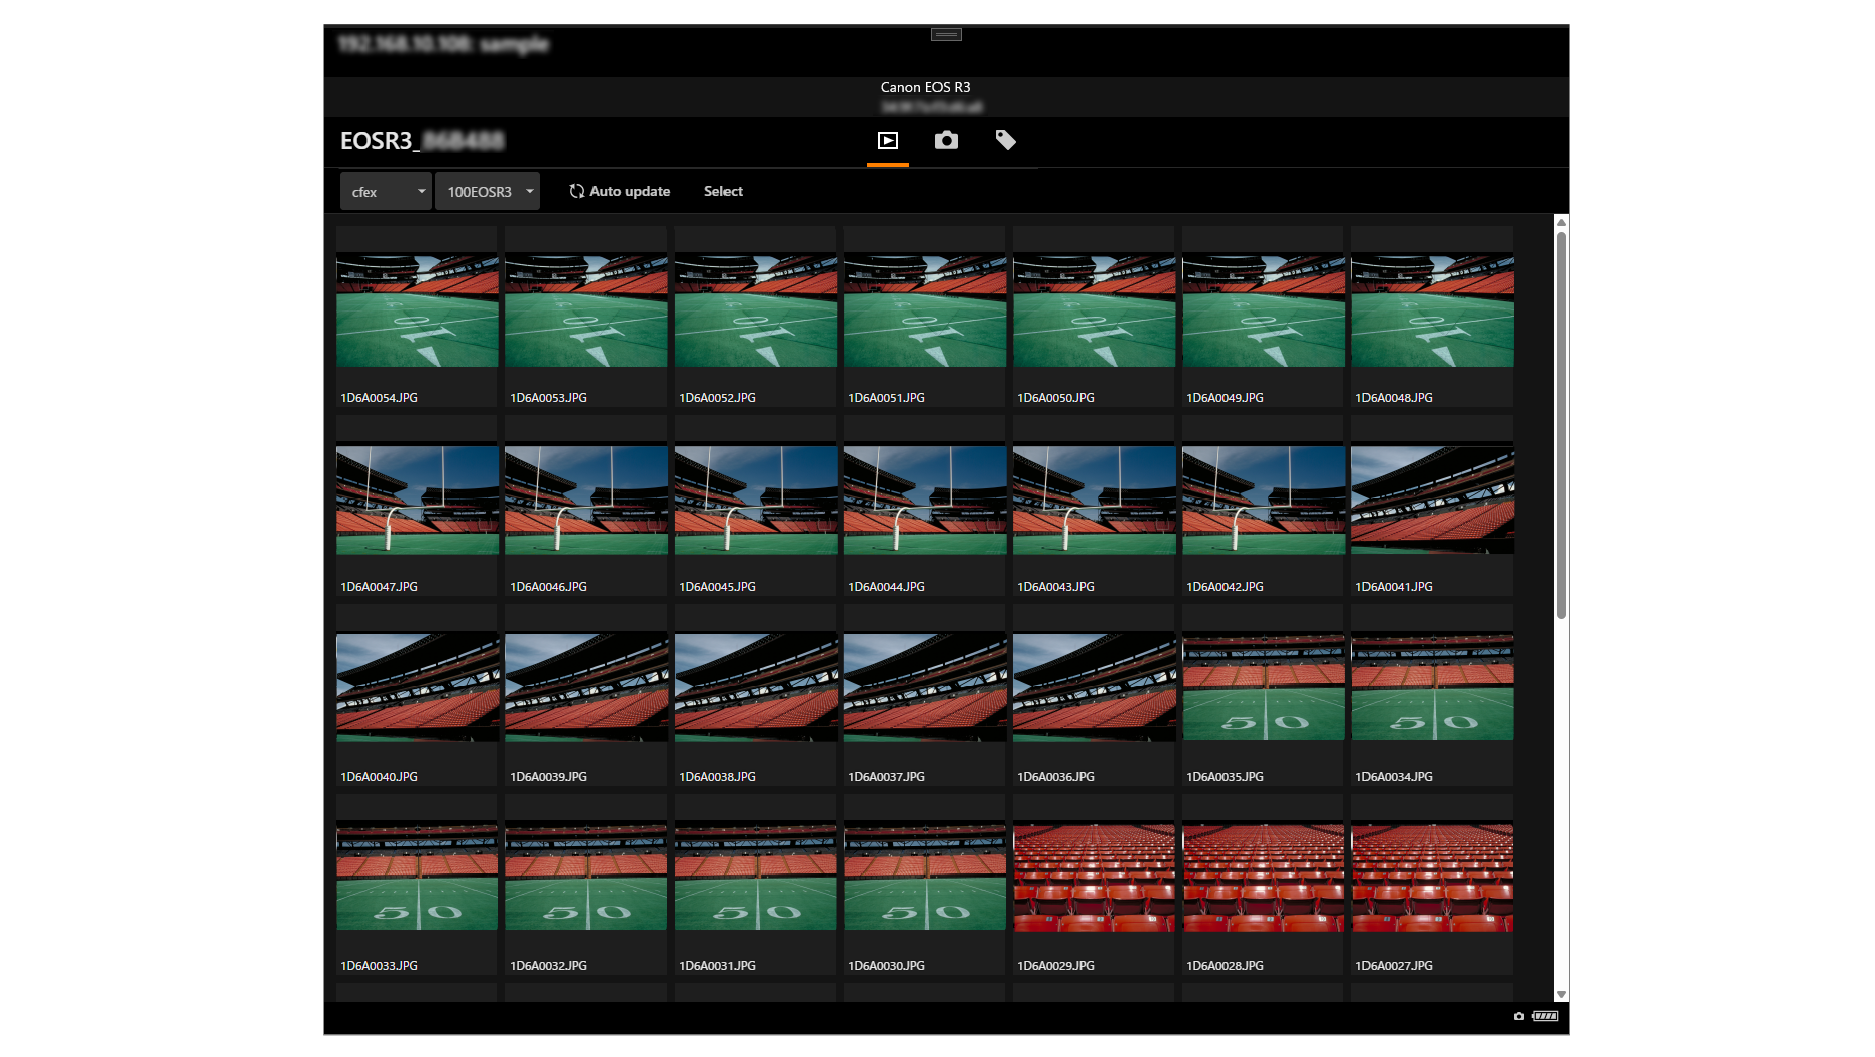
Playback screen
Browse images saved to the card of the selected receiver camera.
Tap an image to play, delete, download to a terminal, or transfer it to an FTP server.
Shooting screen
Perform remote shooting with the selected receiver camera.
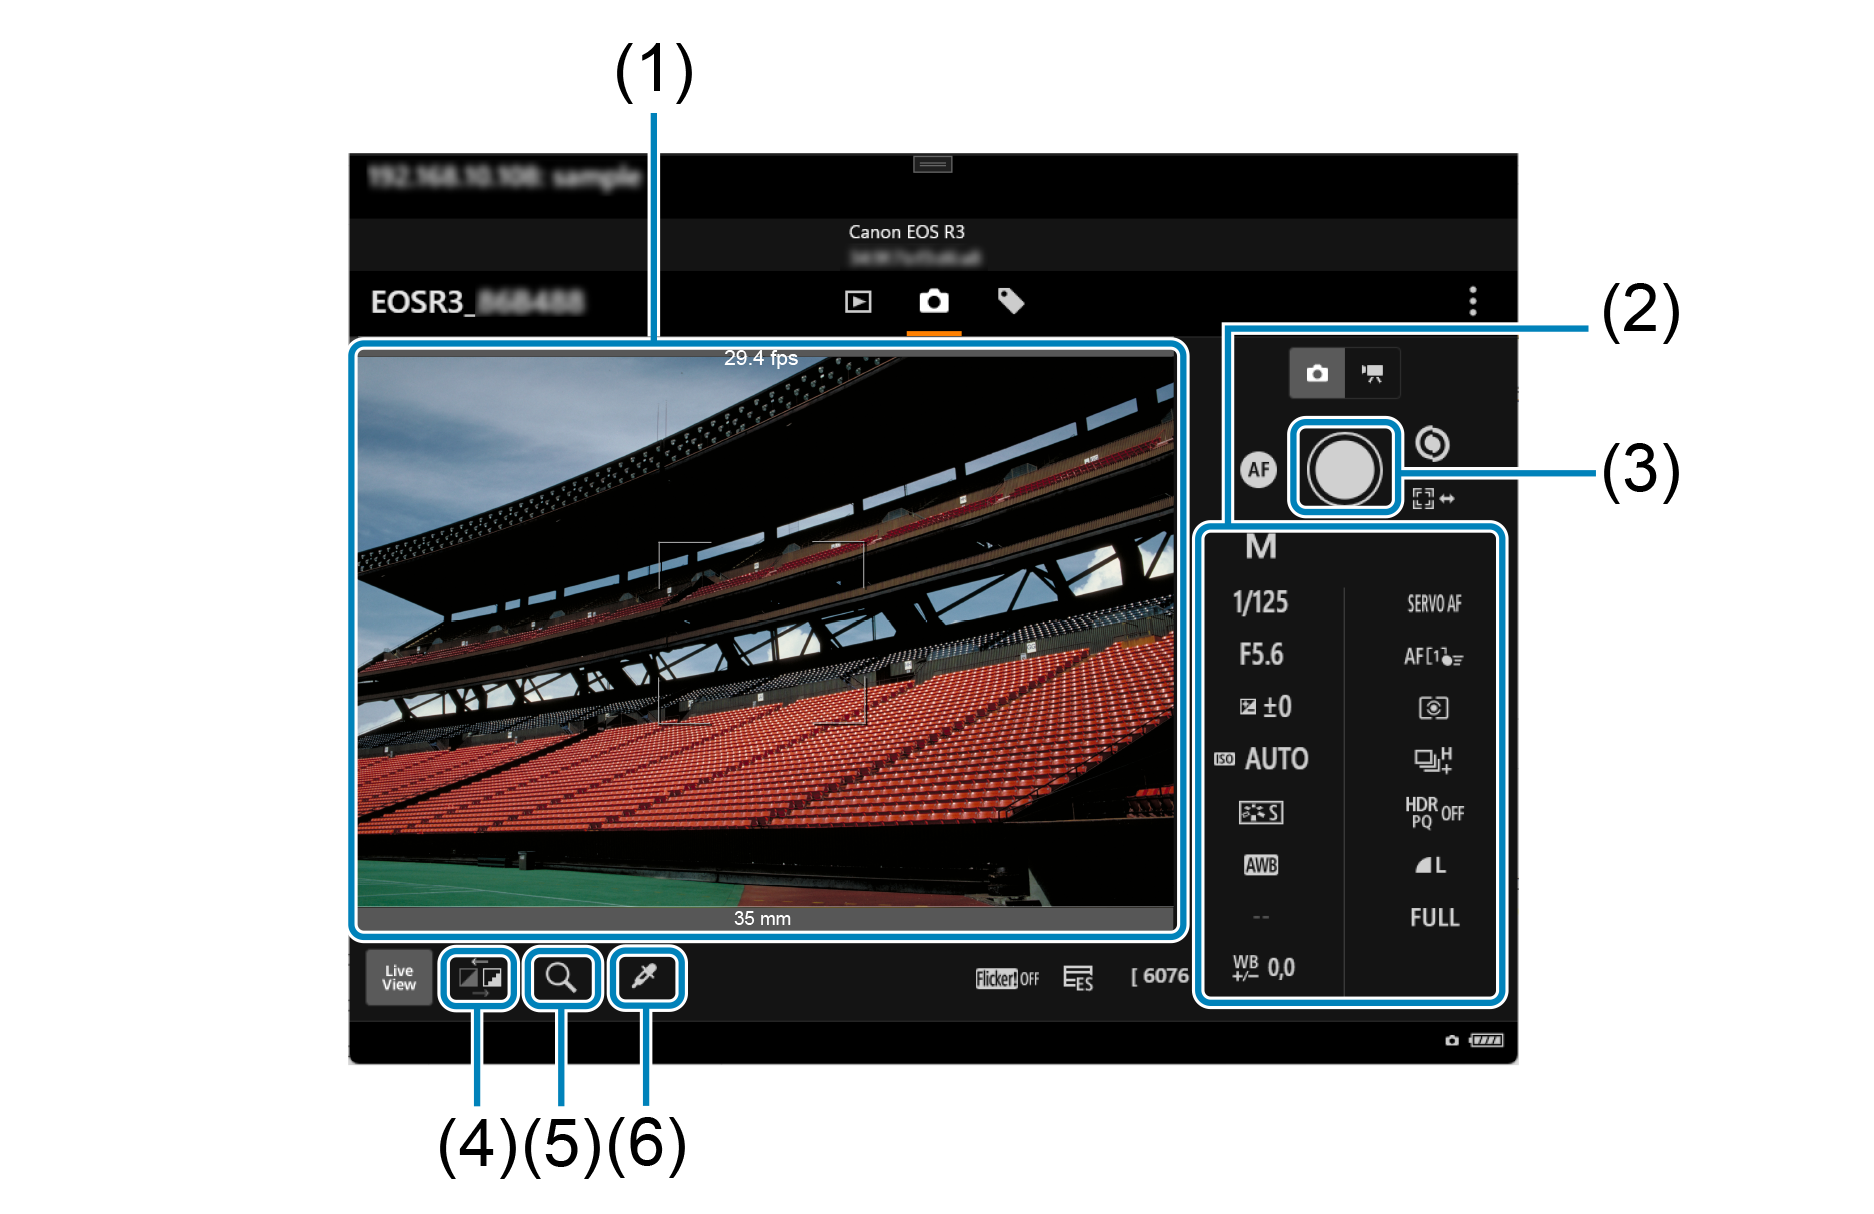
- (1) Shows a Live View image.
- (2) Configure shooting related settings.
- (3) Shoot photos.
- (4) Switch the Live View quality to “high” or “low.”
- (5) Enlarge images.
- (6) Adjust the white balance using the selected location as a white reference.
IPTC information screen
Edit and register the IPTC* information (captions, credits, shooting location, and other comment information) of the receiver camera. Images can be tagged with IPTC information registered on the camera.
*International Press Telecommunications Council
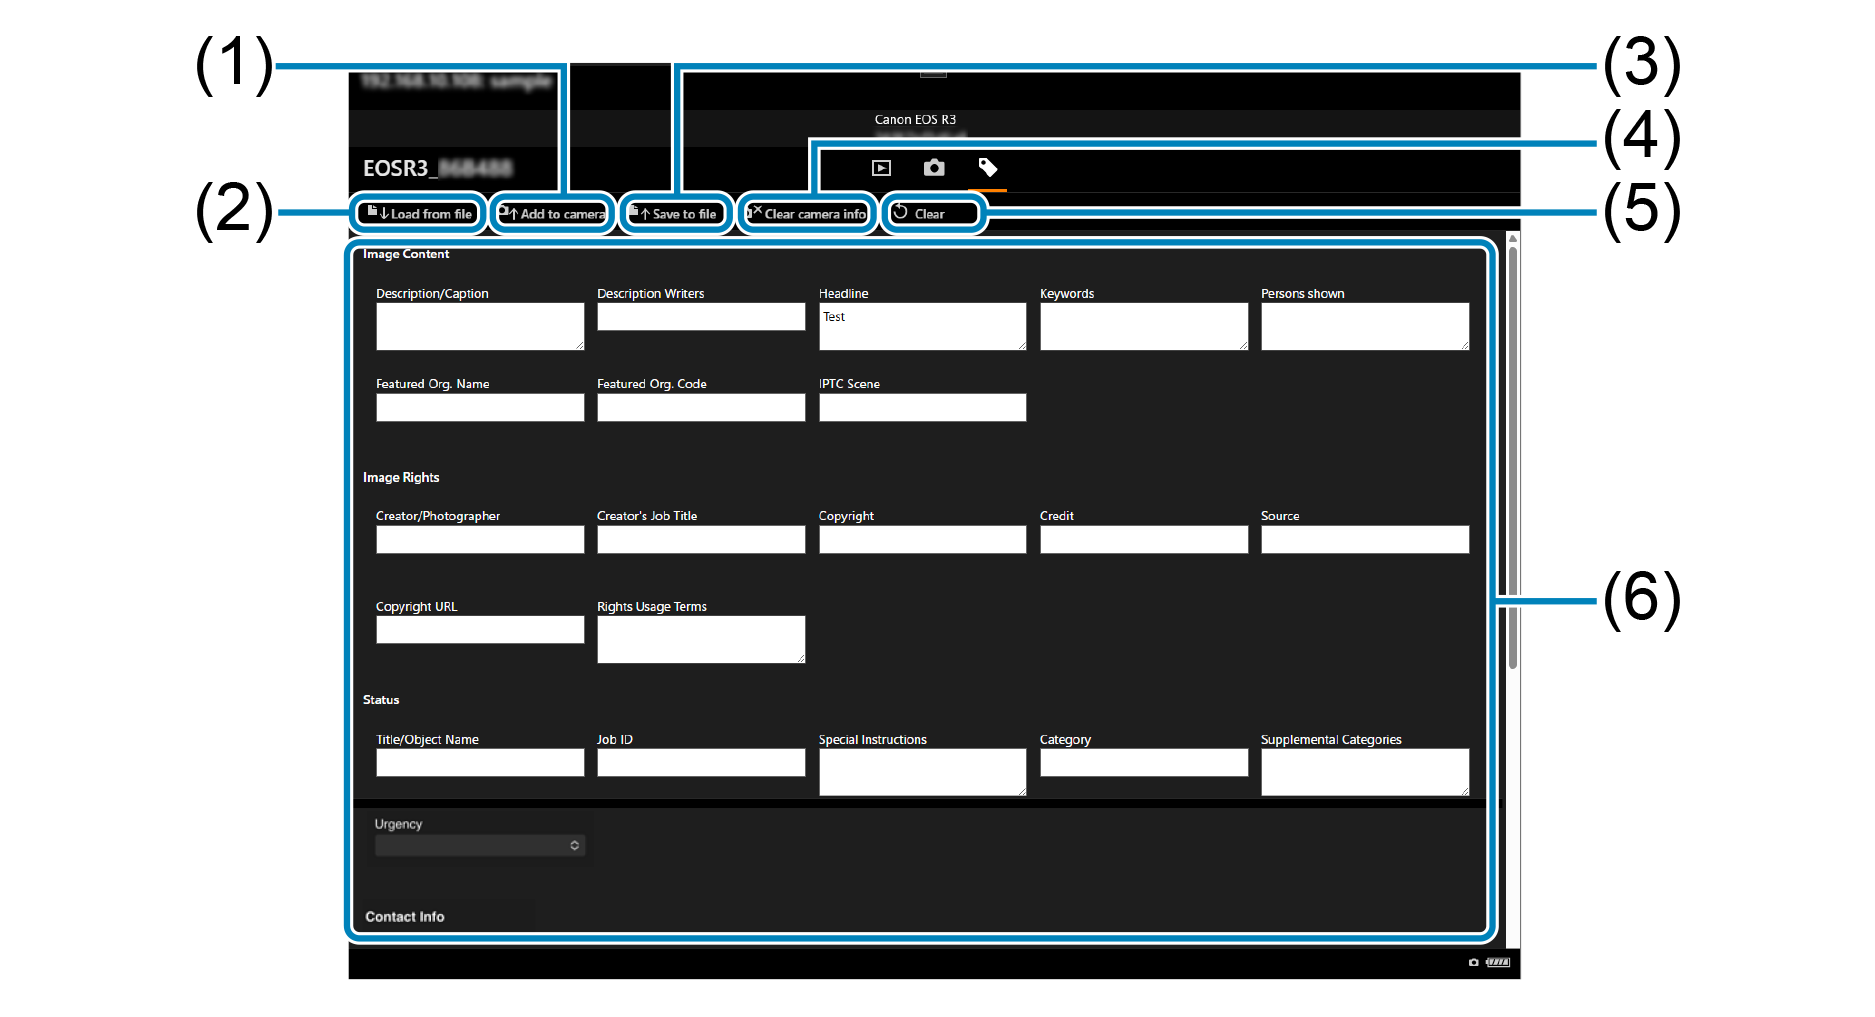
- (1) Register the IPTC information edits to the camera.
- (2) Load the IPTC information (XMP format).
- (3) Save the IPTC information (XMP format).
- (4) Delete all of the IPTC information registered to the camera.
- (5) Erase all of the IPTC information.
- (6) Edit the IPTC information as needed.
Multi-Camera image browsing
Images captured by multiple connected cameras can be viewed simultaneously on a timeline. Tap [Multi-Camera Settings] on the Multi View screen followed by [Multi-Camera Browsing] on the next screen to display images arranged as follows.
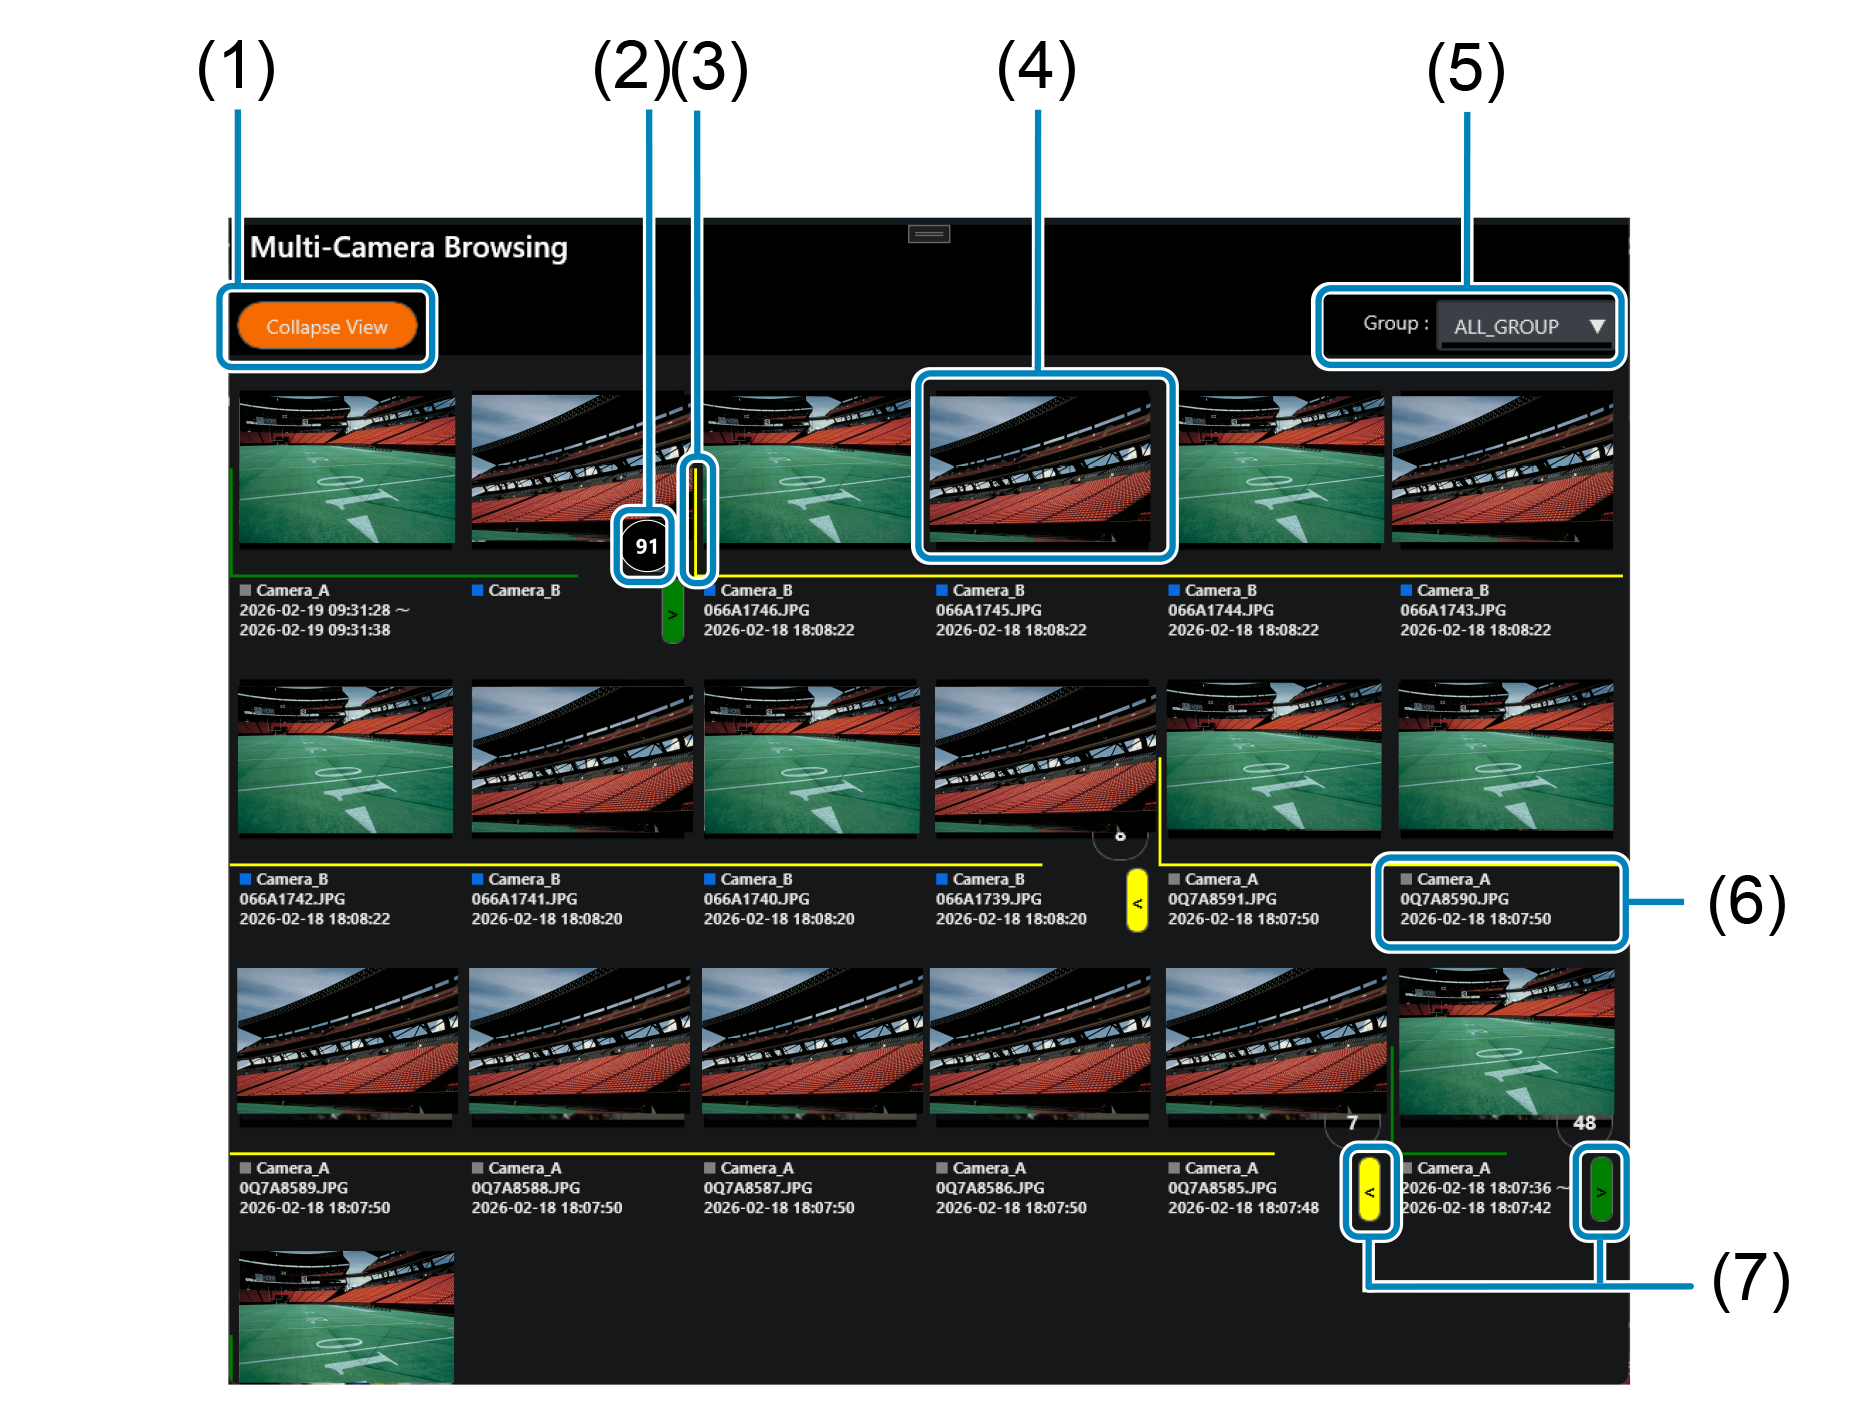
- (1) Tap to display only the image taken at the median capture time of each camera for each scene.
- (2) Shows the total number of images within the same scene.
- (3) Display images captured within a two-second time difference between the previous and next images as one shooting scene with a frame.
- (4) Tap an image to display one image.
- (5) Select the group to display.
- (6) Shows the group color, camera display name, file name, and shooting time.
- (7) Tap to switch the image display between collapsed and expanded for each scene.