
Interval Timer Shooting
Using the interval timer, you can set the shooting interval, number of shots, and delayed start time to automatically keep taking individual shots at your specified interval.
Timer priority and exposure smoothing features are available in Fv, P, Tv, Av, or M shooting mode. These are useful when capturing still photos for a time-lapse movie.
-
Select [Interval timer].
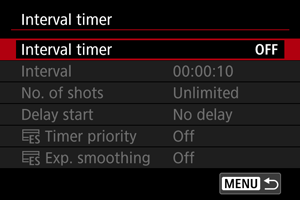
-
Select [On].
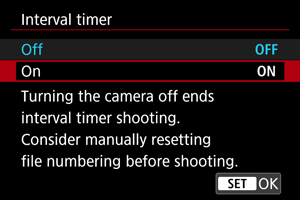
-
Set the item.
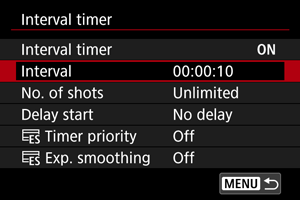
-
Take the picture.
- First shot is taken and shooting continues according to the interval timer settings.
- During interval timer shooting, [
 ] will blink.
 - After the set number of shots are taken, the interval timer shooting will stop and be automatically canceled.
Note
- Using a tripod is recommended.
- Taking test shots in advance is recommended.
- Before shooting, consider manually resetting [
 :
:  File numbering] if necessary. This will simplify editing after shooting.
 - Even during interval timer shooting, you can still shoot as usual by pressing the shutter button completely. Note that the camera will prepare for the next interval timer shot approx. 5 sec. in advance, which will temporarily prevent operations such as adjusting shooting settings, accessing menus, and playing back images.
- If the next scheduled interval timer shot is not possible because the camera is shooting or processing images, it will be skipped. For this reason, fewer shots than specified will be taken.
- Even during interval timer operation, auto power off is triggered after approx. 8 sec. of inactivity, as long as [Auto power off] under [: Power saving] is not set to [Disable].
- Can also be combined with AEB, white balance bracketing, and multiple exposures.
- To stop interval timer shooting, select [Disable] or set the power switch to
 .
.
Caution
- Do not point the camera toward an intense light source, such as the sun or an intense artificial light source. Doing so may damage the image sensor or the camera's internal components.
- Switching to AF focus mode prevents the camera from shooting unless subjects are in focus. Consider setting the mode to manual focus and focusing manually before shooting.
- If the shooting time is long, using the household power outlet accessories (sold separately) is recommended.
- Shooting long exposures or using shutter speeds longer than the shooting interval will prevent shooting at the specified interval. For this reason, fewer shots than specified will be taken. Using shutter speeds nearly the same as the shooting interval may also reduce the number of shots.
- If the time it takes to record to the card exceeds the shooting interval due to the shooting functions set or card performance, some of the shots may not be taken with the set intervals.
- When using flash with interval timer shooting, set an interval longer than the flash charge time. Intervals that are too short may prevent the flash from firing.
- Intervals that are too short may prevent shooting or autofocusing. It is easier for the camera to maintain the interval when [
 Timer priority] is set to [On].
 -
The interval timer is canceled and the setting changes to [Disable] under any of these conditions.
- The power switch is set to
- The Mode dial is changed to B, C1, C2, or C3
- The camera is switched to movie recording
- EOS Utility (EOS software) is used
- The power switch is set to
- During interval timer shooting, you cannot use Remote Control Shooting or remote-release shooting with a Speedlite for EOS cameras.
- Use of RF lenses (except RF75-300mm F4-5.6) is recommended.
- Shooting in Av or M mode is recommended.
Interval
The interval can be set in a range of [00:00:01]–[99:59:59].
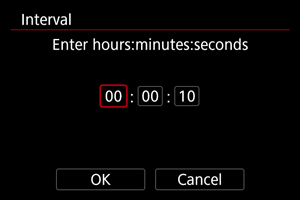
- Select an option (hours : minutes : seconds).
- Press
 to display [
 ].
]. - Set a value, then press . (Returns to [
 ].)
].) - Select [OK] to apply your changes.
Number of Shots
The number of shots can be set in a range of [0001]–[9999]. To keep the interval timer on until you cancel it, select [Unlimited].
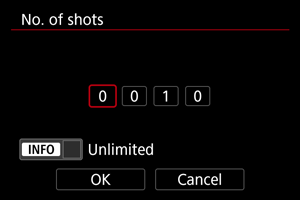
- Select the digit.
- Press to display [].
- Set a value, then press . (Returns to [].)
- Select [OK] to apply your changes.
Delay Start
The delay can be set in a range of [00:00:01]–[99:59:59].
Shooting begins after the configured time elapses once the shutter button is pressed completely.
When [No delay] is selected, shooting begins immediately.
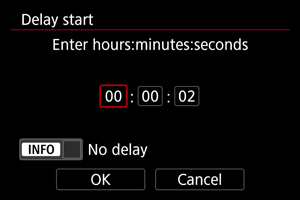
- Select an option (hours : minutes : seconds).
- Press to display [].
- Set a value, then press . (Returns to [].)
- Select [OK] to apply your changes.
Timer Priority
Selecting [On] automatically limits shutter speed as needed to maintain the configured interval. This prevents dropped frames (when a shot cannot be taken after an interval) caused by slower shutter speeds under low light.
Caution
-
Even if this feature is set to [On], shooting at the set interval may not be possible with EF lenses, or with the following settings or features.
- [
 : Servo 1st image priority] set to [Equal priority] or [Focus]
 - [: One-Shot AF release prior.] set to [Focus]
- [
 :
:  HDR Mode]
 - [: Dual Pixel RAW]
- [Digital Lens Optimizer] in [: Lens aberration correction] set to [High]
- When the camera is merging images, as in multiple-exposure shooting
- If you use the camera during interval timer shooting
- [
- With an interval of 1 sec., images cannot be displayed immediately after capture.
- [: Shutter mode] is set to [Electronic ] and cannot be changed.
- [: Display simulation] is set to [Exposure+DOF] and cannot be changed.
- [: OVF sim. view assist] is set to [Off] and cannot be changed.
Exposure Smoothing
Selecting [On] suppresses changes in exposure among shots. This can reduce flickering caused by these changes when a time-lapse movie is created from the still photos.
Caution
- Color filters may interfere with this feature.
- Auto power off is disabled. When a delayed start is used, auto power off is active (8 sec.) until interval timer shooting begins.
- [: Shutter mode] is set to [Electronic ] and cannot be changed.
- [: Display simulation] is set to [Exposure+DOF] and cannot be changed.
- [: OVF sim. view assist] is set to [Off] and cannot be changed.
- Flickering from changes in exposure may not be suppressed when some other features are used, such as HDR shooting.
- Changes in exposure are also suppressed when shots are taken manually by pressing the shutter button completely.