High-Frequency Anti-Flicker Shooting
Images may be affected by banding if you shoot under light sources that flicker at high frequencies. High-frequency anti-flicker shooting enables you to take pictures at suitable shutter speeds for high-frequency flickering, which minimizes the effect of this flickering on images.
Caution
- Exposure in still photo shooting may vary.
- HDR mode is not available in HF anti-flicker shooting.
- Before HF anti-flicker shooting, consider setting [
 : Same expo. for new aperture] to [ISO speed].
-
Set the shooting mode to [
 ] or [
 ].
]. -
Select [
 : HF anti-flicker shooting].
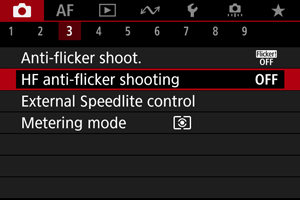
-
Select [HF anti-flicker shooting].
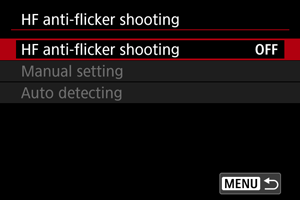
-
Select [On].
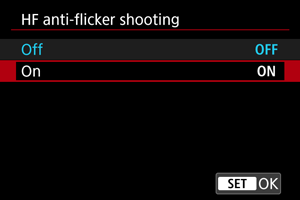
-
Select an option.

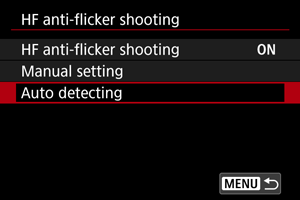
Auto detecting
The camera detects 50.0–2011.2 Hz light sources and displays a suitable shutter speed for shooting under light sources that flicker at high frequencies. You can then switch to the indicated shutter speed.
-
Set the desired shutter speed.
- Set the shutter speed you would prefer to shoot at. For light sources that flicker at high frequencies, the camera will determine a suitable shutter speed near this value.
-
Select [Auto detecting].
-
Select [OK].
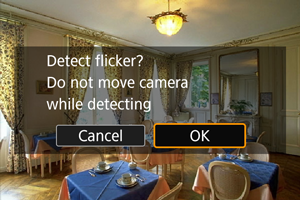
- It may improve HF flicker detection accuracy to magnify, as much as possible, any areas affected by banding.
-
Switch to the indicated shutter speed.
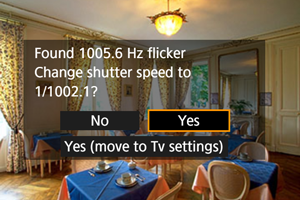
- Select [Yes] to switch to the recommended shutter speed.
- Selecting [Yes (move to Tv settings)] will display the [Manual setting] screen. Go to step 2 in Manual setting.
-
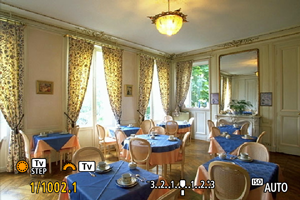
Take the picture.
Caution
-
The range of the recommended shutter speed indicated varies by shutter mode.
- Mechanical shutter: 1/50.0 to 1/1024.0 sec.
- Electronic first-curtain: 1/50.0 to 1/512.0 sec.
- Electronic shutter: 1/50.0 to 1/2048.0 sec.
- Movie recording: 1/50.0 to 1/2048.0 sec.
-
Do the following if [No flicker detected] is displayed, or if switching shutter speeds does not eliminate banding.
- Perform automatic detection again
- Rotate the camera about 90° or switch to automatic detection in other ways
- Try the manual setting option
-
HF flicker detection may be less accurate under these conditions.
- Scenes with repetitive patterns (with a lattice or stripes, for example)
- Subjects in constant motion
- Extremely bright or dark scenes
- Scenes with multiple light sources
- Scenes with small flashing light sources
- Light sources flickering at lower frequencies
Note
- Movie display is not updated if high-frequency flickering is automatically detected during HDMI output of 4K movies.
Manual setting
Check on the screen for image areas affected by light sources that flicker at high frequencies, then find a suitable shutter speed.
-
Select [Manual setting].
-
Adjust the shutter speed.
-
Do the following if banding is not eliminated at the shutter speed set with automatic detection.
- Turn the
 dial. With the dial, you can increase the shutter speed set with automatic detection (×2, ×3, ×4, and so on) or decrease it (×½, ×⅓, ×¼, and so on).
 - Turn the
 dial to fine-tune the setting.
- Turn the
- If this does not eliminate banding, rotate the camera about 90° or switch to automatic detection in other ways.
-
-
Take the picture.
Caution
-
The shutter speed range available for the manual setting mode varies by shutter mode.
- Mechanical shutter: 1/50.0 to 1/2048.0 sec.
- Electronic first-curtain: 1/50.0 to 1/2048.0 sec.
- Electronic shutter: 1/50.0 to 1/8192.0 sec.
- Movie recording: 1/50.0 to 1/4096.0 sec.
- Maximum flash sync speed in flash photography is limited to 1/159.8 sec. regardless of shutter mode.
- Dark lenses may prevent correct display simulation.
- Safety shift in [] mode adjusts the aperture value as needed in HF anti-flicker shooting.
- Image display on the screen or in the viewfinder may differ from actual shooting results. Take some test shots in advance.