Editing a Movie's First and Last Scenes
You can edit out the first and last scenes of a movie in approx. 1-sec. increments.
-
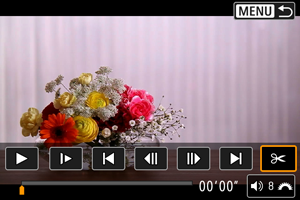
In single-image display, press
 .
.
-
On the movie playback panel, select [
 ].
].
-
Specify the part to be edited out.
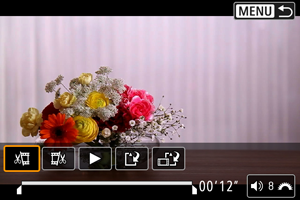
- Select either [
 ] (Cut beginning) or [
 ] (Cut end).
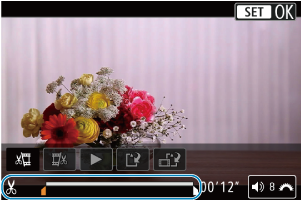
- Press
 left or right to go back or forward one frame. Keep pressing the multi-controller to fast rewind or fast forward frames. Each turn of the
  dial goes back or forward one frame.
 - After deciding which part to edit out, press . The portion indicated by a line at the bottom of the screen will remain.
- Select either [
-
Check the edited movie.

- Select [
 ] to play back the edited movie.
 - To change the edited part, go back to step 3.
- To cancel the editing, press the
 button.
- Select [
-
Save.
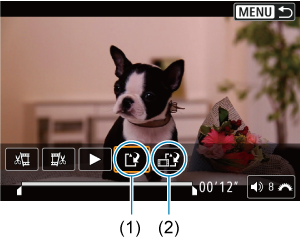
- Select [
 ] (1).
 - The save screen will appear.
- To save it as a new file, select [New file], or to save it and overwrite the original movie file, select [Overwrite].
Select [ ] (2) to save a compressed version of the file. 4K and 8K movies are converted to Full HD movies before compression.
 - On the confirmation screen, select [OK] to save the edited movie and return to the movie playback screen.
- Select [
Caution
- Because editing is performed in approx. 1 sec. increments (at the position indicated by [
 ] at the bottom of the screen), the actual position where movies are trimmed may differ from your specified position.
 - Movies shot with another camera cannot be edited with this camera.
- You cannot edit a movie when the camera is connected to a computer.
- Compress and save is not available for movies recorded with [HDR shooting
 ] set to [Enable] or with [Canon Log] set, for movies recorded in

 (NTSC) or
  (PAL) sizes, or for
  /
/ movies.