Shooting With the Built-in Flash
- Approximate Built-in Flash Range
- Shutter Speed and Aperture Value in Flash Photography
- Shooting With FE Lock
Using the built-in flash is recommended when the [![]() ] icon appears in the viewfinder or on the screen, when subjects in daytime shots are backlit, or when shooting under low light.
] icon appears in the viewfinder or on the screen, when subjects in daytime shots are backlit, or when shooting under low light.
-
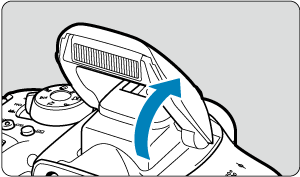
Manually raise the flash.
- In Creative Zone modes, shooting with flash is possible whenever the flash is raised.
- While the flash is charging, “buSY” is displayed in the viewfinder, and [BUSY] is displayed on the screen.
-
Press the shutter button halfway.

- Confirm that a [
 ] icon appears in the viewfinder or on the screen.
- Confirm that a [
-
Take the picture.
- When focus is achieved and you press the shutter button completely, the flash will fire at all times.
- To retract the built-in flash after shooting, push it down with your fingers until it clicks into place.
![]() Shooting tips
Shooting tips
-
In bright light, decrease the ISO speed.
If the exposure setting in the viewfinder blinks, decrease the ISO speed.
-
Detach the lens hood. Do not get too close to the subject.
If the lens has a hood attached or you are too close to the subject, the bottom of the picture may look dark due to the obstructed flash light. For important shots, play back the image and check to make sure the picture does not look unnaturally dark at the bottom part.
Approximate Built-in Flash Range
Rounded to the nearest tenth.
It may not be possible to obtain standard exposure when shooting distant subjects at high ISO speeds, or under certain subject conditions.
Shutter Speed and Aperture Value in Flash Photography
| Shooting Mode | Shutter Speed | Aperture Value |
|---|---|---|
| Auto (1/200–30 sec.)* | Automatically set | |
| Manual (1/200–30 sec.) | Automatically set | |
| Auto (1/200–30 sec.)* | Manually set | |
| Manual (1/200–30 sec.) | Manually set |
When [Slow synchro] under [![]() : Flash control] is set to [1/200-30sec. auto].
: Flash control] is set to [1/200-30sec. auto].
Caution
- Do not use the built-in flash unless it is fully raised.
- The bottom of images may be dark if light from the built-in flash is obstructed by a lens hood, or by a subject that is too close.
Shooting With FE Lock
The background or other factors may make subjects brighter or darker in flash photography with subjects near the edge of the screen. In this case, use FE lock. After setting the flash output for the appropriate subject brightness, you can recompose (put the subject toward the side) and shoot. This feature can also be used with a Canon EL/EX series Speedlite.
FE stands for Flash Exposure.
-
Manually raise the flash.
- Press the shutter button halfway and look in the viewfinder to check that the [] icon is lit.
- Press the shutter button halfway and look in the viewfinder to check that the [
-
Focus on the subject.
-
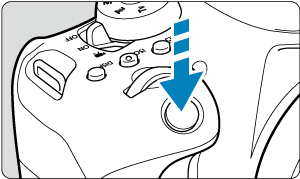
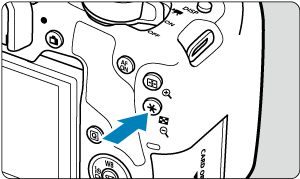
Press the
 button (
 ).
).
- Center the subject in the viewfinder, then press the button.
- A preflash is fired by the flash, and the flash output required for shooting is retained.

- In the viewfinder, “FEL” is displayed for a moment and [
 ] will light up.
 - Each time you press the button, a preflash is fired, and the flash output required for shooting is retained.
- Center the subject in the viewfinder, then press the
-
Take the picture.
- Compose the shot and press the shutter button completely.
Caution
- The [] icon blinks when subjects are too far away and your shots would be dark. Approach the subject and repeat steps 2–4.
- FE lock is not possible during Live View shooting.