Manual Flash
- How to Set the Firing Output of the Manual Flash with the FE Memory Function
- Metered Manual Flash Exposure
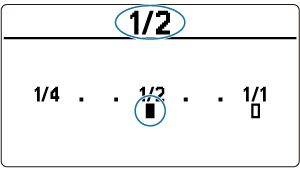
The flash output can be set in 1/3-stop increments from full flash (1/1) to 1/8192 flash.
Use a flash meter (commercially-available) to determine the required flash output to obtain a correct flash exposure. Setting the camera's shooting mode to ![]() or
or ![]() is recommended.
is recommended.
-
Select
 with the joystick.
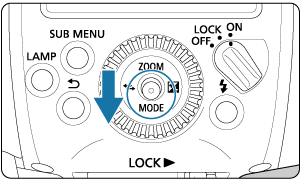
-
Set the flash mode to
 .
.
- Press the joystick up, down, left, or right, or turn
 and select
  , then press the joystick vertically.
- Press the joystick up, down, left, or right, or turn
-
Select
 with the joystick.
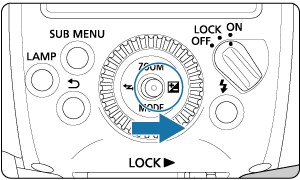
-
Set the flash output.
- Push the joystick to the left or right or turn to set the flash output, then push the joystick vertically.
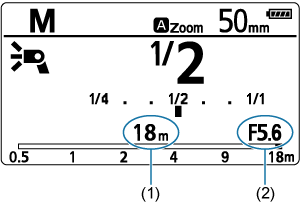
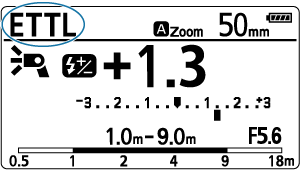
- When you press the camera's shutter button halfway, an indication of the shooting distance (1) and the aperture value (2) are displayed.
- Push the joystick to the left or right or turn
Note
- If high-speed sync or optical transmission wireless is set, the setting range of the flash output will be 1/1 to 1/128.
- For guide number details with manual flash, see "Specifications".
- You can set the flash output by turning directly without selecting with the joystick (C.Fn-13).
How to Set the Firing Output of the Manual Flash with the FE Memory Function
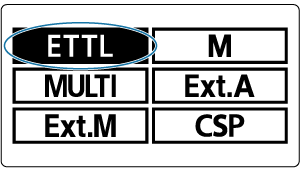
You can set the firing output adjusted in firing mode ![]() as the firing output of the firing mode
as the firing output of the firing mode ![]() .
.
-
Set the FE memory function.
-
Shoot with the firing mode set to
 .
.
- Select with the joystick.
- Press the joystick up, down, left, or right, or turn and select
 , then press the joystick vertically.
- Press the shutter button fully to shoot.
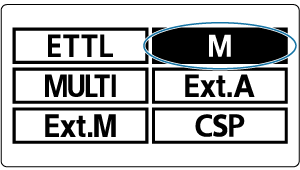
- Select
-
Set the flash mode to
 .
.
- Select with the joystick.
- Press the joystick up, down, left, or right, or turn and select , then press the joystick vertically.
- Select
-
Check the flash output.

Caution
- To fire the flash with the setting, do so when the charging lamp is lit in red (fully charged).
- After shooting with the setting, if you make a change in the ISO sensitivity, aperture value or settings related to the firing output such as the light intensity, zoom, etc., we recommend that you shoot with the setting again.
-
When the white balance of the camera is set to
 , the color temperature difference between the flash and the surrounding ambient light is large, and when the flash compensation is set to the negative side and the [E-TTL balance] is set to [Ambience priority] , the hue of the shot image may differ between the and settings. If the color temperature difference is large, installing a color filter may improve the hue.
- Fluorescent lamp (white daylight) → Color filter light
- Tungsten lamp → Color filter dense
- Sunlight → filter not required
- When you use the FE memory function in wireless multiple flash shooting, set the and firing groups to the same configurations ahead of time. When is set to
 , set to
  .
. - Depending on the shooting conditions, the of the effective flash range display and of the shooting distance display may be different.
Note
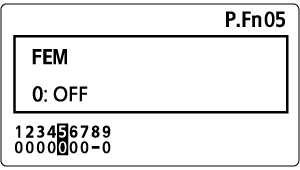
- When P.Fn-05
 is set to 2:ON /
  , just push the joystick down to switch between and .
Metered Manual Flash Exposure
When using an EOS-1D series camera, the flash exposure level can be manually set before shooting. This is effective when you are close to the subject. Use a 18% gray reflector (commercially available) and shoot as follows.
-
Configure the camera and Speedlite settings.
- Set the shooting mode of the camera to or
 .
. - Set the Speedlite's flash mode to .
- Set the shooting mode of the camera to
-
Focus on the subject.
- Focus on the subject manually.
-
Set up an 18% gray reflector.
- Place the gray reflector at the subject's position.
- Aim the camera so that the entire spot metering circle within the viewfinder center is over the gray reflector.
-
Press the
 ,
,  , or
, or  button (
 ).
).- The Speedlite will fire a preflash and the required flash output for the correct flash exposure is retained in memory.
- On the right side of the viewfinder, the exposure level indicator will show the flash exposure level against the standard exposure.
-
Set the flash exposure level.
- Adjust the Speedlite's manual flash output and the aperture so that the flash exposure level aligns with the standard exposure index.
-
Take the picture.
- Remove the gray reflector and take the picture.
Note
- Metered manual flash exposure is available only with EOS-1D series cameras.