Turning on the Power
- About the Quick Flash Function
- About the Auto Power OFF Function
- About the Lock Function
- About the LCD Panel Illumination
-
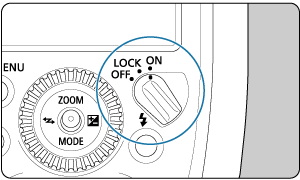
Turn the power switch to
 .
.
- Charging starts.
- When charging,
 is displayed on the LCD panel. When flash recharge is complete, this indicator disappears and a beep sound is heard.
-
Check that the flash is ready.
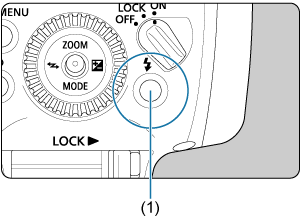
- The status of the flash-ready lamp changes from off → red (flashing) (Quick flash ready) → red (lit) (fully charged).
- You can press the test flash button (flash-ready lamp) (1) to fire a test flash.
Caution
- You cannot use the test flash when operating the flash timer on the camera.
Note
- The flash settings will remain in effect even after the power is turned off.
- You can set the beep not to sound when charging is completed (P.Fn-06).
About the Quick Flash Function
The Quick flash function enables flash photography when the flash-ready lamp is flashing in red (before the flash is fully charged). Quick flash is available regardless of the camera's drive mode setting. Although the flash output will be approx. 1/2 to 1/6 of the full output, it is useful for shooting with a shorter firing interval.
During manual flash photography, this function is available when the flash output is set to 1/4 to 1/8192. Note that you cannot use Quick flash during stroboscopic flash and wireless flash shooting.
Caution
- When Quick flash is fired during continuous shooting, underexposure may occur since the flash output decreases.
Note
- For more details on the display when setting the radio transmission wireless sender unit, see "About the LCD Panel Illumination".
- You can disable Quick Flash (P.Fn-02).
About the Auto Power OFF Function
To save battery power, the power will turn off automatically after approx. 90 sec. of idle use. To turn on the Speedlite again, press the camera's shutter button halfway or press the test flash button (flash-ready lamp).
When set as the sender unit for radio transmission wireless flash shooting () or set for linked shooting (), the time until auto power off takes effect is approx. 5 min.
Note
- Auto power off can be disabled (C.Fn-01).
About the Lock Function
By setting the power switch to ![]() , you can disable the flash's button and dial operations. This is useful when you want to prevent the flash function settings from being accidentally changed after you set them.
, you can disable the flash's button and dial operations. This is useful when you want to prevent the flash function settings from being accidentally changed after you set them.
If you operate a button or dial, ![]() is displayed on the LCD panel.
is displayed on the LCD panel.
Note
- You can directly fire a test flash and the modelling light even if the power switch is in the
 position. Also, when a button or dial is operated, the LCD panel illuminates.
About the LCD Panel Illumination
When a button or dial is operated, the LCD panel illuminates for approx. 12 sec (![]() ).
).
For more details on the LCD panel illumination when setting the radio transmission wireless sender unit, see "About the LCD Panel Illumination".
Note
- You can change the setting of the LCD panel illumination (C.Fn-22).