RAW Burst Image Tool
- Starting the RAW Burst Image Tool
- Changing a Roll's Representative Image
- Save current image separately
- Extract specified range and save separately
- Extract and save images of specified range separately
You can do the following with rolls of images from continuous shooting in RAW burst mode.
- Change the image shown in thumbnails and elsewhere that represents the roll
- Save current image separately
- Extract specified range and save separately
- Extract and save images of specified range separately
For details and precautions on RAW burst mode, refer to the instruction manual of cameras with this feature.
Note
- In DPP, you can work with the representative image of rolls in editing, saving, printing, and so on as if it were a single RAW image.
Starting the RAW Burst Image Tool
-
Select a roll in the main window or elsewhere.
-
Only rolls captured on cameras with RAW burst mode are supported (thumbnail icon:
 ).
).
-
-
Select [Start RAW Burst Image tool] in the [Tools] menu.

- To exit, click [Close].
Functions
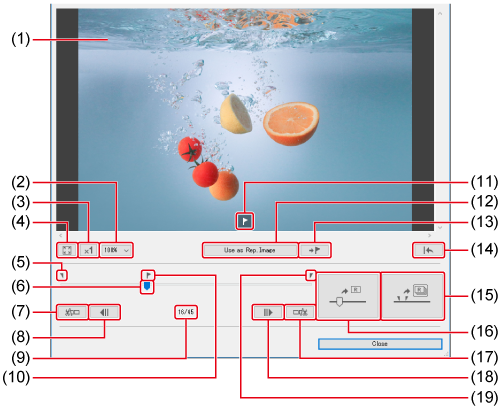
- (1) Image display area
- (2) Set image magnification
- (3) Display image at actual size
- (4) Fit image display to window
- (5) First-image marker ()
- (6) Slider (, )
- (7) Set first image in roll after extraction ()
- (8) Move to previous image (, )
- (9) Current image number
Indicates the current image number and the total number of images in the roll
- (10) Position of representative image in roll
- (11) Representative-image mark
Shown when the representative image is displayed
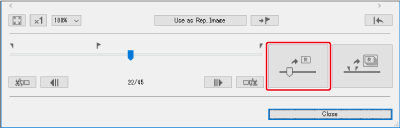
- (12) Set current image as representative image ()
- (13) Move to representative image
- (14) Restore settings at the time of shooting
Discard all editing done with this tool and restore settings at the time of shooting
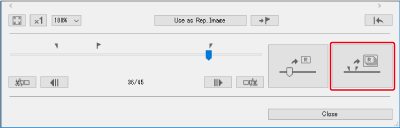
- (15) Extract specified range and save separately ()
- (16) Extract and save images of specified range separately ()
- (17) Save current image separately ()
- (18) Set as last image of roll after extraction ()
- (19) Move to next image (, )
- (20) Last-image marker ()
Changing a Roll's Representative Image
You can change the image representing a roll.
-
Display the RAW burst image tool window.
- Follow steps 1–2 in Starting the RAW Burst Image Tool.
-
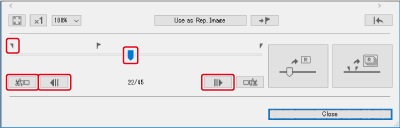
Display the image that will be the new representative image.
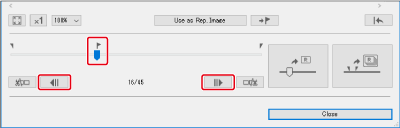
- Use the slider or [
 ]/[
]/[ ] to display the image to set as the representative image in the image display area.
 - The position of the current representative image is indicated with a [
 ] mark above the slider.
- Use the slider or [
-
Change the representative image.
- Click [Use current image as representative image].
- The representative image changes to the current image.
- To restore the state at the time of shooting, click [
 ].
]. - To exit, click [Close].
Save current image separately
You can extract any single image from a roll and save it.
-
Display the RAW burst image tool window.
- Follow steps 1–2 in Starting the RAW Burst Image Tool.
-
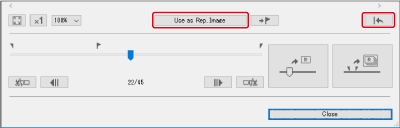
Display the image to save.
- Use the slider or []/[] to display the image to save in the image display area.
- Use the slider or [
-
Save the file.
- Click [
 ], then complete the required settings and save the file.
 - To revert to settings at the time of shooting, click [].
- To exit, click [Close].
- Click [
Extract specified range and save separately
You can extract a range of images from a roll and save them as a new roll.
-
Display the RAW burst image tool window.
- Follow steps 1–2 in Starting the RAW Burst Image Tool.
-
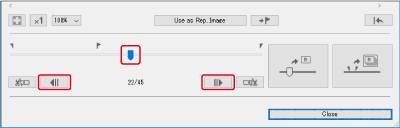
Set the first image.
- Use the slider or []/[] to show the image to set as the first image in the image display area, then click [
 ].
]. - The first-image marker (
 ) moves, and the first image in the roll is set.
- Use the slider or [
-
Set the last image.
- Use the slider or []/[] to display the image to set as the last image in the image display area, then click [
 ].
]. - The last-image marker (
 ) moves, and the last image in the roll is set.
- Use the slider or [
-
Save the file.
- Click [], then complete the required settings and save the file.
- To revert to settings at the time of shooting, click [].
- To exit, click [Close].
- Click [
Caution
- Cannot be used in conjunction with Copying and Applying Recipes to Other Images, Saving Recipe Files, or Loading and Applying Recipes.
- After this editing, settings cannot be restored to the states in [Revert to shot settings] or [Revert to last saved settings] in the [Adjustment] tab in the menu. However, you can click [] for this function to restore the state at the time of shooting.
- Even if you change the representative image of a roll with this function, the roll's shooting information as shown in the main window and elsewhere applies to the representative image at the time of shooting.
- Adjustments to a roll made in the main window and elsewhere (as noted in the recipe) are not reflected in the window for this function, except for 90° image rotation.
Extract and save images of specified range separately
You can save multiple images in a specified range separately.
-
Display the RAW burst image tool window.
- Follow steps 1–2 in Starting the RAW Burst Image Tool.
-
Set the first image.
- Use the slider or []/[] to show the image to set as the first image in the image display area, then click [].
- The first-image marker () moves, and the first image in the roll is set.
- Use the slider or [
-
Set the last image.
- Use the slider or []/[] to display the image to set as the last image in the image display area, then click [].
- The last-image marker () moves, and the last image in the roll is set.
- Use the slider or [
-
Save the file.

- Click [
 ] to save.
 - To revert to settings at the time of shooting, click [].
- To exit, click [Close].
- Click [